You’ve installed H1Z1 (or Z1 Battle Royale, as it’s now called), sat down at your PC or PS4, and are all set to play. But it won’t even start! What gives? What went wrong? Why didn’t the game launch?
If this has happened to you, you were no doubt left frustrated. In this article, we’ll show you how to fix the problem and get you back playing your favorite game in no time.
Game Not Starting
There can be a few reasons why Z1 Battle Royale isn’t starting on your device. Before doing anything, check the game’s system requirements to make sure it’s compatible with your PC. If everything looks okay, and your game still isn’t starting when you press Play from your Steam Library, you’ll have to take remedial action. Here’s what you need to do:
- Close the game launcher.
- Go into the Z1 Battle Royale installation folder.
- From there, go into your Steam Library.
- Find Z1 Battle Royale on your list of games.
- Right Click, then click on Properties.
- In the Local Files tab, click on BROWSE LOCAL FILES…
- Find the LaunchPad.exe application file, right-click on it, then press Run as Administrator.
- Now press Play when the game launcher opens.
This should fix the problem, and you’ll be able to play as normal.
If this fix works for you, you should consider permanently enabling Administrator mode on that game. To do so, follow these steps:
- Locate the LaunchPad.exe file as noted above.
- Right click on it, then press Properties.
- In the Compatibility tab, check the box named “Run this program as an Administrator”.
- Click Apply.
Now Z1 Battle Royale should automatically start in Administrator mode, removing the need to find the LaunchPad every time you want to play.
Compatibility Mode
Another way to try and solve your problem is to force Z1 Battle Royale to run in Windows 7 compatibility mode. This fix will only apply if you don’t have Windows 7 installed already.
Follow these steps:
- Locate the LaunchPad.exe file as noted above.
- Right click on it, then press Properties.
- In the Compatibility tab, check the box named “Run this program in compatibility mode for”.
- In the drop down menu below the checkbox, select Windows 7.
- Click Apply.
Verify Files Through Steam
You can verify your installation to see if some of your files are missing and replace them.
- Find Z1 Battle Royale in your Steam Library.
- Right-click, then click Properties.
- Under the Local Files tab, click VERIFY INTEGRITY OF GAME FILES
- Wait for the process to finish.
This will update Z1 Battle Royale to the most recent version and replace any missing or corrupted files in your installation.
Scan Your System
If the previous fixes didn’t help, you can try searching for any corrupted files.
Follow these steps:
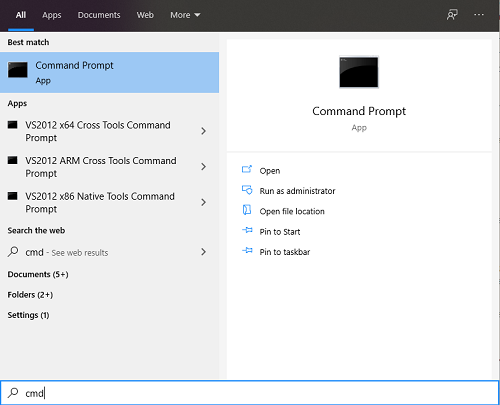
- Open Start.
- Type in cmd in the search box.
- Right click on the Command Prompt application that pops up, then click Run as Administrator.
- If you’re running Windows 8, 8.1, or 10, type in this command then press Enter(otherwise skip this step):
DISM.exe /Online /Cleanup-image /Restorehealth - Type in the following command and press Enter: sfc /scannow
- Do not close the command prompt until the process isn’t 100% finished.
If you receive the following information:
Windows Resource Protection found corrupt files but was unable to fix some of them. Details are included in the CBS.Log %WinDir%LogsCBSCBS.log
Follow this link to find what you’re missing, then replace it with a known good copy.
Otherwise, your system should fix any issues it has on its own, and you should be able to play without further problems.
Update Your Graphics Driver
If nothing else works, try updating your graphics drivers. This will depend on what graphics card you’re using, but you should be able to do it easily from the application that was provided.
Get Your Game On
Now you should be able to fix any launching issues. Z1 Battle Royale is a great game and it would be a shame if you couldn’t play it because of any small issues. As all gamers know, there’s nothing worse than not being able to play a game with your friends.
Have you had any problems launching Z1 Battle Royale? What solution worked for you? Let us know in the comments section below.


