Learn the best Fade Seize Lineups on Fracture in Valorant!
Fade’s abilities are fairly straightforward, which means players from all ranks can pick the Agent and bring decent value to their team. Her Haunt ability is especially powerful for gaining information on enemy positions on most maps in VALORANT, while Prowlers help her clear close corners and cubbies for her teammates.
Seize plays a bigger role in Fade’s kit, allowing her to weaken her enemies and set them up for their inevitable demise when paired with other Agent abilities. With that said, Seize is arguably Fade’s most powerful ability in her kit. Still, many players simply throw the ability and use it as a pseudo-slow ability to stall enemies.
We have lined up some of the most useful Seize Lineups for Fracture in this quick guide.
Fracture A-site Seize Lineups
Seize is best used in situations where you and your teammates can capitalize on its HP reduction and binding effects.
For Defending A-site, you can set up a Seize Lineup that will bind enemies attempting to push the Dish area, allowing you to punish them with other abilities such as Prowler or your teammates’ high-damage abilities. The same can be done for A-Main and A-Rope, although you can just throw Seize toward these spots directly without lineups.
For Attacking, you can use Seize to cover the close corners at A-Sands, which will greatly help your team’s A-site take. A well-placed seize toward A-Default can help punish Defenders in the A-Default and A-Platform areas when taking the A-Main route.
A-Dish Seize Lineup
- Align yourself with this line on the floor at A-Drop:


2. Aim for this corner on the dish frame:

3. Run forward, then JUMPTHROW Fade’s Seize:

When done properly, Fade’s Seize should land at the A-Dish Entrance:

A-Sands Seize Lineup (Attacking)
- Align yourself with the right zipline:

2. Aim just above this small protrusion along the roofline:


3. Run then JUMPTHROW Fade’s Seize:

When done properly, fade’s Seize should land at A-Sands near the mechanical door.

A-Upper Platform Seize Lineup (Attacking)
- Stand in this corner at A-Drop:

2. Aim for this corner of the tower:

3. Left-click-throw Fade’s Seize:

When done properly, Seize will land on the A-Default platform:

A-Default/A-Stairs Seize Lineup
- Stand in this corner at A-Drop:

2. Aim for this point on the rectangle


3. Run forward, then JUMPTHROW Fade’s Seize:

When lined up properly, Fade’s Seize should land at the B-Default and B-Stairs area.

Fracture B-site Seize Lineups
For B-site, you can use Seize to bind and weaken enemies attempting to take the Ultimate Orb at B-Main. Once again, make sure you play with another teammate with high-damage abilities (Raze comes into mind) so you can punish enemies while Seize holds them down.
B-Main Orb Seize Lineup (Defending)
- Stand in this corner behind B-Default:

2. Aim for the bottom right corner of the inverted triangle on the wall:


3. Run forward, then JUMPTHROW Fade’s Seize:

When done correctly, Fade’s Seize should land at B-Main and bind any player going for the Orb in the area.

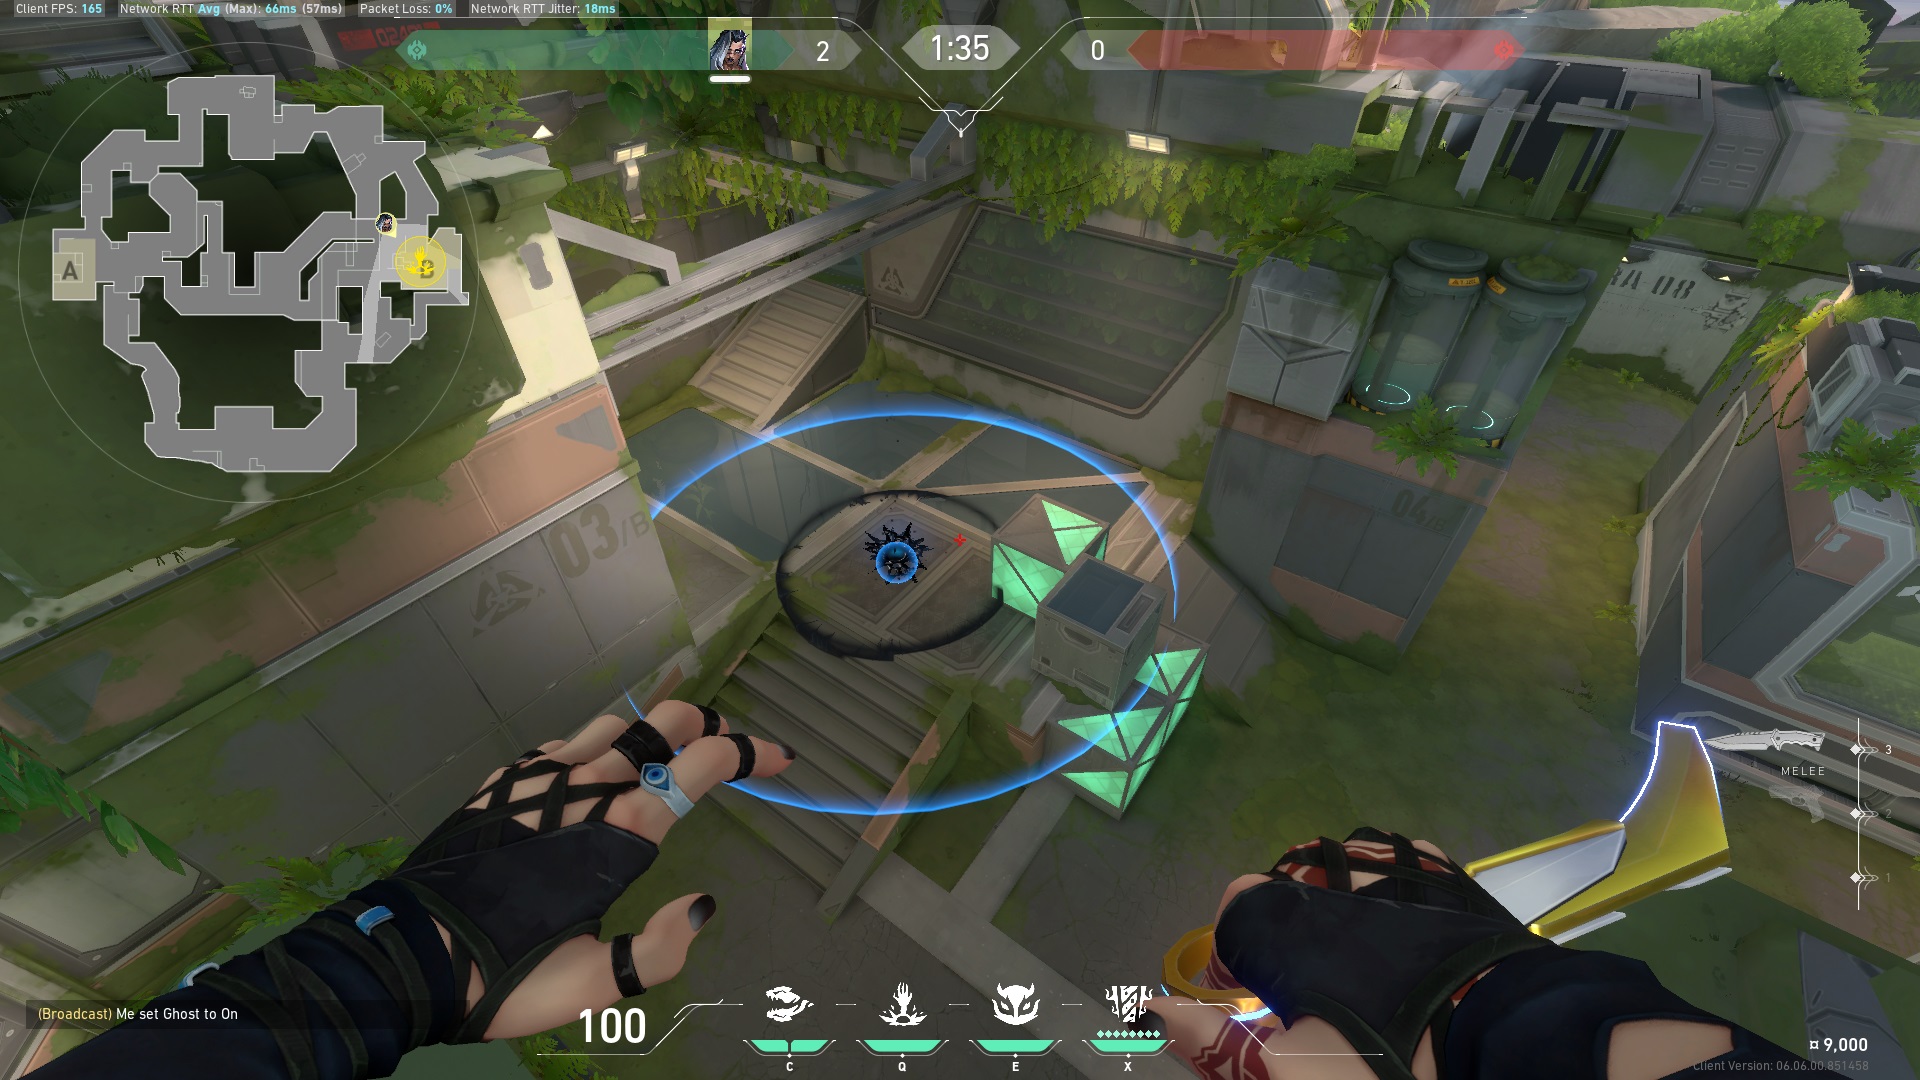
B-Main Close Seize Lineup (Attacking)
- Stand in this corner next to the boxes at B-Tree:

2. Aim for this small gap along the roofline:


3. UMPTHROW Fade’s Seize:

When done properly, it should land at the tall box along the B-site entrance:

B-Default Seize Lineup (Attacking)
- Stand on top of the large box at B-Tree:

2. Align yourself with the middle of this wall. Use the dark spots as a reference:

3. Aim for this small box on the wall:
4. Run forward, then JUMPTHROW Fade’s Seize:
When lined up correctly, Fade’s Seize should land at B-Default and bind any Defender hiding behind the B-Default box.

B-Arcade Seize Lineup
- Stand anywhere at B-Arcade and aim for this wall:

2. Throw Seize while running forward:

This will cover the B-Arcade boxes

Bind Them
Seize carries a ton of value with its ability to bind enemies, reduce their HP, and deafen them for a brief moment. When used properly while attacking or defending on Fracture, you can quickly stir chaos, break down the enemy team’s bombsite, clear key areas around the map, and make site entry easier for your team.
Master the Fade lineups we have featured above and coordinate with your teammates to maximize Fade’s Seize on Fracture.