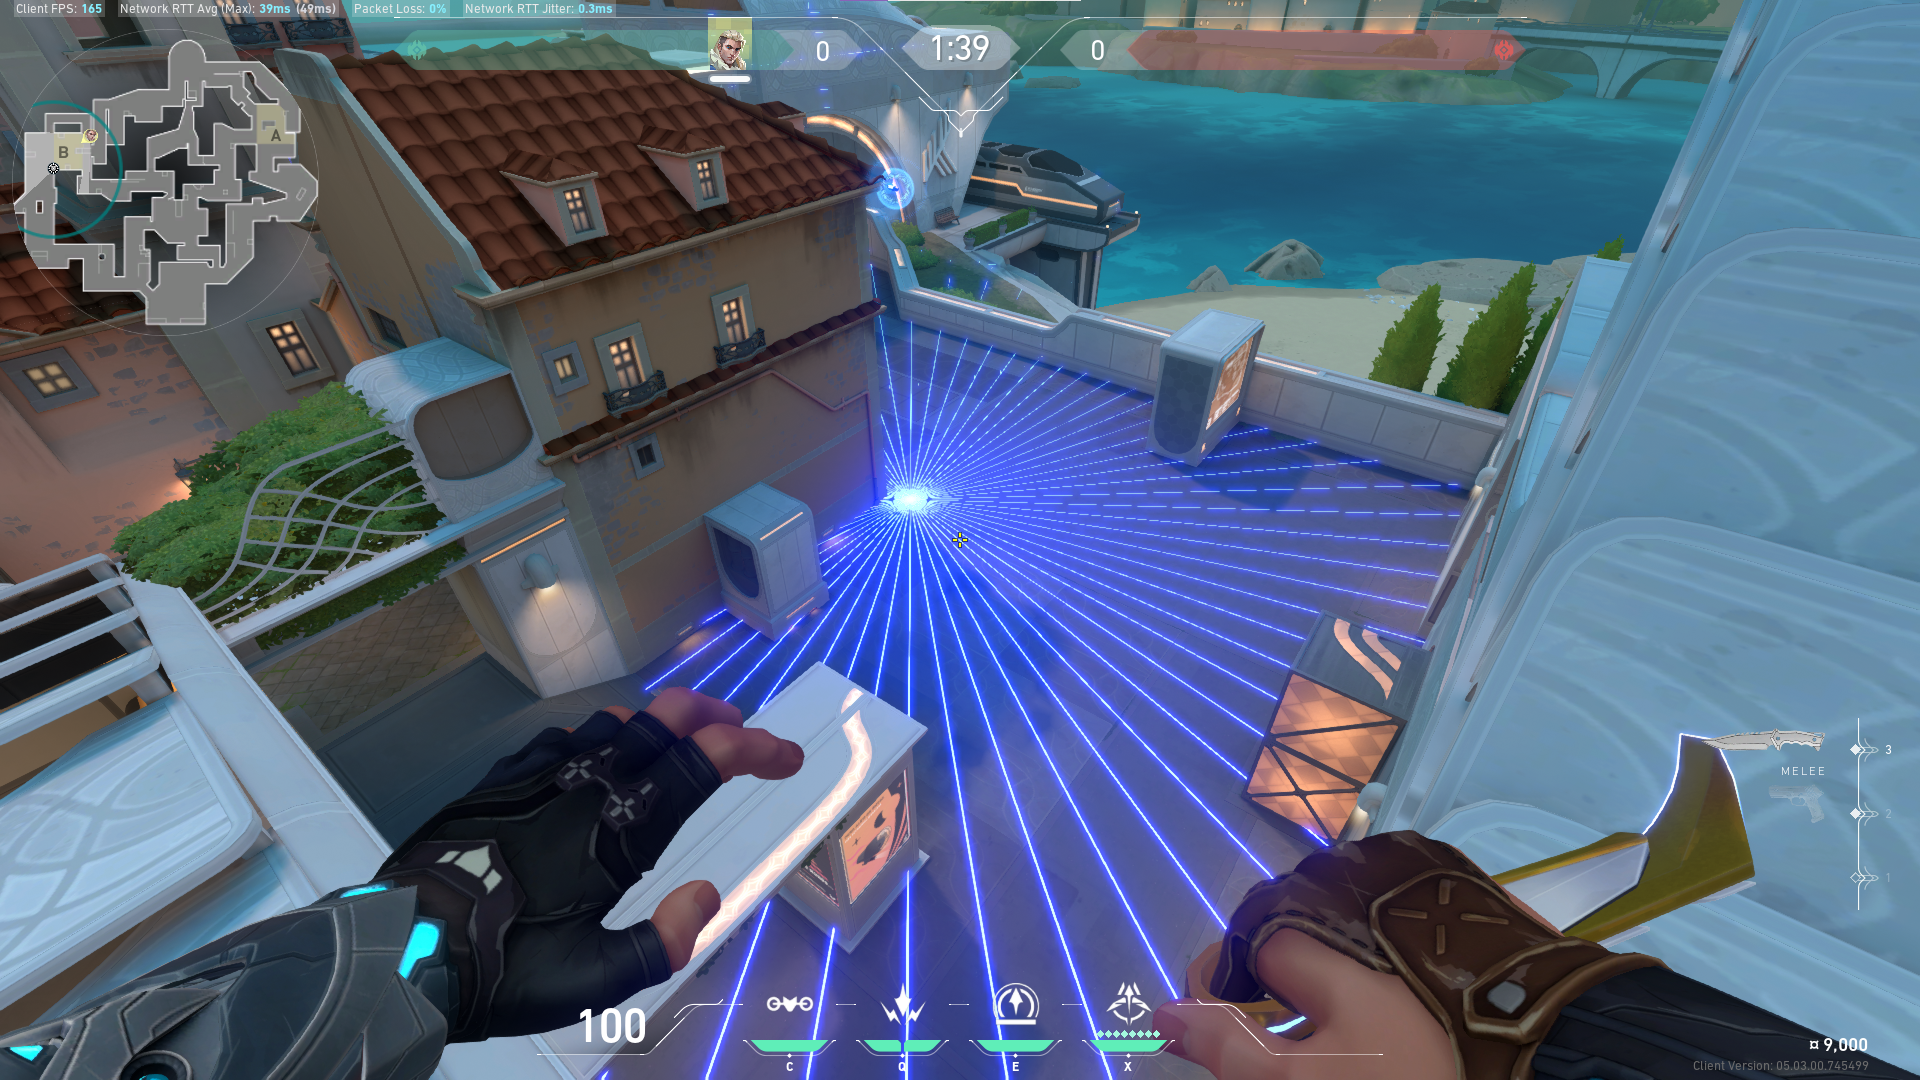
Make site defense and retakes more manageable in the Attacker-sided map, Pearl.

The introduction of Pearl at the start of Episode 5 brings back the classic scramble for middle control gameplay.
Pearl’s layout is a bit more familiar than the unorthodox layout of other recent VALORANT maps such as Fracture, but do not let its simple looks fool you – the Portugal-inspired map takes a ton of strategy and planning to play correctly, especially if you are playing Defense.
Due to Sova’s Recon Bolt’s long cooldown, the more viable strategy would be to hold off on using the ability until your team can regroup and initiate a retake. After all, revealing five enemy players at Pearl A-Main will not you or your team much if they decide to overwhelm A-site with their superior numbers.
With that in mind, we have featured a combination of early information Sova Lineups for Pearl and a few quick and easy retake lineups for A-site and B-site in this guide.
Sova Recon Dart Lineups on Pearl A-site Defending
Pearl A-Main Sova Lineup
There is an Ultimate Orb waiting for the Attacking and Defending team at Pearl A-main, making the area a highly contested spot on the map.
If your team has someone with a precious Ultimate Ability, you want to take control of A-main as often as possible. This Sova Recon Bolt lineup will reveal any Attacker at the A-Restaurant/A-Main area so you can take the Ultimate Orb safely.
- Stand inside A-Art:

2. Look through the small hole on the wall, and aim for the corner of the roof:

3. No bounce + Max Charge:

When done properly, Sova’s Recon Bolt should reveal anyone at A-Restaurant/A-Main:

Pearl A-site Retake Sova Lineup
Retaking A-site on Pearl can be a bit of a nightmare, thanks to the numerous angles flanking both A-Link and A-Main – two of the fastest rotational lanes towards A-site.
Clear out A-Main and some of A-site with this quick Sova Recon Bolt Lineup from A-Link:
- Stand in this corner at A-Link:

2. Turn around and place the right tip of the Owl Drone logo against this part of the roof:


3. No bounce + 1-bar Charge:

When done correctly, the Recon Bolt arrow should land on this wall at A-Main:

Pearl Middle Contol Sova Lineup
Pearl Middle is the Attacking-side’s most powerful lane for taking control of either A-site or B-site on Pearl, and the Attacking team can do just about anything they want once they have control of Pearl Middle.
This early-information Sova Recon Bolt Lineup should help clear Pearl Middle of any Attackers, so you and your team can cut off the Attacking team’s usable lanes towards either bombsite on the map.
- Stand in this corner between the large box and the wall in the Middle:

2. Look towards this tower on the right:

3. Aim for the center of this small strip on the tower:

4. One-bounce + Max Charge:

When done correctly, Sova’s Recon Bolt arrow should land on this wall at Mid Shops:

Pearl B-Site Early Information/Retake Sova Lineup
B-site can also be quite challenging to retake on Pearl. The bomb site has a ton of weird angles and hidden covers that the Attacking team can use post-plant (Hall, Tunnel, Tower)
Use this Sova Recon Bolt Lineup to clear B-site’s most common angles, so you can focus on checking Hall, Tunnel, and Tower instead.
- Stand in the gap between the pipe and the wall at Defender Side Records:

2. Place the right tip of the left HP HUD line in the middle of the stripe on the floor and the corner of the box:


3. No bounce + 1-bar Charge:

When done correctly, Sova’s Recon Bolt arrow should land perfectly on the corner of the roof at B-Main:

Nowhere to Run
Pearl’s layout brings back a typical tactical shooting game layout, where teams scramble to gain Mid-control on the map. However, the map will be an Attacker-sided map due to the Attacking side’s immediate access to the area.
Nevertheless, these Sova Recon Bolt Lineups should help you gather valuable information on enemy locations during round start or post-plant and make Defense on the map more.
Visit the PlayerAssist website for more Gaming Guides, Gaming News, Game Codes, and other Gaming Content!


