Learn how to find the grubs in the Tower of Love in Hollow Knight!
Hollow Knight, a Metroidvania action-adventure game developed by Team Cherry, tells the story of a nameless warrior known as the Knight as he travels over Hallownest, devastated by a terrible disease.
As the Knight wanders around Hallownest, he will encounter several creatures that will help the player fully understand the game’s plot. Some of these characters are cute little creatures called Grubs.
Grubs are small green creatures imprisoned inside glass jars that the Knight will encounter throughout Hallownest.
The Collector, a Void creature who enjoys collecting dead and alive bugs from all across Hallownest and keeping them in glass jars, captured these Grubs.
The high-pitched wailing of a Grub can be heard in its general area, alerting the Knight to its presence. Once they are located, the Knight can free them by breaking the glass jar with the Nail. A Grub that a Knight has released gives forth a joyful, high-pitched yell before tunneling into the ground to rejoin its colony with the Grubfather.
Hollow Knight Grubs
There are 46 Grubs in total throughout Hallownest, and many rewards for releasing a particular number of Grubs.:
- The Knight will obtain Geo as a reward for the first four Grubs from the Grubfather, who is located in the northwest corner of the Forgotten Crossroads (10 Geo for the first Grub, 20 Geo for the second, 30 Geo for the third, and 40 Geo for the fourth Grub found).
- After saving the fifth Grub, the Grubfather will reward the Knight with a Mask Shard.
- After freeing the sixth through ninth Grubs, the Grubfather will reward the Knight with Geo (50 Geo for the sixth, 60 Geo for the seventh, 70 Geo for the eighth, and 80 Geo for the ninth Grub found).
- After the Knight has freed the tenth Grub, the Grubfather will grant him the Grubsong Charm, which enables him to gain Soul whenever he sustains damage.
- After the Knight frees the 11th through 15th Grubs, the Grubfather will reward him with Geo (90 Geo for the 11th, 100 Geo for the 12th, 110 Geo for the 13th, 120 Geo for the 14th, and 130 Geo for the 15th Grub found).
- After freeing the 16th Grub, the Grubfather will reward the Knight with a Rancid Egg.
- After freeing the 17th through 22nd Grubs, the Grubfather will reward the Knight with Geo (140 Geo for the 17th, 150 Geo for the 18th, 160 Geo for the 19th, 165 Geo for the 20th, 170 Geo for the 21st, and 180 Geo for the 22nd Grub found).
- After the Knight has freed half (23) of the total number of Grubs, the Grubfather will award the Knight a Hallownest Seal, and the Grubfriend Achievement will be unlocked.
- After freeing the 24th to 30th Grub, the Grubfather will give the Knight some Geo (200 Geo for the 24th, 200 Geo for the 25th, 205 Geo for the 26th, 210 Geo for the 27th, 215 Geo for the 28th, 220 Geo for the 29th, and 220 Geo for the 30th Grub found).
- For freeing the 31st Grub, the Grubfather will give the Knight a Pale Ore.
- After freeing the 32nd through 37th Grubs, the Grubfather will reward the Knight with Geo (230 Geo for the 32nd, 235 Geo for the 33rd, 240 Geo for the 34th, 245 Geo for the 35th, 250 Geo for the 36th, and 255 Geo for the 37th Grub found).
- For freeing the 38th Grub, the Grubfather will award the Knight with a King’s Idol.
- After freeing the 39th through 45th Grub, the Grubfather will give the Knight a Geo (260 Geo for the 39th, 265 Geo for the 40th, 270 Geo for the 41st, 280 Geo for the 42nd, 290 Geo for the 43rd, 295 Geo for the 44th, and 300 Geo for the 45th Grub found).
- The Grubfather will reward the Knight the Grubberfly’s Elegy Charm and the Metamorphosis Achievement after the Knight has freed every Grub in Hallownest. The Grubberfly’s Elegy charm enables the Knight to fire projectiles when using the Nail and at full health.
In this guide, you will learn how to find all the Grubs in the Tower of Love in Hollow Knight!
Tower of Love Grubs’ Location in Hollow Knight

There are three Grubs in the Tower of Love, located at the top of the Tower of Love, at the far right corner of the City of Tears.
But first, the Knight must battle and defeat the Collector, a secret boss in the game, to reach the Grubs.
Before entering the Tower of Love, defeating the Collector, and obtaining the Collector’s Map.
However, the Knight must first acquire an item called the Love Key.
Love Key

The Love Key is held by a corpse who was the original tenant of the Tower of Love at the far end of the room near the bottom-rightmost area of the Queen’s Gardens.
In the Queen’s Gardens, the Knight will fight various creatures. The Knight will face the following enemies on the way to the Love Key: Oomas, Uomas, Spiny Husks, Fool Eaters, Mossflies, Mantis Petras, and Mantis Traitors.
Before going to the Queen’s Gardens to find Love Key, the Knight must first have Isma’s Tear ability, which allows the Knight to swim in acid pools, the Mantis Claw ability, which allows the Knight to stick and slide to walls and jump off of them, and the Mothwing Cloak ability, which allows the Knight to perform a horizontal dash forward. Although it is not essential, having the Monarch Wings ability, which allows the Knight to do a secondary jump while in mid-air, would be beneficial.
Getting to the Queen’s Gardens area and obtaining the Love Key will be a breeze with these abilities.
This is what the Knight must do to find the Love Key in the Queen’s Gardens (assuming this is the Knight’s first time in the area):
- Starting from the Bench in the Queen’s Station Stagway Station, head to the right, take the exit, jump up the small platforms, head to the very top, then take the exit on the top left of the room.
- Then, the Knight will now be in Fog Canyon. In this area, the Knight will encounter many Uomas and Oomas. Be cautious when attacking Oomas, as attacking them will cause its shell to pop, and its orange core will home in on the Knight and explode. Head up by jumping on the platforms while sticking to the left side of the room, then take the next exit on the left in the middle of the room.
- Next, head to the left, where the Knight will find a pool of acid and a wall of thorns. Drop down, swim to the left of the pool of acid (thanks to Isma’s Tear ability), pass through the narrow path below the wall of thorns, jump to the next platform, continue heading to the left, and take the exit at the end of the path.
- Then, upon entering the next room, the Knight has arrived in the Queen’s Gardens! Head to the left, where the Knight will find a Spiny Husk, drop down a few platforms where the Knight will encounter a Mossfly, and continue to the left, where the Knight will find two Mossflies, a Spiny Husk, and another separate Spiny Husk.
- Next, as the Knight heads to the left, you will find that part of the floor is vines filled with thorns. Jump and dash or do a secondary jump over the thorns with the help of the Monarch Wings ability or the Mothwing Cloak ability, head to the left, then take the exit at the end of the path.
- After that, head to the left, where the Knight will run into a Mantis Petra, drop down on the gap on the left, and head downwards using the small platforms that drop down after being touched (the room’s floor is covered in thorny vines, so be careful not to fall) where the Knight will find another Mantis Petra and two more Mossflies, then head for the exit on the bottom right of the room just beside the vines with thorns.
- Next, head to the right, where there are several fixed and dropping platforms and thorny vines on the bottom. Once the Knight is in the middle of this part of the room, the Knight will be trapped inside this area, and the Knight must defeat the enemies in the room to continue. The Knight has to defeat three Mantis Petras.
- After defeating all the enemies, head to the newly-opened path on the right, drop down the gap, head to the right, drop down another gap where there is a closed exit on the right, drop down the gap on the left, land on a dropping platform, jump towards the next dropping platform on the left (be careful as there are thorns on the ceiling and the floor), and dash towards the safe ground on the left with the help of the Mothwing Cloak ability where the Knight will encounter a Fool Eater.
- Then, dash towards the next dropping platform on the left, jump, and dash towards the next safe platform on the left, where the Knight will find another Fool Eater, and jump down the shaft on the left, where the Knight will encounter another Fool Eater at the bottom.
- Next, jump then dash towards the dropping platform on the right, jump then dash towards the safe platform on the right where the Knight will run into a Mantis Petra, jump then dash towards the next dropping platform on the right, jump then dash towards the platform on the right where there is a switch, and strike the switch to open the closed gate above.
- After that, jump then dash towards the platform on the right, jump up the wall on the right, head up the shaft with the help of the Mantis Claw ability where there is a wooden barrier on the left wall at the top, attack the wooden barrier several times to reveal a path, jump up towards the previous platform above, and take the newly-opened exit on the right.
- Then, jump across the gap towards the platform above on the right, head to the right, cross the gap, continue heading to the right, head down the gap, head down using the dropping platforms where the Knight will encounter two Mossflies, then take the next exit on the right.
- Next, head to the right, where the Knight will find another Mossfly; drop down the small platform below on the right where the Knight will find another Mossfly; drop down to another small platform below on the left, where the Knight will run into another Mossfly, drop down to the small platform below on the right, then jump towards the platform on the right where there is a Geo Deposit.
- After that, head to the right, drop on the pool of acid, swim through the narrow space, jump up the platform, and head to the right, where the Knight will encounter two Mantis Traitors.
- Finally, at the end of the room, a corpse is holding something glowing. Inspect the glow, and the Knight has now acquired the Love Key!
With the Love Key in hand, the Knight can now enter the Tower of Love, slay the Collector, and find the Grubs!
Tower of Love Grubs in Hollow Knight
Again, the three Grubs can be found at the top of the Tower of Love, which can be entered through the middle of the Kingdom’s Edge.
In the City of Tears and Kingdom’s Edge, the Knight will encounter a variety of foes. The Knight will run into these specific foes during the journey to the Grubs that were mentioned: a Husk Hornhead, a Husk Dandy, a Gluttonous Husk, Vengeflies, Belflies, Booflies, Hoppers, Primal Aspids, and the Collector.
The Knight must first learn the Mantis Claw ability, which allows the Knight to cling to walls and jump off them before he can find the Grubs.
Although it is not required, having the Isma’s Tear ability, which allows the Knight to swim in acid pools, the Mothwing Cloak ability, which allows the Knight to perform a horizontal dash, and the Monarch Wings ability, which allows the Knight to perform a secondary jump in mid-air, would be extremely beneficial. With these powers, reaching the Tower of Love and finding the Grubs will be a snap.
To find the Collector’s Map, this is what the Knight must do:
- Start from the King’s Station Stagway Station and take the exit on the left; the Knight will be in a room with a Husk Hornead, a Husk Dandy, and a Gluttonous Husk. Drop to the bottom of the room and head to the right to take the exit.
- Then, head to the right, where the Knight will encounter two Vengeflies, drop down on the water, swim to the right, and the Knight will pass through a hidden passageway.
- Next, the Knight will find a Belfly from the ceiling, so dodge or hide below an elevated platform to avoid damage, jump towards the platform, head to the right, where the Knight will encounter two separate Belflies, and then take the exit.
- The Knight is now in Kingdom’s Edge! If the Knight has already learned the Isma’s Tear ability, head to the right where the Knight will run into a Boofly, jump towards the small platforms, follow the small platforms upwards towards the ledge, and exit on the right. If the Knight has not yet learned Isma’s Tear ability, the Knight must take the exit on the bottom right of the area and then head up the room and take the exit that leads upstairs.
- Next, drop down the pool of acid, swim to the right through the narrow space, jump up the small platform, and head up the room with the help of the ledges and platforms where the Knight will encounter a Primal Aspid, a Boofly, another Primal Aspid, another Boofly, and another Primal Aspid, and take the next exit on the left.
- Then, The Knight will return to the middle room of Kingdom’s Edge, but on a higher level. Head to the left, where the Knight will find a Hopper and a Boofly; jump to the small platform below on the left where the Knight will run into a Primal Aspid and a Belfly; jump to the small platform below on the left; jump to another small platform below on the left, jump to the small platform on the left, and jump to the platform on the left where the Knight will encounter another Belfly.
- After that, head to the left, drop down the gap on the left where the Knight will find another Hopper, and then take the exit on the left.
- The Knight is now at the entrance of the Tower of Love! Head to the left across the gap, inspect the locked door, confirm on the prompt to use the Love Key, and enter the newly-opened entrance to the Tower of Love.
- It is advised to drop down the shaft before the entrance to the Tower of Love and then activate the shortcut by pressing the switch on the right side of the section toward the bottom to avoid completing all of the preceding steps when returning to the area. The Knight can use the exit above before the exit at the end of the path leading to Kingdom’s Edge.
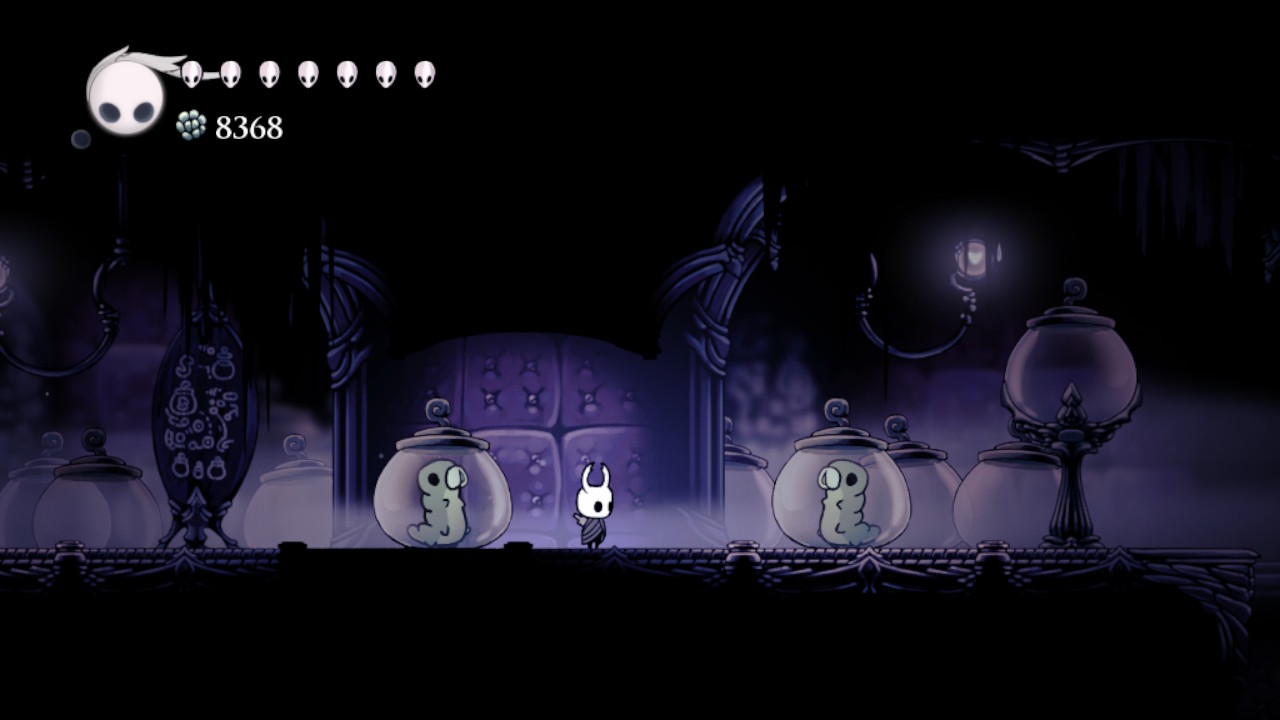
- Then, head to the left, head up the wall on the left with the help of the Mantis Claw ability, jump towards the platform on the right, and head to the right, where there will be glass jars with one having a dead bug inside. Another one with a live Vengefly, head up the next shaft, jump to the platform on the left, head to the left where there will be more glass jars with one of them having another Vengefly, head up the next shaft, and jump towards the platform on the right.
- Afterward, head to the right, where the Knight will be trapped in an open arena and fight the Collector. The Knight must beat the Collector to continue.
- Finally, head to the right, head up the shaft, jump to the platform on the left, and head to the right. There, the Knight will find three Grubs trapped inside glass jars! The Knight can now strike the glass jars and free the Gurbs!
The Collector Tips
As the Knight has to defeat the Collector to obtain its Map, it is important to know how to defeat it.
Related: Best Hollow Knight Charms
In battle, the Collector will use the following moves: One of them is Hop, which the Collector will use to move around the arena. The Collector will make several hops before launching its next attack.
Another is the Jar attack, where The Collector will leap into the ceiling, causing glass jars to fall from various parts of the ceiling.
When the glass jars break and fall to the ground, they randomly release a Vengefly, an Aspid Hunter, or a Baldur. When the glass jars fall and touch the Knight, they do not break, but they will take damage.
The player can anticipate the number of glass jars falling by listening to the rattling glass noises of each falling jar.
Furthermore, by examining the trail of dust that the glass jars leave as they descend, the player can anticipate where they will land.
When all of the glass jars have fallen, the Collector will return to the arena. Another of the Collector’s moves is the Grab attack, where the Collector will jump towards the Knight and perform a grabbing gesture that causes contact damage if the Knight is hit.
The fight against the Collector’s main challenge is that the Knight can not generate Soul when striking the Collector with the Nail, which makes healing and casting Spells difficult.
The only way to get Soul while fighting the Collector is to hit it with the Dream Nail with Weaverlings from the Weaversong Charm paired with the Grubsong Charm or strike the summoned enemies in the arena. It is ideal to hit the Collector with the Dream Nail when staggered.
The Collector will use the Hop attack, as was previously mentioned, to move about the arena and evade the Knight’s attacks.
Another difficulty defeating the Collector is the Jar attack, which also summons other little enemies.
The number of glass jars that are dropped when the Collector uses the Jar attack depends on both the number of summoned foes that are still alive in the arena and the phase of the battle.
The Collector will cease dropping glass jars if there are four or more summoned foes still alive in the arena.
The Collector will drop one to two glass jars simultaneously during the first phase, summoning up to five enemies simultaneously. Phase 2 of the combat, which quickens the Collector’s drop of glass jars, will begin when the Knight has dealt 350 damage to the Collector.
During this phase, The Collector will drop two to three glass jars at once, and the maximum number of summoned enemies is six.
The player should continue carefully if the Knight needs healing because the Collector moves rapidly and has a challenge predicting movement patterns.
Watch out for the long-ranged Collector’s Grab attack when healing.
Additionally, it is advised that the Knight’s Nail be at least the Coiled Nail, as it is powerful enough to kill the summoned creatures instantly.
Spells, such as the Vengeful Spirit spell, the Shade Soul spell (the Vengeful Spirit spell’s upgrade), the Desolate Dive spell, the Descending Dark spell (the Desolate Dive spell’s upgrade), and Nail Arts, such as the Cyclone Slash Nail Art, are also effective in dealing huge damage to the Collector and its summoned foes.
However, because the Soul is a bit of a luxury in the battle against the Collector, it would be wise that the Knight’s Soul be spent for healing.
The following Charms can also be of great help to the Knight in the fight against the Collector: the Quick Focus Charm can help the Knight heal faster, the Shape of Unn Charm can help by allowing the Knight to move while healing, the Mark of Pride and Longnail Charm can help by increasing the length of the Knight’s Nail, the Shaman Stone Charm can help by increasing the size and damage of Spells, and the Soul Catcher and Soul Eater Charm can help by increasing the amount of Soul that the Knight gains when hitting enemies.
The Kingsoul Charm can help by regenerating Soul every two seconds, the Grubsong Charm can help by gaining Soul every time the Knight takes damage, the Spell Twister Charm can help by reducing the amount of Soul required to cast Spells, the Stalwart Shell Charm can help by increasing invincibility time and decreasing recoil every time the Knight takes damage, and the Fragile Strength Charm or the Unbreakable Strength Charm can help by increasing the Nail’s damage output by 50%.
After defeating the Collector and acquiring the Collector’s Map, the Knight can now see the Grubs’ locations on the Knight’s Map, which makes finding all of them so much easier!