Learn how to obtain the Joni’s Blessing Charm in Hollow Knight!
Team Cherry’s Metroidvania action-adventure game, Hollow Knight, follows the journey of a nameless warrior called the Knight as he travels through Hallownest, which is now a kingdom in ruins because of a supernatural disease. As the Knight journeys through Hallownest, he can unlock new abilities, spells, and charms that will help him traverse through different areas of Hallownest and defeat enemies.
In the game, special items give the Knight different abilities and bonuses called Charms. To equip or unequip these Charms, the Knight must sit on a Bench, and the Knight must have enough unused Notches to equip them. In this guide, we’ll learn about the Joni’s Blessing charm.
One of the 45 Charms in the game is Joni’s Blessing Charm, which requires and takes up a whopping four Charm Notches. When equipped, the Joni’s Blessing charm changes all of the Knight’s Masks into Lifeblood Masks and increases the number of Masks overall by 40%. So, if the Knight has five base Masks, with Joni’s Blessing charm, the Knight now has seven Lifeblood Masks.
If the Knight has six base Masks, then the Knight will have nine Lifeblood Masks; if the Knight has seven base Masks, then the Knight will have 10 Lifeblood Masks, and so on. It is worth noting that the increase in Masks is based on the Knight’s base Masks and the Masks added by the Fragile Heart charm or the Unbreakable Heart charm and not including the Masks added by other charms like the Lifeblood Heart charm and the Lifeblood Core charm.
This charm is useful for situations where the player has difficulty surviving, or Soul needs to cast spells instead of healing. With the Joni’s Blessing charm, the Knight will not die immediately and has more Masks!
Location

The Joni’s Blessing charm can be found in Joni’s Repose on the corpse of Blue Child Joni on the eastern side of Howling Cliffs, but the entrance to access it is on the western side of Howling Cliffs.
In the Howling Cliffs, the Knight will encounter different kinds of enemies. However, the Knight will encounter these enemies to find Joni’s Blessing charm: Crawlids, Tiktiks, Vengeflies, Leaping Husks, a Husk Hornhead, and a Husk Bully.
Before the Knight can head to Howling Cliffs and find Joni’s Blessing charm, it is recommended that the Knight must first have the Mantis Claw ability, which allows the Knight to cling to walls and jump off of them, and the Mothwing Cloak ability, which allows the Knight to perform a horizontal dash forward, or the Monarch Wings ability, which allows the Knight to perform a secondary jump in mid-air.
The Knight must also purchase the Lumafly Lantern from Sly in Dirtmouth to light up very dark rooms. With this item and these abilities, reaching the Howling Cliffs area and finding Joni’s Blessing charm will be no challenge.
To find the Joni’s Blessing charm in Howling Cliffs, this is what the Knight must do:
- From the bench in the middle of Dirtmouth, head to the left, and then, upon reaching the wall, jump and climb up the wall using the Mantis Claw ability. At the top of the wall, use the Mothwing Cloak ability to dash towards the platform or the Monarch Wings ability to perform a secondary jump towards the next platform, then take the entrance on the left.
- Upon entering the room, the Knight is back in the King’s Pass area, the first area in the game. Head to the left, drop down on the next gap, head to the right, drop down to the gap, continue dropping down to the platforms below the left, and head to the bottom on the right side of the spikes.
- Next, continue to the right of what looks like a wall, and the Knight will be hidden. Continue to the right, jump over the spikes with the help of the Monarch Wings ability to double jump or the Mothwing Cloak ability to dash forwards in mid-air, and drop down on the gap where the Knight will start using the Lumafly Lantern to light up the area, and head to the left where you will find a Geo Chest which, after hitting it, will give off the Fury of the Fallen charm and not Geos.
- After that, head to the left, then drop on the narrow gap, continue to the left where the Knight will encounter a Crawlid, continue to head and jump on the platform on the left where the Knight will encounter another Crawlid, jump across the gap, and head to the left until the Knight reaches a large area.
- Next, continue to the left of what looks like the end of the path, and the Knight will be in a hidden part of the area with a Geo Deposit. Head up the narrow shaft using the Mantis Claw ability (watch out for the spikes!), then take the exit at the top.
- Then, head to the next platform above using the Mantis Claw ability to cling to the wall on the right and jump up, then continue to the left, where you will find a wooden structure holding up a wall on the other side. Strike the wooden structure often to destroy it and open up the path.
- After that, continue to the left and up the platforms, where the Knight will encounter another Crawlid. The Knight has now arrived in Howling Cliffs! Continue to the left, where the Knight will encounter another Crawlid, cross the gap by jumping on the small platforms (also where the Knight will encounter a Tiktik, a Vengefly, and another Crawlid), continue to the left past Gorb the Great Mind’s tomb, cross the gap by jumping on the small platforms where the Knight will encounter another Vengfly and Tiktik, then take the exit on the left.
- Next, continue to the left, drop down on the gap where the Knight will encounter another Vengefly, Tiktik, and Crawlids, continue to drop down while staying on the right side of the room until you find the platform where Cornifer can be found, then take the exit on the right.
- Then, in the next room, the room will be dark, and the Knight’s Lumafly Lantern will only light up the small area surrounding the Knight. Practicing caution in this room is important as it is filled with small platforms with spikes underneath. Upon entering, head to the right, jump towards the next small platform above the spikes where the Knight will encounter a Vengefly, continue jumping to the platforms and head to the right where the Knight will encounter two more Vengeflies, and drop down on the gap on the right side (as there are spikes on the left side).
- After that, drop down the gap again and move slightly to the right while falling to land on a small platform and not on the spikes here. The Knight will encounter two more Vengeflies, continue jumping on the platforms, and head to the left where the Knight will encounter two more Vengeflies, continue to the left, then jump and drop down the small platforms to head down where the Knight will encounter two more Vengeflies.
- Next, continue jumping on the platforms and head to the right, where the Knight will encounter a Leaping Husk; jump on the next platform on the right, where the Knight will encounter two more Vengeflies and another Leaping Husk, then continue to the right and the Knight will reach a narrow path with a Husk Hornhead.
- Then, head to the end of the path on the right, jump up to the next platform where the Knight will encounter a Husk Bully and another Vengefly, jump up the small platforms and head up where the Knight will encounter three more Vengeflies, continue to head up where the Knight will encounter another Leaping Husk, then take the next exit on the right. It is worth mentioning that there is a Soul Totem and another Vengefly on the opposite side of the exit.
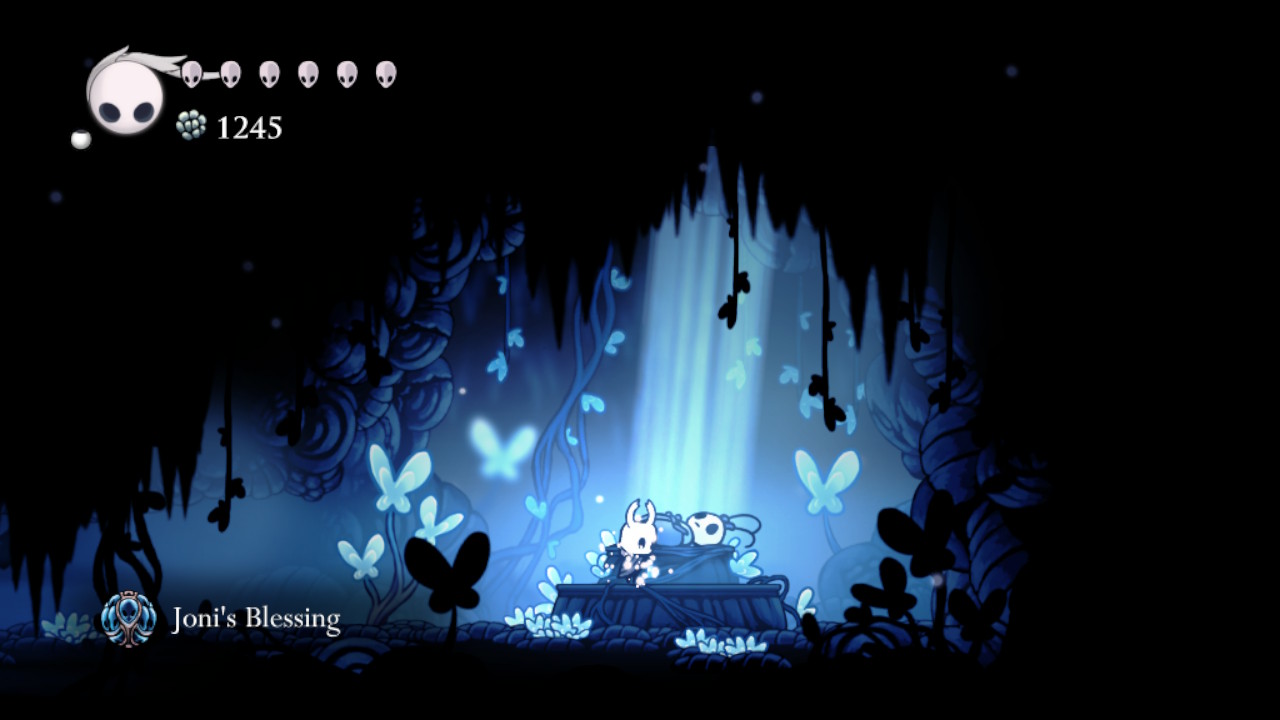
- After that, head to the right, drop down the gap where there will be lots of blue butterflies flying up on the screen, head to the bottom of the shaft, head to the right, and you will see something glowing on top of a corpse.
- Finally, inspect the glowing thing, and the Knight has acquired Joni’s Blessing charm!
To exit this area, simply head back up the shaft, exit the room on the left, continue to the left, and jump up the platform on the left with the Soul Totem and the Vengefly. There, you will see that the ground on the left side of the Soul Totem is breakable. Cast the Desolate Dive or the Descending Dark spell to break the ground, head to the left to return to the first part of the room, then take the exit on the left.
There are other Charms that go well with the Joni’s Blessing charm, specifically the HIveblood charm, which allows the Knight to heal the last Mask with using any Focus and, if paired with the Joni’s Blessing charm, allows the Knight to regenerate Lifeblood Masks that was granted because of the Joni’s Blessing charm but it will take twice as long, the Shaman Stone charm, which increases the damage output of the Knight’s spells and increases the size of the Vengeful Spirit or Shade Soul spell and, if paired with the Joni’s Blessing charm, means that the Knight will be able to deal major damage using spells as the Soul gained may be used more on spells instead of healing, the Fragile Heart charm or the Unbreakable Strength charm, which increases the Knights health by two Masks and, as stated above, the Masks added by these charms are included in the computation of the Lifeblood Masks added if paired with the Joni’s Blessing charm, the Lifeblood Heart charm, which adds two more Lifeblood Masks when the Knight sits on the Bench and pairing it with the Joni’s Blessing charm means that the Knight will gain two more Lifeblood Masks, and the Lifeblood Core charm, which adds four more Lifeblood Masks when the Knight sits on the Bench and pairing it with the Joni’s Blessing charm means that the Knight will gain four more Lifeblood Masks. The Lifeblood Heart charm and the Lifeblood Core charm can be stacked together with Joni’s Blessing charm to add at least six Lifeblood Masks from the Lifeblood Heart charm and Lifeblood Core charm alone.
Now that the Knight has Joni’s Blessing charm, the Knight can now equip it while sitting down on a Bench, and the Knight’s Masks will now become Lifeblood Masks and will increase in number!