Learn the best Killjoy Turret Spots on Fracture while Defending in Valorant!
Riot Games is likely satisfied with where Killjoy stands in the meta right now, evidenced by the lack of changes to her kit since Patch 3.05. Nevertheless, she has since remained an excellent pickup on most maps in VALORANT, thanks to her valuable kit.
Killjoy has not been given too much attention in the past few updates, which meant players probably glossed over the fact that Killjoy completely owns most maps in VALORANT, such as Ascent, Haven, and Icebox, where she holds a 49.5%, 49.6%, and 49.6% win rate, respectively. (ValorBuff)
Killjoy has seen the most success on Fracture, winning the most games on any map with her 49.8% win rate.
With that in mind, we have developed some valuable Killjoy Turret spots that you can use to Defend bombsites on Fracture.
Killjoy Turret
VALORANT veterans will tell you just how broken Killjoy’s Turret was in the early days. Not only was Killjoy’s Turret extremely tanky, but it also dealt high damage with its auto-burst fire. Who can forget about getting slowed to a crawl whenever the Turret landed a few shots on them?

Many players complained about Killjoy’s Turret and how broken it was, especially on maps such as Ascent. The community outcry eventually led to a substantial nerf to Killjoy’s Turret in patch 3.05, which reduced the Turret’s bullet-tag slow from 72.5% to just 29.5%.
This change significantly reduced Killjoy’s Turret’s ability to control key entry points on most bombsites in VALORANT and forced Killjoy mains to be more creative in their bombsite setups.
Still, the Turret is as close as teams get to having another player. The Turret’s ability to automatically fire at enemies as soon as it spots them gives Killjoy the ability to hold multiple lanes/sightlines on any map safely.
Fracture A-site Killjoy Turret Spots
The Attacking team can take A-Hall, A-Ropes, and A-Drop to enter A-site on Fracture. With Killjoy, you should be able to cover most of these spots with the help of your Alarm Bot and Nanoswarm abilities.
A-Drop is generally difficult to hold actively from within the A-site because of the tough vertical angle. In addition, standing in the middle of the bombsite is the last place you want to be when the Attacking team storms the bomb site.
That said, you can use Killjoy’s Turret to cover A-Drop while you focus your other abilities on the other entry lanes on the bomb site.
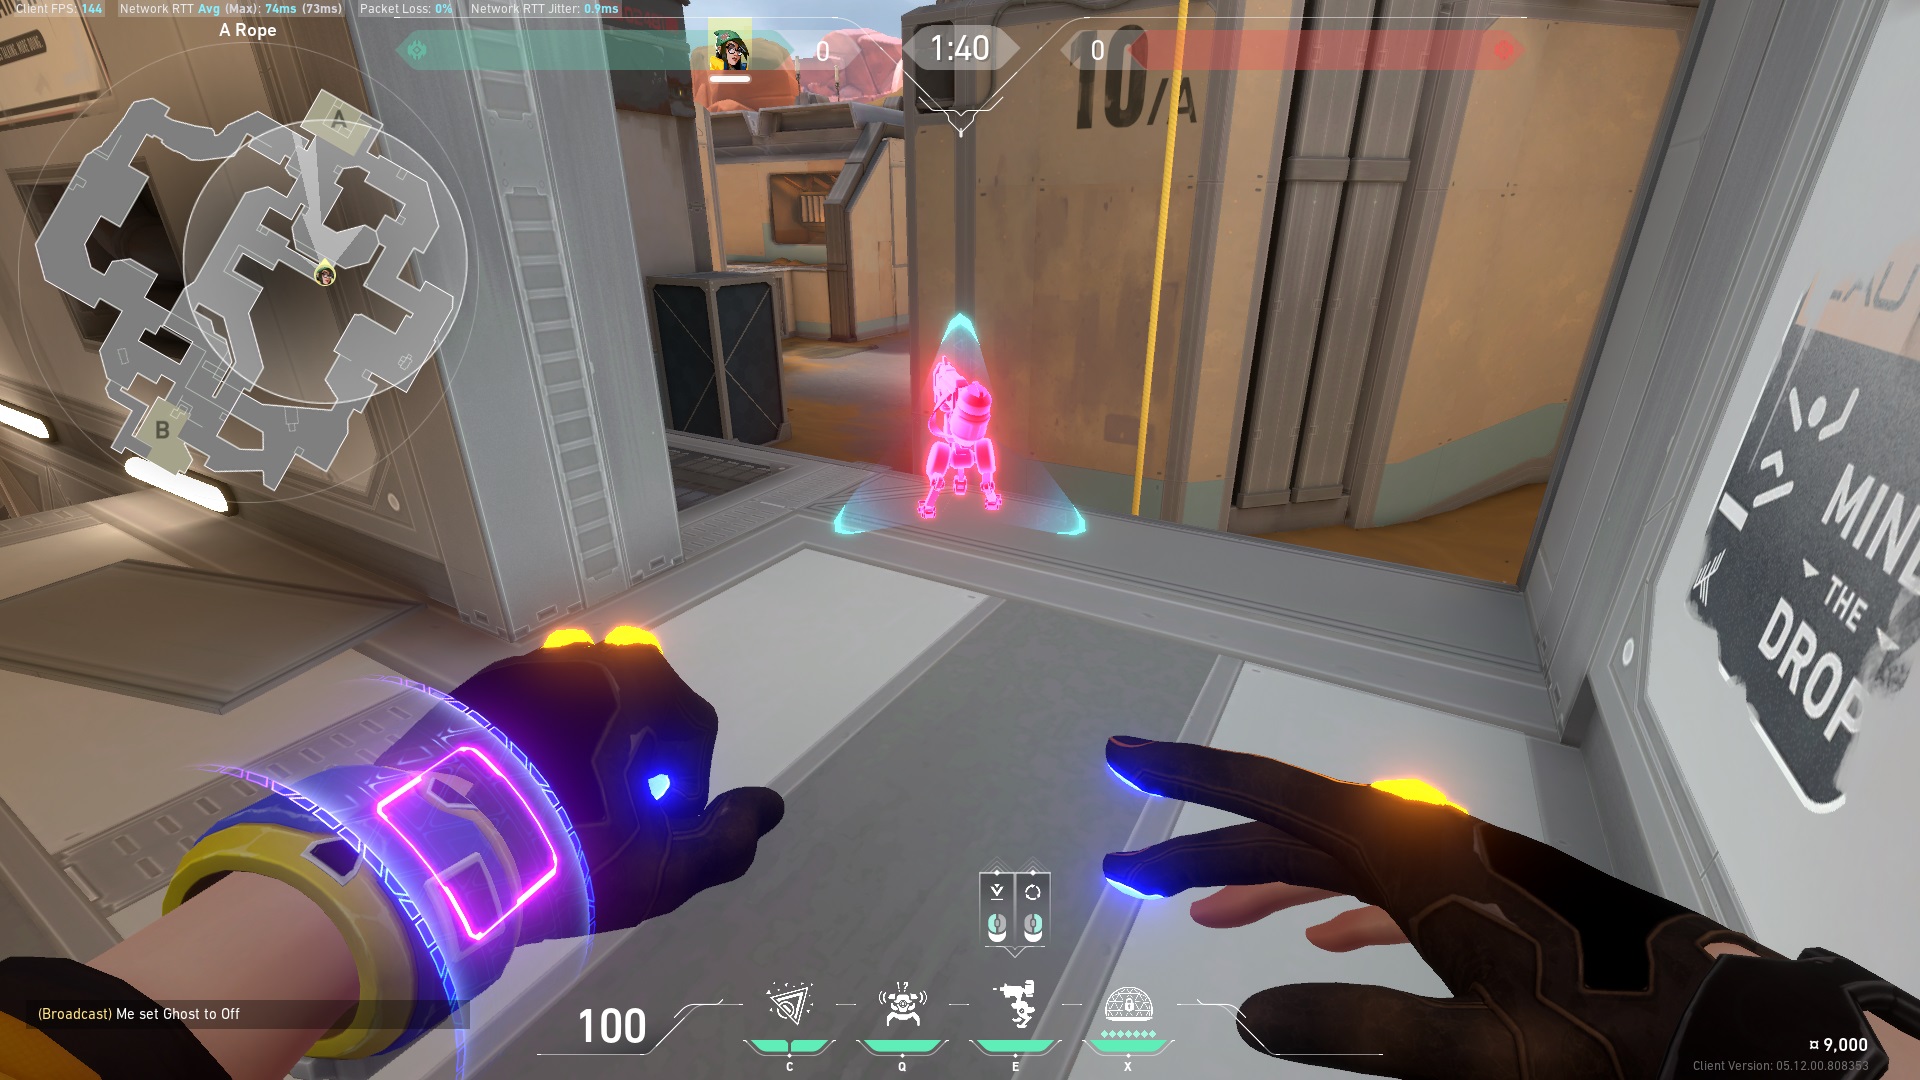
Fracture A-Drop Turret

A Killjoy Turret on top of these Radianite boxes in A-site will help cover the A-Drop area and give you an early warning for any Attacker lurking in the A-Drop/A-Dish area.
This placement will allow it to react and fire at enemy team players from A-Hall or A-Ropes.
Fracture A-Drop/A-Rope Turret

An alternate Killjoy Turret you can try is this Turret placement along the platform at A-Ropes. This Turret will cover some of the A-Drop and the entire A-Rope area.
Note that this spot is a typical smoke spot for the Attacking team, which can render the Turret useless. Still, this Turret placement is worth trying, especially if the enemy team has consistently succeeded when entering the B-Rope area.
Fracture B-site Killjoy Turret
B-site is where Killjoy’s Turret shines. B-site requires Defenders to watch both B-Main and B-Arcade. Killjoy’s Turret can help secure either of these lanes, removing the need to peek and hold angles actively on either spot.
Fracture B-Canteen Turret

A Killjoy Turret on top of this large box in B-site will help slow down the Attacking team’s rush into B-site from B-Main. Placing the Turret in this spot will give it a vision towards B-Arcade.
Fracture B-Arcade Turret

If your team decides to stack A-site and leave you alone in B-site, you must place Killjoy’s Turret along the edge of the A-Tower rope area. Doing so will allow you to defend two spots simultaneously on B-site.
Fracture B-Generator Turret

If the enemy team pre-checks and easily destroys your Turret when placed on the large box along the B-site entrance, you can try to place the Turret on top of the B-Generator instead.
Read: VALORANT: KAYO Flash Lineups on Fracture
This placement will still give the Turret vision toward B-site and B-Arcade.
Fracture B-Tower Turret

Another alternative spot you can try is the area along the A-Tower entrance. When placed in this spot, the Turret can simultaneously watch over the B-site and inside the B-Tower. This turbine will be a pain to destroy from the attacking team’s POV because of the added verticality required to shoot it down.
Fracture B-site Default Aggressive Turret

Place Killjoy’s Turret atop the B-Default boxes if you feel sharp. Hide behind the boxes and wait for the Turret to start shooting before you swing out and attempt a quick pick on the enemy.
Trusty Wingman
In the early days of VALORANT, the sight of Killjoy’s Turret was enough to send chills down the spines of many Attackers looking to rush into Killjoy’s bombsite. Riot Games has since nerfed Killjoy’s Turret, reducing its overall damage output and HP.
Still, Killjoy’s Turret remains a valuable tool for watching alternate lanes on many maps in VALORANT. It is precious on Fracture, which features multiple lanes that the Attacking team can use to flank bombsites right at round start.
With the Killjoy Turret placements featured above, you can deter and watch two lanes simultaneously on Fracture and allow your teammates to rotate as needed toward other bombsites on the map.