KAY/O’s kit is more or less focused on the suppression of enemy abilities. KAY/O is equipped with Flash Grenades, Molotovs, an ability suppressing Knife, and his ultimate that can also suppress enemy abilities and at the same time gives KAY/O a battle trance.
In a map like Bind, KAY/O is a great pickup regardless of how the rest of your team is composed. KAY/O’s kit allows him to stall and slow-down enemy rushes and allows your teammates to help you before you get overwhelmed by the sheer number of attackers. As an Attacker, knowing disabling any Defender on the site your team decides to take is important as this allows you to take sites much safer.
While the rest of KAY/O’s abilities are pretty much self-explanatory, his Signature ability, ZERO/POINT, urges players to learn efficient lineups that can maximize the effect of the EMP blast.
With this in mind, today we will focus on KAY/O’s EMP Knife and the lineups that can come in handy on a map like Bind.
Robot Initiator: KAY/O

KAY/O is a humanoid robot from the distant future. As some of the lore would suggest, KAY/O was built by humans to kill Radiants.
In the distant future, it seems that a divide between humans and Radiants has ensued, causing humans to fear Radiants, and at the same time, Radiants to despise humans. Of course, Radiants would have the upper hand in the ensuing war seeing as Radiants are super-powered humans like the X-Men.
This is probably the reason why they were forced to make a ruthless Radiant killing machine in KAY/O.
Everything about KAY/O is aimed towards the destruction of all Radiants. His skill set revolves around the disruption of any Radiant Ability. Figuring out how to render Radiant Abilities useless through KAY/O is an impressive feat for the human race, and most likely gave them the upper hand in the war since, through KAY/O’s voice lines, he would share how many times he has killed Reyna in his lifetime, and we all know how powerful Reyna can be.
More information about the lore surrounding KAY/O, the Radiants, and the human race will only be revealed as time goes by. Riot has done an amazing job of injecting tasteful storylines into the game. KAY/O’S lore is no exception.
ZERO/POINT
KAY/O’s Signature Ability is his third ability called ZERO/POINT.
When activated, KAY/O pulls out a small blade from his forearm and equips himself with a suppression blade that sticks to the first wall or objects it comes into contact with. KAY/O throws this knife with a precision that only a humanoid robot can achieve.
The blast resulting from ZERO/POINT affects Radiants and human technology alike, disabling every Agent Ability within a large spherical area.
ZERO/POINT is KAY/O’s Signature Ability which disables the abilities of all Agents hit by the EMP blast radius. As a bonus, ZERO/POINT pings you and your allies of the number of enemy players hit by the EMP blast. The pings give information about which Agents were hit by the EMP blast, along with how many were hit by the blade’s area of effect.
ZERO/POINT is a great tool for figuring out which players are playing which sites on most maps in VALORANT. A good ZERO/POINT lineup on Bind, for example, can give you and your team a good idea of how many players are currently playing on which side of the two bomb sites. Early information on Bind is particularly important because of how short the barriers are from the bomb sites themselves.

The information given by ZERO/POINT is valuable in a map such as Bind that relies heavily on gaining information about which site the enemies have stacked. You and your team can attack and rotate accordingly using this valuable information given by ZERO/POINT.
ZERO/POINT’s projectile travels pretty quickly and has a consistent trajectory which makes lineups pretty straightforward. ZERO/POINT’s area of effect is quite large. The large area of effect makes this ability very forgiving in terms of where your knife must be thrown to effectively utilize its radius. It also has the bonus of tagging enemies even if they are behind walls since the EMP blast goes through walls and other types of in-game cover.
The ability does not cost any credits to equip. However, it has a slightly long cooldown time of 40 seconds.
Bind Attacking – A-site Triple Box, Bench, Cubby, Showers Entrance ZERO/POINT

This first ZERO/POINT lineup on Bind covers a pretty wide area within Bind A-site. Some of the more important spots covered by this lineup are Triple Box, Cubby, Bench, Showers Entrance, Tank, and Pocket.
This is a solid lineup to learn because it clears the most common angles to watch out for when coming from Showers. This lineup can also help your teammates at A-short if you were going for an A split strategy where some of your teammates are going to be coming from A-Short while you come from Showers.
- Look for this corner at the Teleporter:

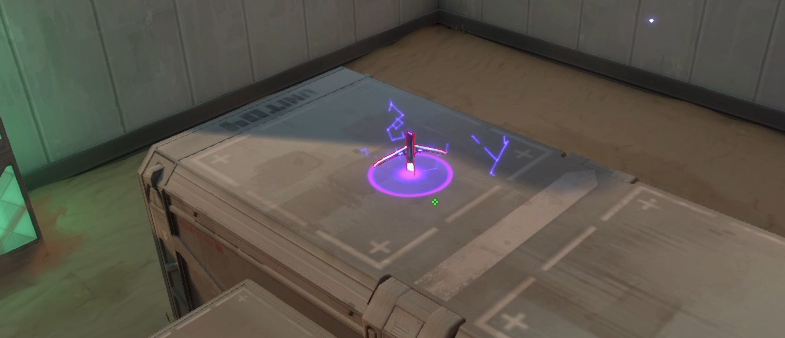
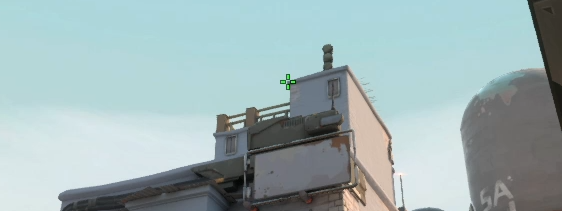
2. Tuck yourself within the corner and look up towards this tower:

3. Place the left tip of the ZERO/POINT Icon on the tip of this marked spot close to the antenna:

4. Left click to throw ZERO/POINT:

When done properly the Knife should land here close to Triple Boxes:

And cover the following areas within A-site:
Bind Attacking – A-site Pocket, Tank, Lamps ZERO/POINT

The next lineup on this list clears out enemy players defending the A-Short area. These spots include Lamps, Tank, some of the Triple Boxes, and Cubby.
Because of how narrow the A-Short passageway into the A-site is, this spot is often easy for Defenders to defend since they have the natural angles advantage. This ZERO/POINT lineup ensures that while defenders might persist on the following spots, they will at least be disabled and unable to use utility against you.
- Look for this barrel at A-Lobby:

2. Stand on top of the barrel and tuck yourself in the corner:


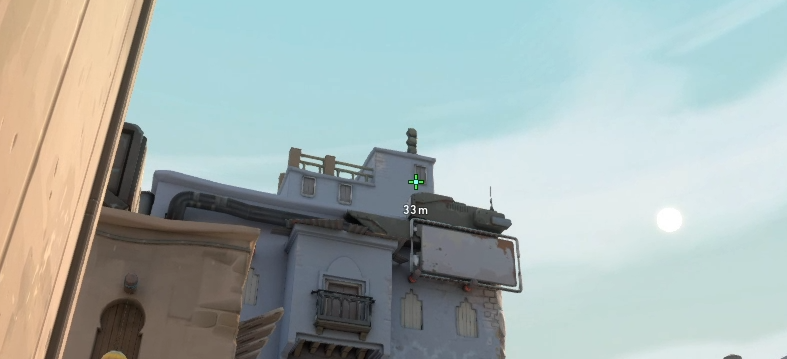
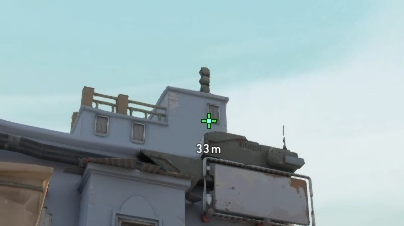
3. Look up towards these solar panels and look for this small rectangular indent on the 3rd panel from the top:

4. Place the left tip of the ZERO/POINT icon on the upper left corner of the rectangular indent:

5. Left click to throw ZERO/POINT:

When done correctly, the Knife should land close to the Tank:

And cover these areas on A-site:

Bind Attacking – B-site Default ZERO/POINT

If you happen to play a lot in Bind, you will know that B-site is the most excruciatingly painful site to take whenever the enemy team has a Killjoy or a Cypher.
Thankfully, KAY/O’s Knife not only disables Radiant power, but it also disables any gadgets that Killjoy or Cypher have laid out on site.
This next lineup encompasses almost all of the default B-site. It covers most of the important angles that Attackers need to clear out when taking space within the B-site.
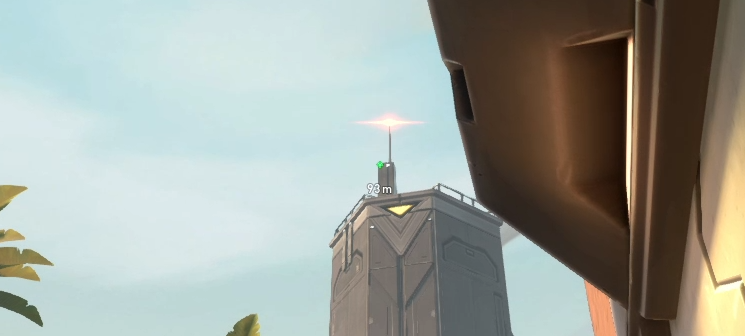
- Look for this Cart at A-Link:

2. Stand on top of the Cart and tuck yourself in the corner:

3. Turn around and look up towards these small pipes on the wall:
4. Once again, place the tip of the ZERO/POINT Icon on this middle pipe holder:

5. Left click to throw ZERO/POINT:

When done correctly, ZERO/POINT should land on top of B-site Tube:

And cover these areas within B-site:

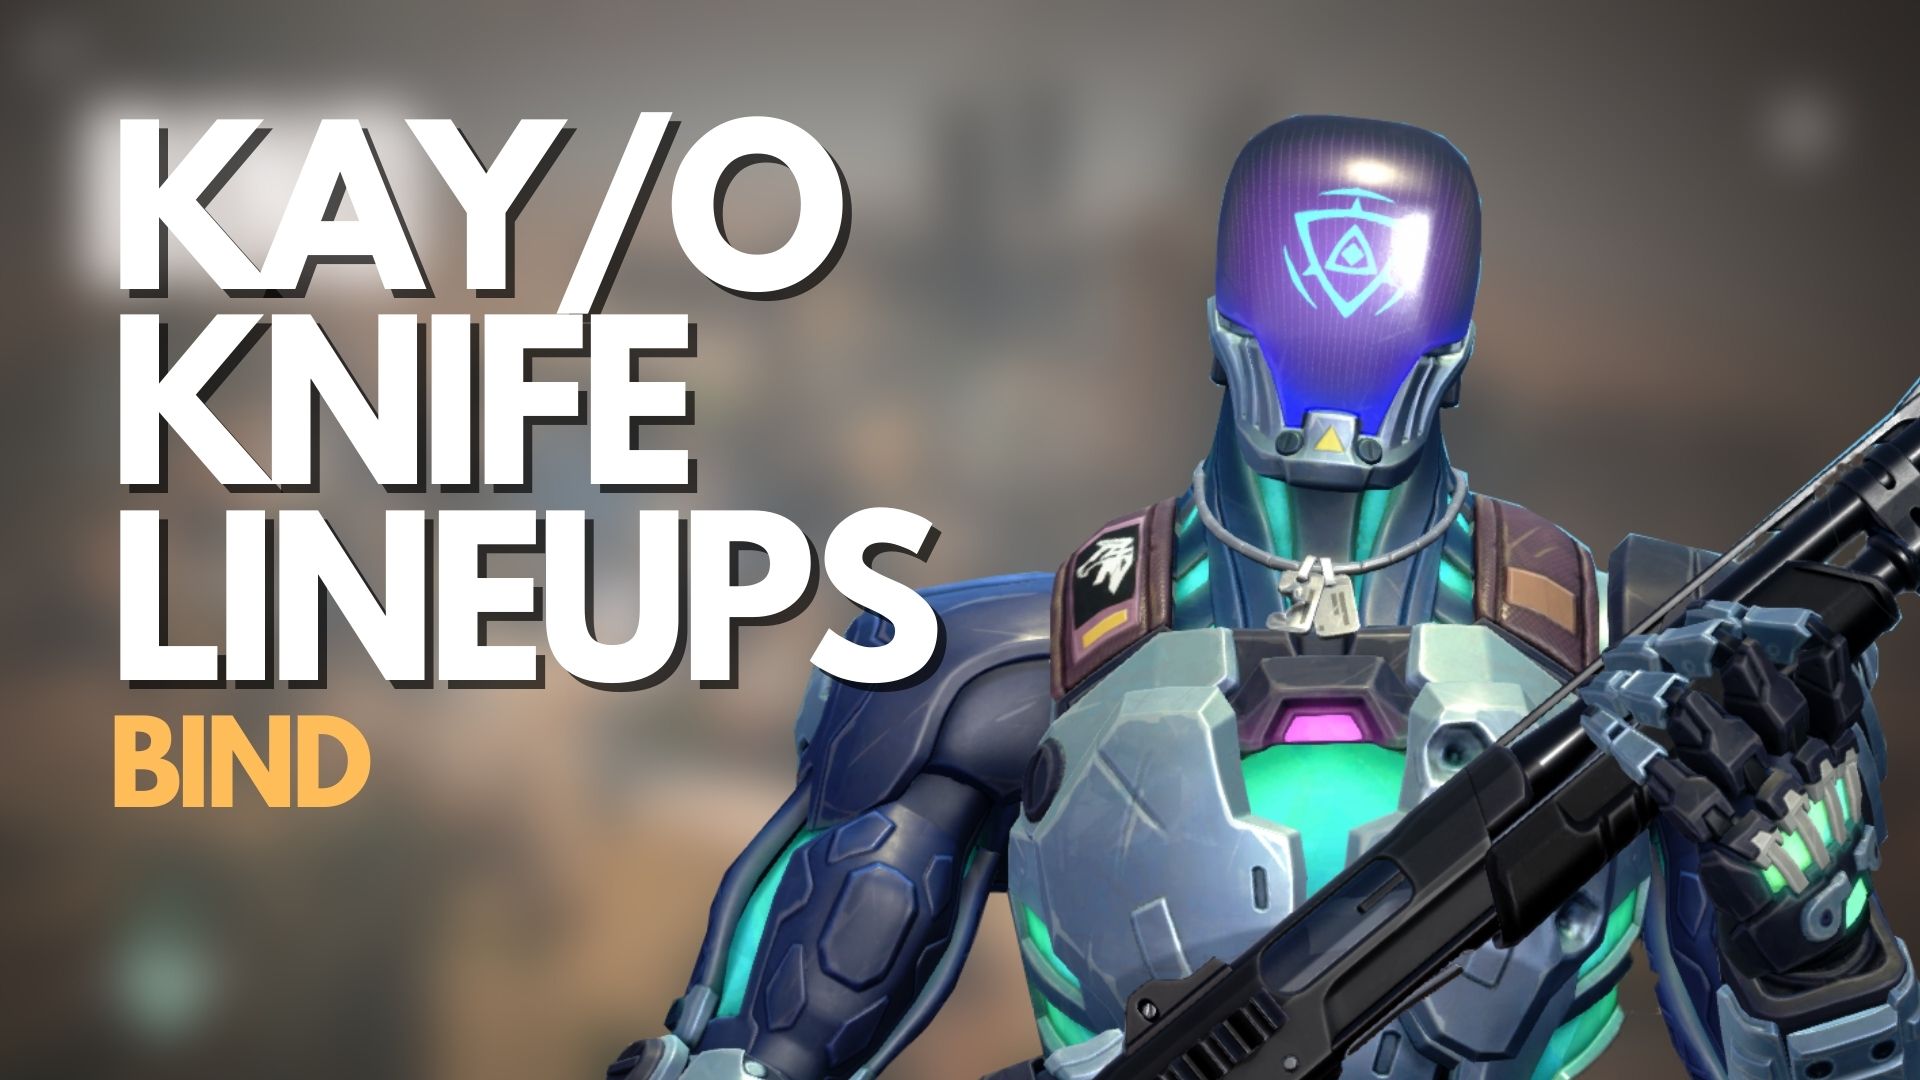
Bind Defending – B-site Short/Hooka Early Information ZERO/POINT

The next lineup on this list is for the B-Short/Market/Outside Hooka area.
This lineup covers most of the important areas within B-Short and is great for gathering early information about how many players are currently hanging around the area. You can use this information to get a rough estimate of which bomb site the Attackers are most likely going to take.
- Look for this cover at B-site Backsite:

2. Tuck yourself in the corner and look up towards this small balcony:

3. Place the left tip of the ZERO/POINT Icon on the left tip of this building:

4. Left click to throw ZERO/POINT:

When done correctly, ZERO/POINT should land in front of the Market Entrance:

And cover most of the B-Short Area:
Bind Defending – B-site Fountain/B-Long Early Information ZERO/POINT

This ZERO/POINT lineup covers most of the fountain area just outside of B-site.
The Fountain area is a common spot for Attackers to occupy whenever they plan on taking B-site. Tagging two or more players around this area is a good indication that Attackers will be taking B-site.
With this in mind, Fountain is a very important area to get early information on. Hence, this lineup will teach you to use ZERO/POINT to cover a large area and tag as many enemies as possible.
- Look for this corner in B-site:

2. Tuck yourself within the corner and look up towards the same balcony as the previous ZERO/POINT lineup:
3. Place the tip of the ZERO/POINT Icon at the bottom left corner of this window:

4. Left click to throw ZERO/POINT:

When done properly, KAY/O’s EMP Knife should land just beside Fountain:

And cover all of these spots around Fountain:

Bind Defending – A-Site Short God ZERO/POINT

This next ZERO/POINT lineup covers most of the spots around A-Short whenever Attackers plan to take A-site.
This next lineup will take a while to land at A-Short because of the trajectory, but this works in our favor. By the time enemies have taken up more space around A-short, most of them will most likely be in the area of effect of the EMP Knife because the radius will be much wider around the middle of where the knife has landed.
- At Defender Spawn, look for this box at the backmost part of Spawn.

2. Stand on top of this box, and tuck yourself within the corner:

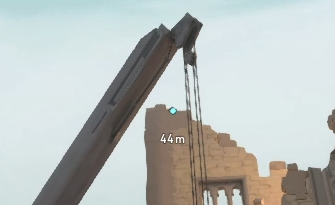
3. Look up towards the Crane and look for this uneven wall:
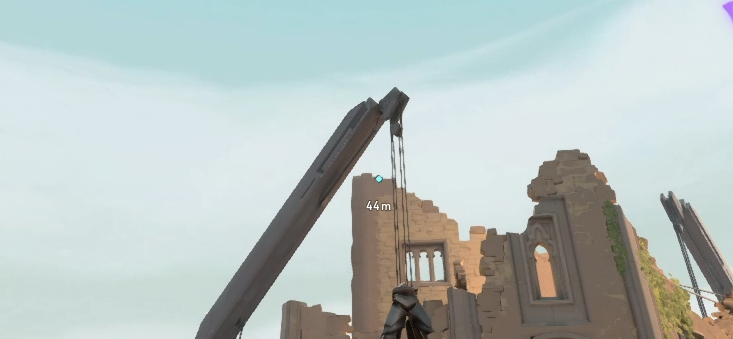
4. Place the tip of the ZERO/POINT Icon on this marked spot:

5. Left click to throw ZERO/POINT:

When done properly, the EMP Knife should land here:

And cover most of the A-Short area:
Bind Defending – A-site Showers ZERO/POINT

The last lineup on our list is a ZERO/POINT lineup that can tag enemies around the Showers area. This area is an important space to control as a Defender since a simultaneous attack from both A-short and Showers can be pretty difficult to stop.
This is a useful lineup to use whenever your team has a Sage that can wall off A-Short, which removes the need for you to tag enemies at A-Short. Instead, you can use KAY/O’s EMP Knife to gather information on enemy players playing around the Showers area.
- Look for this corner just below A-Heaven:

2. Tuck yourself in the corner and look up towards this 01 Generator:

3. Place the tip of the ZERO/POINT Icon on this edge:


4. Left click to throw ZERO/POINT:

When done correctly, KAY/O’s EMP Knife should land here:

And cover most of the Teleporter/Outer Showers area:
UN.BIND//ME

As mentioned before, KAY/O is a great fit for any team on a map like Bind. While the map can be pretty big, the alleys and bomb sites themselves are narrow. KAY/O’s ZERO/POINT will have no problem covering the most common angles and spots within and around bomb sites.
Bind is a map where Sentinels such as Killjoy and Cypher sometimes have too much fun with their traps and gadgets. KAY/O can easily disable their cheap toys and render them useless, making it easier for your team to attack and abuse the sites where the pesky Sentinels are playing in.