
Haven is VALORANT’S only map with three bomb sites.

The two bombsite setup, which most tactical shooting games have used for years, is already challenging to deal with both as a Defender or an Attacker. In Haven, VALORANT players have to devise a new way of attacking or defending, thanks to the addition of the third bomb site.
Defending in Haven can be a very daunting task, though, as two of the three bomb sites will often have just one defender holding the site. Defenders in Haven will need a strong Agent that can hold down a bomb site on their own.
Thimphu, Bhutan

VALORANT’S only three bombsite map is located in Thimphu, Bhutan. The whole map is a mix of a beautiful Bhutan landscape with multiple culturally accurate buildings and structures. However, fire and newly formed rock formations circle the outer rim of the map, suggesting a calamity has taken place in Haven.
As previously mentioned, Haven consists of three separate bomb sites. The bomb sites connect through the middle bombsite or B-site.
Lore-wise, there is not much lore around Haven; for now, the place is simply a Kingdom Corporation storage facility for Radianite. We will have to wait and see what type of story this map adds to the current collection of lore-related nuggets for VALORANT.
German Efficiency Child Prodigy: Killjoy

Killjoy belongs to the Sentinel class of Agents. As such, her abilities allow her to lock down bombsites on her own. Allies can rely on the German Prodigy to stall or even stop an enemy team’s push on her own to buy her teammates enough time to rotate over to her bombsite.
Killjoy uses her superior knowledge and skill to employ robots and gadgets to fight on her behalf. Her skill set consists of nanobots, an alarm bot, and a sentry bot she can set up to give her the best chance at holding down a bombsite. Her ultimate ability allows her to cover a large enough area to cover entire bombsites, giving Killjoy the ability to detain anyone caught in her ultimate.
In the VALORANT lore, Killjoy is known to have a father-daughter relationship with Brimstone. While neither character is related, Brimstone still sees fit to act as a guide to Killjoy.
Killjoy is in-charge of almost all of the non-Sentinel VALORANT Agents’ tech. She oversees repairs and tech innovation for every Agent. Taking some of the Agents’ voice lines into context, Killjoy seems to be a natural-born tactician, using data she gathers from engagements as inspiration for her next inventions and strategies.
Killjoy Nanoswarm

Killjoy’s Nanoswarm is a molly-type ability that deals quick damage over time to a large radius. Killjoy’s Nanoswarm ability can be equipped at the beginning of each round for just 200 credits each and a maximum of two charges.
What sets Killjoy’s molly ability apart from other molly-type abilities like Phoenix’s Hot Hands, Viper’s Snake Bite, and KAY/O’s FRAG/MENT is Killjoy’s ability to place the grenades before the start of the round and activate them at any time within the same round. After placing the Nanoswarm Grenades, they will become completely invisible until enemy players stand next to them.
Among the other molly-type abilities present in VALORANT, Killjoy’s Nanoswarm Grenade is the only molly ability in VALORANT that does not activate upon landing. However, a slight caveat is that KJ’s Nanoswarm Grenades shells can be destroyed when damaged with guns or abilities. Killjoy’s Nanoswarm Grenades also emit a subtle buzzing noise when enemy players stand close enough to the Nanoswarm Grenades.
Haven Defending – A-site Solo Hold Setups

When playing in Haven, Haven’s A-site will be the best site to hold as Killjoy. A-site Haven is where Killjoy can make the most out of her abilities and utilities, thanks to A-site’s narrow entryways and chokepoints.
Gaining a complete hold of A-site will allow Killjoy’s teammates to freely and confidently rotate over to either B and C sites to help out her other teammates. It is also best that the Defending team avoids playing into an A-site retake in Haven because of how inherently difficult it can be when playing as a Defender.
Killjoy’s Nanoswarm, Alarm Bot, and Turret can help her buy enough time so her teammates can rotate over to the A-site to help her deal with the incoming Attackers.
Our first setup for this guide will arguably be the most important setup when playing in Haven because of the aforementioned reasons. The goal is to buy enough time for your teammates so they can safely come into A-site to help you defend against the Attackers.
Remember, the goal is to buy your teammates time to rotate. It is best to avoid playing “hero” and preemptively score kills against the attackers.
First Nanoswarm Placement
You will place your first Nanoswarm Grenade in the middle of the short lane that connects A-Long to A-site. This should buy your teammates enough time to rotate. The large area covered by Nanoswarm should deter any incoming Attackers from taking any more space towards A-site.
- Place the Nanoswarm Grenade in the middle of this lane:

It does not have to be pixel-perfect. The Nanoswarm Grenade covers a larger radius than the lane itself. You can place the Nanoswarm Grenade pretty much anywhere on the A-site entrance. It can still cover the entire entryway.
Alarm Bot
Like the first Nanoswarm Placement on the A-site entrance, our Alarm Bot will be placed at the same spot. The Alarm Bot serves as a cue to activate the first Nanoswarm.

Place the Alarm Bot at the same spot as the first Nanoswarm Grenade.
Second Nanoswarm Placement
The second Nanoswarm Grenade will be placed at A-short and serve as a Plan B if enemies decide to rush you at A-short.
- Stand anywhere at A-site Cubby.

2. Aim for this dark patch at the bottom right corner of the A-short entryway:
3. Left-click-throw the Nanoswarm Grenade:

The Nanoswarm Grenade should land cover the A-short Cubby:

Turret Placement
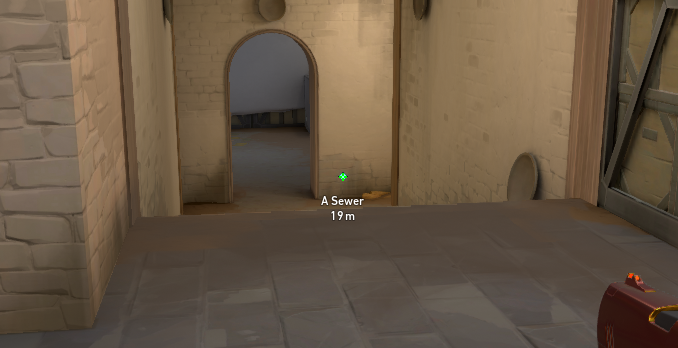
As for the Turret placement, place the Turret on top of these boxes at A-short:

Remember to rotate the Turret, so it is facing Sewers:

How to play around the A-site setup:
As we have mentioned above, this setup aims to help you hold down A-site until your teammates arrive to help you out. Think of this setup as a defense-centric setup that you can work around to your advantage.
You will mostly play A-short for this setup because of the cover and high ground that it provides against players pushing up from Sewers. Also, your Turret and Nanoswarm Grenade can help you score cheap and easy kills from A-short. The Alarm Bot and Nanoswarm Grenade, which you placed at A-Long, can be used to stall enemies at A-Long from pushing up on you.
Remember, the goal is to buy your teammates time to rotate to A-site and help you out.
Haven Defending – B-site Setup

B-site is the least ideal bomb site for Killjoy to hold as a Defender. Sage’s wall is way more viable in stopping an outright Attacker push into B-site. Sage’s Barrier Orb requires attackers to shoot at it or knife it down to destroy it. This gives your team information regarding the bombsite that the Attackers have chosen to take control of.
However, if you find yourself defending B-site as Killjoy, here is a standard setup for Haven B-site that can come useful.
First Nanoswarm Placement
Place the first Nanoswarm Grenade along this caution strip on the floor:

Second Nanoswarm Grenade Placement
As for the second Nanoswarm Grenade placement, you can place them on either side of the Default Spike plant sites on B-site.


Alarm Bot Placement
Place your Alarm Bot just along either side of the B-site entrance:

Turret Placement
Your trusty Turret will be placed on top of the right-side crates inside B-site:

Remember to rotate the Turret so that it is facing B-site itself. You will need to jump to place this Turret as the crates will be too tall to place the Turret while standing.
How to play around the B-site setup:
This B-site setup is a little more straightforward compared to the previous setup for A-site. Still, the goal is to delay an enemy team push and plant with your Nanoswarm Grenades, Alarm Bot, and Turrets.
Activate your first Nanoswarm Grenade when your Alarm Bot is alerted. Activate the second Nanoswarm Grenade when the spike plant sound is cued.
Since the enemies will have to commit to entering B-site to destroy your Turret fully, you can swing off your Turret’s first contact to punish the enemy team.
Haven Defending – C-site Setup

C-site is not a bad site for Killjoy to play in as well. However, your gameplay will not revolve around delaying an enemy team push this time. Our goal with this setup is to score as many kills as possible so our teammates will have to deal will fewer enemies upon retake.
This setup will help force enemy team players into your line of sight at Platform so you can score some quick and easy kills on enemies pushing Garage and C-Long.
First Nanoswarm Placement
Straightforward Nanoswarm Placement at C-Long entrance:

Second Nanoswarm Placement
The second Nanoswarm Placement will be at Logs to give yourself protection against a Garage to Logs push into the site.

It does not have to be perfect. The Nanoswarm Grenade radius is large enough to cover the entire lane.
Alarm Bot Placement
Place your Alarm Bot at the corner of C-Long’s entrance. The Alarm Bot will alert you of any enemies pushing into C-site. Activate your Nanoswarm Grenade accordingly.

Turret Placement
The Turret will be placed in this corner of the boxes at C-Backsite. It will cover the C-Link area as well as Logs.


How to play around the C-site setup:
For this setup, you will strictly be playing at the Platform area. The Nanoswarm Grenades and Turret are set up in such a way that will help you focus on the Garage area.
The first Nanoswarm Grenade should be activated when your Alarm Bot is triggered. The second Nanoswarm Grenade should be activated upon your Turret’s detection as well.
Killing the Joy in Haven
Killjoy is a wonderful Sentinel-class Agent specializing in locking down and anchoring bomb sites alone. Her skill set can be set up in many ways to set up traps and control lanes as no other Agent can.
A-site in Haven is still Killjoy’s best bomb site to hold as a Defender. However, with the help of these simple setups for Haven, you can help your team hold down the other bomb sites in Haven as well.
Haven can be challenging to play in, no thanks to its tight chokepoints and multiple lanes to defend. With the help of our German Prodigy, Killjoy and her bots might be a match made in Heaven.


