Two electrically-charged arrows are all you need to wreak havoc on Haven.
Haven is the only VALORANT map with three separate bomb sites.
With only five players to work with, the Defending team, on paper, should be at a disadvantage. This is, however, balanced out by the fact that most of the entryways into either of the three bomb sites are chokepoints that Defenders can easily block off with smokes or some mollies.
Scoring an early pick on Haven is often equivalent to securing a Spike plant for Attackers. Defenders will usually be coming from the other side of the map, so Attackers should have enough time to plant the Spike and reposition themselves towards more advantageous angles on post-plant.
Whether you are playing the Defending or Attacking-side, here are a few Double Shock Dart Lineups that you can use for early picks, plant-denies, and post-plant defense on Haven.
Shock Bolt
Sova’s Shock Bolt is a projectile-based ability that can deal decent chip damage to just about any spot on most maps in VALORANT, thanks to its variable Charge and Bounce options.
Players can easily add up to two Bounces to the arrow and up to three levels of Charges (how far the arrow travels).

Sova’s Shock Bolt explodes shortly after landing and deals 10-90 damage relative to how close enemies are to the center of the Shock Bolt.
Along with its decent damage output and flexible placement, Shock Bolt also has very decent coverage with its 5-meter blast radius.

When combined, two of these Shock Bolt Arrows are enough to deal fatal damage to any Agent regardless of armor. Hence, tons of Sova players often use the potential of Double Shock Dart lineups for easy early picks and post-plant Spike defense on most maps.
Sova can equip up to two Shock Dart charges for 150 credits each.
A-site Behind Default Box Double Shock Dart Lineup
For Defenders, the spot behind the Default Box might be the best area to be in when playing A-site on Haven.

Both A-Long and Sewer can be checked from behind the Default Box with no problems, and Attackers will have to commit to pushing past Default to clear out the spot behind Default Box.
To save yourself some time and reduce the risk of you or your Attacker teammates getting caught off guard by the behind Default player while clearing A-site, you might want to try out this Double Shock Dart Lineup for Behind Default.
First Shock Dart
- Walk into this corner just outside of A-Lobby:

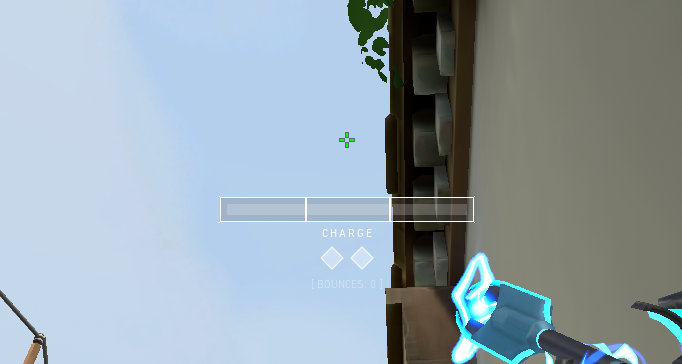
2. Turn around and look towards this window:

3. Place the leftmost tip of the HP HUD line underneath the dark spot on the corner of the window:

4. No bounce + 2-bar charge:

Second Shock Dart
- After firing the first Shock Dart, drag your crosshair straight down until the same HUD Line tip aligns with the upper left corner of this square with the flower print:


2. No bounce + 1-bar charge:

When done correctly, both Shock Darts should land on the spot behind A-Default:

A-Default Defuse Deny Double Shock Dart Lineup
Using both of your Shock Dart Charges to clear Behind Default or saving them for post-plant is entirely up to you.

If you choose to use them for post-plant, remember to use your Recon Arrow to clear out most of the A-site so that your teammates can enter the bombsite without significant problems.
First Shock Dart
- Go to the same corner at the A-Lobby sandbags as the previous Shock Dart Lineup:

2. Crouch, then aim for this corner on the roof:


3. While crouching, do no bounce + 1-bar charge:

Second Shock Dart
- After firing the first Shock Dart, release the crouch button then aim for the center of this light bulb:


2. No bounce + 1-click:

Together, both Shock Darts should look like this:
C-Behind Platform Double Shock Dart Lineup
Behind the Platform on C-site is another common spot that Defenders love to hang out in, especially on eco rounds.

Most of the time, this spot at Platform will be home to Operator players from the Defender-side because of the quick and easy angle it provides towards C-Long.
If you notice that the enemy team tends to hold the Platform area often, then these Double Shock Dart Lineups will make quick work of any enemy hanging around at the Platform area.
First Shock Dart
- Stand in this corner at C-Long:

2. Turn around, then look for this tower:

3. Place the right tip of the Shock Bolt icon on the upper right corner of the tower:

4. No bounce + 2-bar charge:

Second Shock Dart
- After firing the first Shock Dart, drag your crosshair straight down, then place the leftmost tip of the HP HUD line under this tree branch where it touches the wire:

2. No bounce + 1-bar charge:

Together, the Shock Darts should look like this:

C-site Behind Box Double Shock Dart Lineup
The spot behind C-Default serves a similar purpose to the area behind A-Default back in A-site.

The spot behind the C-Default box allows Defenders to check both C-Garage and C-Long through jiggle peeking while providing decent cover from any fire and utilities.
First Shock Dart
- Go to the same corner at C-Long as the previous Shock Dart Lineup:

2. Look up towards this inverted C-shape leaf formation:

3. Place your crosshair in the middle of the inverted C-shaped leaf formation:

4. No bounce + 2-bar charge:

Second Shock Dart
- After firing the first Shock Dart, drag your crosshair down until the right tip of the right Bounce-diamond rests on this corner:

2. No bounce + 1-bar charge + jump:

Tip: Jump before releasing the Shock Dart arrow for optimum results.

C-Default Plant Post-plant Double Shock Dart Lineup
Post-plant defuse denies are among the most common uses for Double Shock Darts in VALORANT.
Molly lineups will arguably be much stronger on post-plant until Riot introduces a way to thaw out molly utilities in-game.
However, Double Shock Dart Lineups are no slouch in the post-plant department, as well-timed lineups can instantly deny a defuse from far away.
Here is a C-Default Double Shock Dart Lineup for post-plant:
First Shock Dart
- Go to the same corner at C-Long as the previous Shock Dart Lineup:

2. While Crouching, aim for this leaf to the right of the v-shaped leaves:


3. No bounce + 2-bar charge:

Second Shock Dart
- After firing the first Shock Dart, release the crouch button, then drag your crosshair down until the second charge bar line slots in underneath this protruding wood piece:

2. No bounce + 1-bar charge:

Both Shock Darts should land at the C-Default area with no problem:
A-site Plant Deny Double Shock Dart Lineup
The A-site’s default spot is the area in front of the large container box, and A-Default is the most common spot where Attackers plant the Spike on A-site.

Ideally, Sova should be playing B-site on Haven so he can scan the entire Middle Courtyard and Middle Window area – both crucial spaces to control for complete B-site or C-site control.
The sooner Sova discovers where the enemies may be, the faster his team can rotate or flank the right bomb site.
Playing B-site on Haven gives Sova the flexibility to cover B-site’s surrounding areas and provide A-site assistance through his Double Shock Darts.
Here is an A-site Double Shock Dart Lineup from A-Link to deny the Attackers’ Spike plant.
First Shock Dart Lineup
- At A-Link, go to this corner between the barell and the doorframe:

2. Place the left Owl Drone charge HUD Line between these two dark spaces on the building:


3. No-bounce + 1-bar charge:

Second Shock Dart
- Right after you fire off the first Shock Dart, drag your crosshair down until the bottom of the 2nd charge bar line touches the light bulb:

2. No bounce + 1-click:

Together, both Shock Darts should easily delete anyone trying to plant the Spike at A-Default:

C-Default Plant Deny Double Shock Dart Lineups
Players can take advantage of C-Default, the most common Spike plant spot for Haven C-site, and line up some Shock Darts to deny the Spike Plant.

Make sure that Garage is clear first before you attempt to use this Double Shock Dart lineup. Otherwise, you might fall as easy prey to enemy players coming from C-Garage.
First Shock Dart
- Go to this corner at C-Link:

2. Place the left tip of the Owl Drone HUD Line underneath this protruding wooden beam:

3. No bounce + 1-bar charge:

Second Shock Dart
- After firing the first Shock Dart, drag your crosshair down until the top-middle line of the Shock Dart mouse-click indicator sits underneath this antenna:

2. No bounce + 1-click:

When done correctly, both Shock Darts should land at C-Default without any problem:

Electric Shock
Double Shock Dart lineups can serve a multitude of purposes around Haven. There is a Shock Dart lineup on this guide for many scenarios, whether for early-picks, post-plant defense, or early plant denials.
Of course, Double Shock Dart lineups are not the be-all-end-all of playing Sova on Haven.
Post-plant at B-site Default, for example, is better defended through traditional Shock Darts aimed directly at the defuser. In these situations, you are better off going for the fastest and most direct way to deal the necessary damage to your enemies.
That is about it! Hopefully, you found this helpful guide! Visit PlayerAssist.com to not miss out on excellent game guides, gaming news, and game codes for all your favorite titles!