In Minecraft, building bases is on the top of the priority list. Without a base, a player cannot gather and store resources, food, and more. Bases are the player’s “home.” They serve as a place where we can take a moment to collect ourselves before we venture out into the wilderness again.
If you are like me, your first base would probably have been a tiny, simple room where everything was just thrown together in a rush to protect yourself before nightfall. But over time, we upgraded our bases. We made it bigger, fancier, and full of decorations. But one thing we all had in common was we made our bases on land. We never thought about making one underwater or on top of a lava pool. It was much too complicated and dangerous. But did you know that underwater bases are pretty cool? You get to see the wonders below the water in the safety and comfort of your own home. It’s like getting a giant aquarium for your base. Pretty awesome, right? Here, we will teach you how to make a simple underwater base you can try for yourself!

Things you will need
Although it is a simple base, there are quite a number of things you will need first. You may do this in survival or creative mode. For survival mode, you will need to conquer an ocean monument first before making your first underwater base. The ocean monument contains a “sponge room” where you can gather sponges to drain water. You must obtain a sponge. Otherwise, it is impossible to decorate the base. Accordingly, here is a list of things that you will need for the base: (NOTE: The number of materials required may vary slightly)

Steps in building an underwater base
- STEP 1: Find a nice spot underwater and flatten the area around it. Make sure you leave space for at least twelve blocks horizontally and ten blocks vertically.

- STEP 2: Using smooth quartz blocks and smooth quartz stairs, build the layout or frame of the base on the flat surface. You should place two blocks at the top-center and then place two stairs opposite each other. Then using one stair, place it diagonally from the last stair by swimming down and looking upwards when placing the block. This should invert the position of the stair. Do this until you form a round-shaped frame. (Follow instructions as shown below)

- STEP 3: Following the outer frame, remove two layers of blocks inside until it is completely hollow.

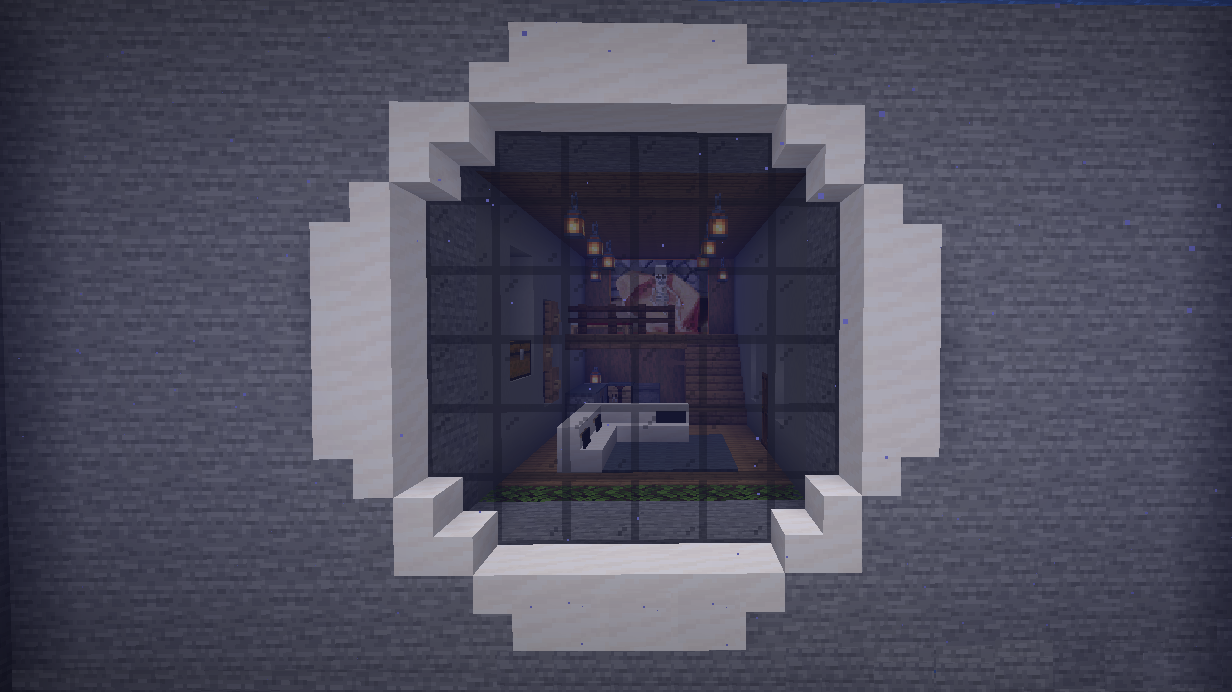
- STEP 4: Completely cover the first layer with black stained glass. This will give the effect of a glass window. Then use a sponge to drain the water inside the glass. You can obtain sponges from ocean monuments.

- STEP 5: Once the water is completely drained, dig out another 12 layers inside. This will give you enough space to build and decorate your base. The base should be a 6 blocks tall and 13 blocks long.

- STEP 6: Dig out the floor and replace it with spruce planks (8 blocks in length) and polished andesite (4 blocks in length) all the way to the edge. Leave the first layer nearest to the glass untouched.

- STEP 7: Dig out the ceiling and cover it completely with spruce planks. Then place eight lanterns in exact order. From the edge, leave one block space before placing a lantern and two block spaces in between each lantern accordingly. (refer to the images below)


- STEP 8: Next, replace both the parallel walls with light gray concrete and place stripped spruce logs vertically for the center wall.

- STEP 9: Remove the first layer of spruce planks and dig down one layer of blocks. Place glowstone at the bottom layer and oak leaves for the upper layer. Cover completely.

- STEP 10: Remove two lanterns near the stairs and place them on each corner. Then make a 3-block high staircase on the first block of polished andesite and use spruce slabs to connect the stairs to the wall. Then build the second floor by making a 4×4 spruce slab floor. Finally, place four dark oak fences on the edge of the second floor.

- STEP 11: Dig out two blocks each accordingly on the wall near the stairs for decoration and for the door. You will need two glowstone blocks, twelve stripped spruce logs, two grass blocks, two peonies (flower), and one dark oak door (refer to the image below). You will place the peony on top of the grass block.


- STEP 12: For the other wall, dig out two 2×3 areas accordingly. Then dig out the next layer and replace it with stripped spruce logs each. For decorations, you will need one painting, two chests, three barrels, three oak buttons, three flower pots, and three tulips (any color). Place each decoration according to the image. To place the oak buttons on the barrel, hold SHIFT or crouch and click on the barrel. This will prevent interacting with the barrel and will place the object instead.

- STEP 13: In this step, we will make the couches. You will need three black banners, six smooth quartz stairs, and ten gray carpets. To make the couch, dig out the first spruce plank and place the banner below. Place one smooth quartz stair on the left side of the banner and place another stair next to it by clicking on its side. This will make the banner intersect with the stairs (see image below for reference). Remove the first stair and continue to do this step accordingly until you make a couch. Place the carpets in a 3×3 pattern with the last one near the door.


- STEP 14: We will now do decorations under the stairs. You will need six spruce planks, two spruce slabs, and four barrels. First, cover the entire back wall with planks and a slab under the stairs. Then arrange the barrels in a 2×2 position, covering the rest with another plank and slab.

- STEP 15: Next for the interior, you will need two furnaces, one smoker, one crafting table, one stone, one cauldron, one water bucket, four gray carpets, and one lantern. Place each decoration according to the image below and place the stone at the corner between the furnace and the crafting table. Make sure to place carpets on top of each block except for the cauldron. Pour the water bucket on the cauldron to fill it with water.

- STEP 16: To decorate the second floor, you will need two beds and one painting. You can also add additional decorations, but that is up to you. Place the beds horizontally and place the painting on the wall. This will generate a large picture as decoration. Now the interior of your base is complete.

- STEP 17: From the door, dig a path going up to the surface. Place spruce stairs on each level going up. Place lanterns on the ceiling of each step to provide light.

- STEP 18: Using fences, lanterns and a fence gate, surround the entrance of your base to prevent hostile mobs from invading your base. The number of fences and lanterns will depend on how large you need your entrance to be.

With this, your underwater base is complete. You may decorate your base however you wish. You can replace the fences with planks for the surface entrance and build a small room around it for a better and safer pathway. The options for decorating are only limited by your imagination!