Learn how to defeat Grimm in Hollow Knight
Hollow Knight, the challenging action-adventure game developed by Team Cherry, presents players with many formidable opponents. One of these enemies is named Grimm. With his fast and hypnotic strikes, this enemy provides a difficult challenge, leaving even the most accomplished adventurers trembling in fear.
This guide will explore the essential strategies and techniques to defeat Grimm in Hollow Knight. With this, the Knight may master the art of combat, defeating Grimm and claiming triumph in the eerily beautiful world of Hollow Knight. So, prepare yourself, equip your preferred Charms, and ready your Nail. The journey to defeat this formidable adversary has only just begun!
Before attempting to locate and defeat Grimm, it is vital to note that the Knight can only encounter Grimm in The Grimm Troupe DLC. So, the player must first download and install this free DLC pack to face Grimm and complete the story it provides.
Grimm in Hollow Knight
In Hollow Knight, Grimm offers the Knight a quest and is one of the boss battles for The Grimm Troupe content pack. This NPC is the main character in this additional storyline, and he has a Dream form known as the Nightmare King.
According to in-game lore, Grimm is in charge of The Grimm Troupe, a traveling circus. The Grimm Troupe travels from the Nightmare Realm to the location of the Nightmare Lantern once it is lit. They gather Nightmare Flames from destroyed areas to power the Nightmare’s Heart, the evil creature that controls the Troupe.
Their method for feeding the Nightmare’s Heart involves feeding a Grimmchild with Nightmare Flames. They then kill the Nightmare King, allowing it to be reincarnated through the Grimmchild.
How to Find Grimm in Hollow Knight
Encountering Grimm can be separated into two phases:
How To Defeat Grimm Phase 1: Summoning the Grimm Troupe
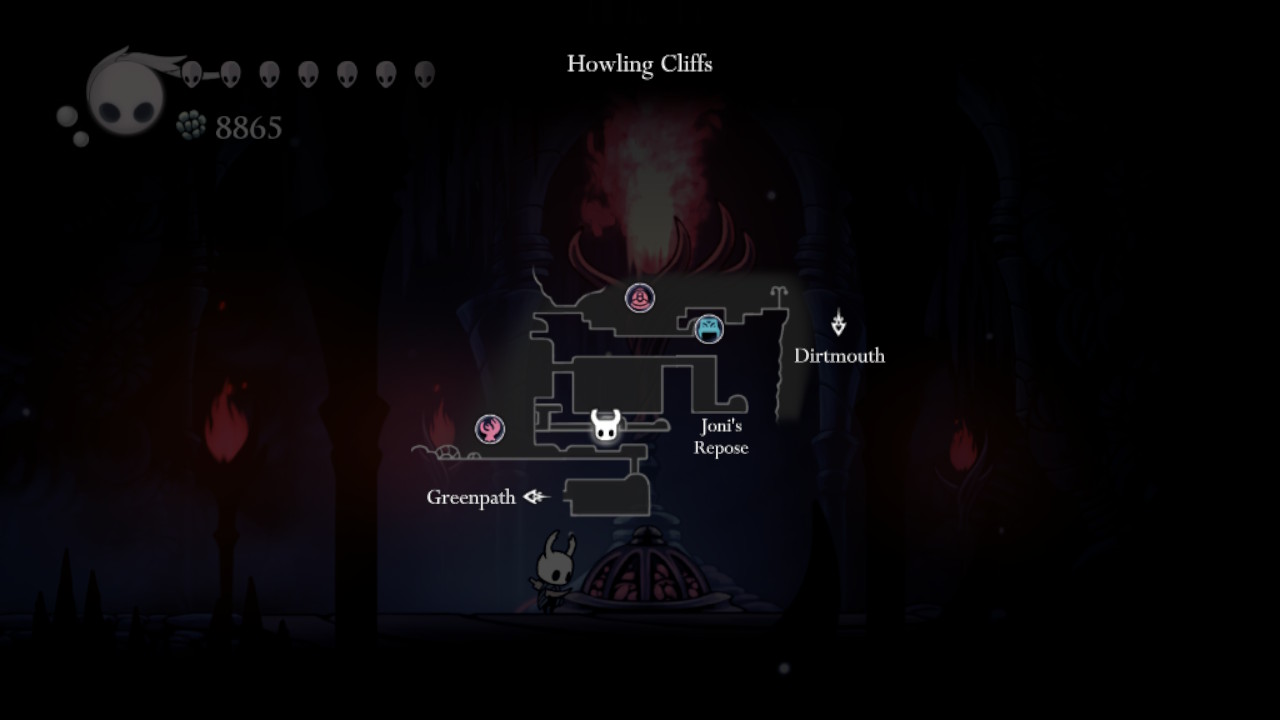
The Knight must first summon them to find Grimm and the Grimm Troupe. The Knight must first light the Nightmare Lantern to summon them. The player may do this after heading to a secret area in the lower portion of Howling Cliffs.
Requirements
To summon the Grimm Troupe, the Knight must have a few abilities. One of them is the Mantis Claw ability. The Knight can cling to and jump off vertical surfaces with this ability. The next prerequisite is the Dream Nail ability. This ability allows the Knight to gain Essence and enter Dreams. Another prerequisite is the Mothwing Cloak or Monarch Wings ability. The Mothwing Cloak ability enables the Knight to move ahead in a horizontal dash. The Monarch Wings ability, on the other hand, enables the Knight to jump once more while in the air.
To illuminate exceptionally dark areas, the Knight must also acquire the Lumafly Lantern from Sly in Dirtmouth.
Enemies
On the way to the Nightmare Lantern, the Knight will encounter a few enemies. To be more specific, the Knight will find Crawlids, Tiktiks, and Vengeflies.
Path to the Nightmare Lantern
The Knight must do the following to find the Nightmare Lantern:
- Go to the left from Dirtmouth’s Bench, then use the Mantis Claw ability to make your way up the wall at the end. Dash using the Mothwing Cloak ability or double jump using the Monarch Wings ability to the platform at the top of the wall, then go through the entrance.
- The Knight is now in King’s Pass. Follow the path to the left, then descend the gap to the right. Fall the gap and use the platforms to continue to the left. Continue to the bottom, on the right side of the spikes.
- Afterward, walk to the right of what looks to be a wall to reveal a hidden area. Dashing or double-jumping to the right will get the Knight over the spikes. Head down the gap where the Knight will use the Lumafly Lantern to illuminate it. The Knight will find a Geo Chest with the Fury of the Fallen charm.
- Then, travel to the left, down the small gap, and again to the left. Here, the Knight will come upon a Crawlid. Go to the platform on the left, where the Knight will meet another Crawlid, then jump over the gap and to the left, where there is an open area.
- Then, discover another secret path to the left of what looks like the room’s wall. Continue on this path, climbing the thin shaft while looking for spikes and exiting at the top.
- After that, move to the next platform above, then to the left. Here, the Knight will find a wooden structure that supports a wall. To open the passage, repeatedly attack the wooden structure.
- If the Knight goes to the left and up the platforms, the Knight will arrive at Howling Cliffs. Here, the Knight will confront a Crawlid. To the left, the Knight will encounter another Crawlid. Use the little platforms to cross the gap. On the way, find a Tiktik, a Vengefly, and another Crawlid. Pass Gorb the Great Mind’s tomb to the left and use the small platforms to cross another gap. On the way, the Knight will find another Vengefly and Tiktik. Exit through the path on the left.
- Next, go left and drop down the gap to land on a small platform. Here, the Knight will encounter another Vengefly, Tiktik, and more Crawlids. Follow the shaft below, then the corridor on the right until you reach a platform with pieces of paper. Go to the left, fall down the gap, and then back to the left to land on a platform with a Crawlid. Turn right and drop down the gap to a little platform below. The Knight will come across another Crawlid on the left.
- Then, go to the right wall and repeatedly strike it to break it down and reveal a hidden path. Descend the shaft to the right, where the Knight will discover a Wanderer’s Journal. Proceed to the right-hand wall. Strike this wall a few times to destroy it and reveal an exit. Take the newly discovered exit.
- Following that, to enter another chamber, continue to the right. The Knight will find the carcass of a large bug near the far right end of this room. Use the Dream Nail ability on the large bug corpse, and then it will burst with red Essence.
- Return to the previous region to the left, where the Knight will discover the Nightmare Lantern. Once the Knight repeatedly strikes the Nightmare Lantern, the torches in the room will illuminate, and music will begin to play. This means The Grim Troupe has finally arrived in Dirtmouth!
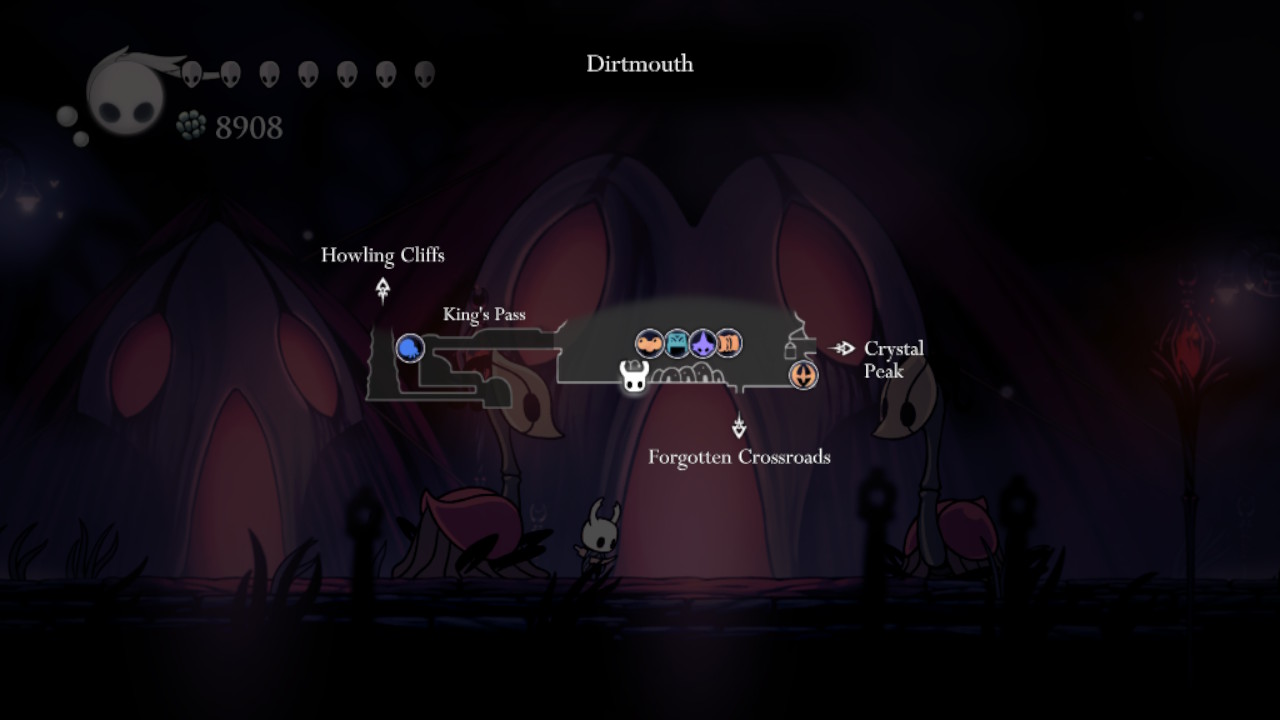
The Knight will now be able to return to Dirtmouth and discover The Grimm Troupe! They’ve pitched their tents to the left of the Bench and Sly’s shop.
How To Defeat Grimm in Hollow Knight Phase 2: The Nightmare Flames
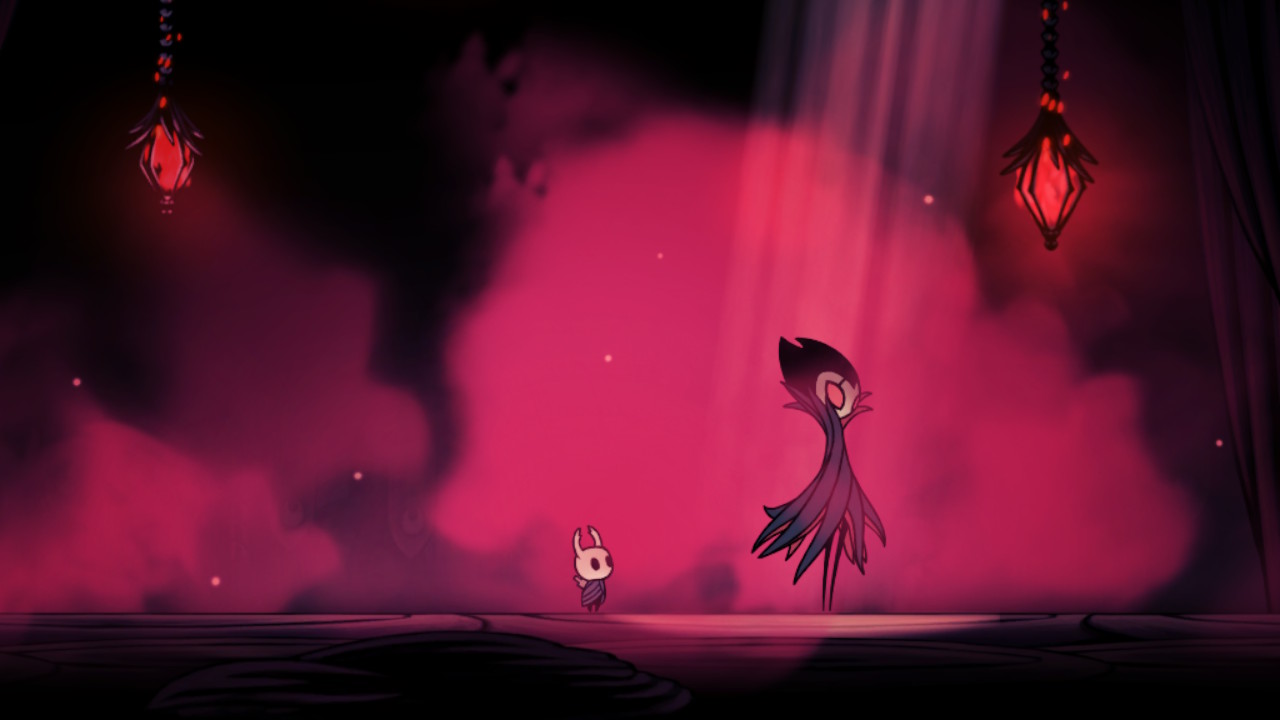
Grimm appears in a flash of crimson light and smoke as the Knight enters the main tent. The Troupe Master is aware that the Knight called them via the Lantern and invites the Knight to join them in their Ritual. He then offers the Grimmchild Charm to the Knight and orders them to collect the Nightmare Flames.
For the Grimmchild to develop, Grimm has the Grimmchild swallow each pair of three Nightmare Flames that the Knight acquires. Grimm will ultimately test the Knight’s might as a boss after the second set in a dramatic, theatrical encounter. According to Grimm, this prepares the Knights to meet with the Nightmare King.
The Knight can find each of these Flames after equipping the Grimmchild Charm. The Grimmchild will follow the Knight around and assist in inflicting damage to foes if equipped. The Knight can access the locations of the first set of three Flames on the map if the Grimmchild Charm is equipped. On the map, a flame icon shows their location.
Grimmkins are carrying each of these Flames. These Grimmkins are violent spirits that will laugh, erupt in flames, and hover around the Knight. The Knight has to defeat them to reclaim the flames on their torches.
Nightmare Flames: Grimmkin Novices
To gain the first set of Flames, the Knight must defeat the Grimmkin Novices. The Knight can discover them in the locations listed below:
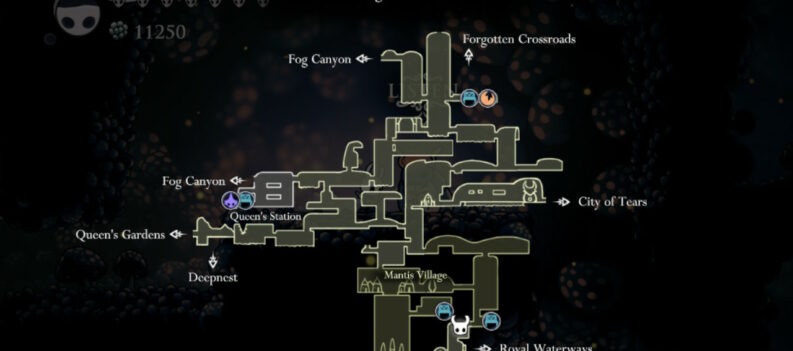
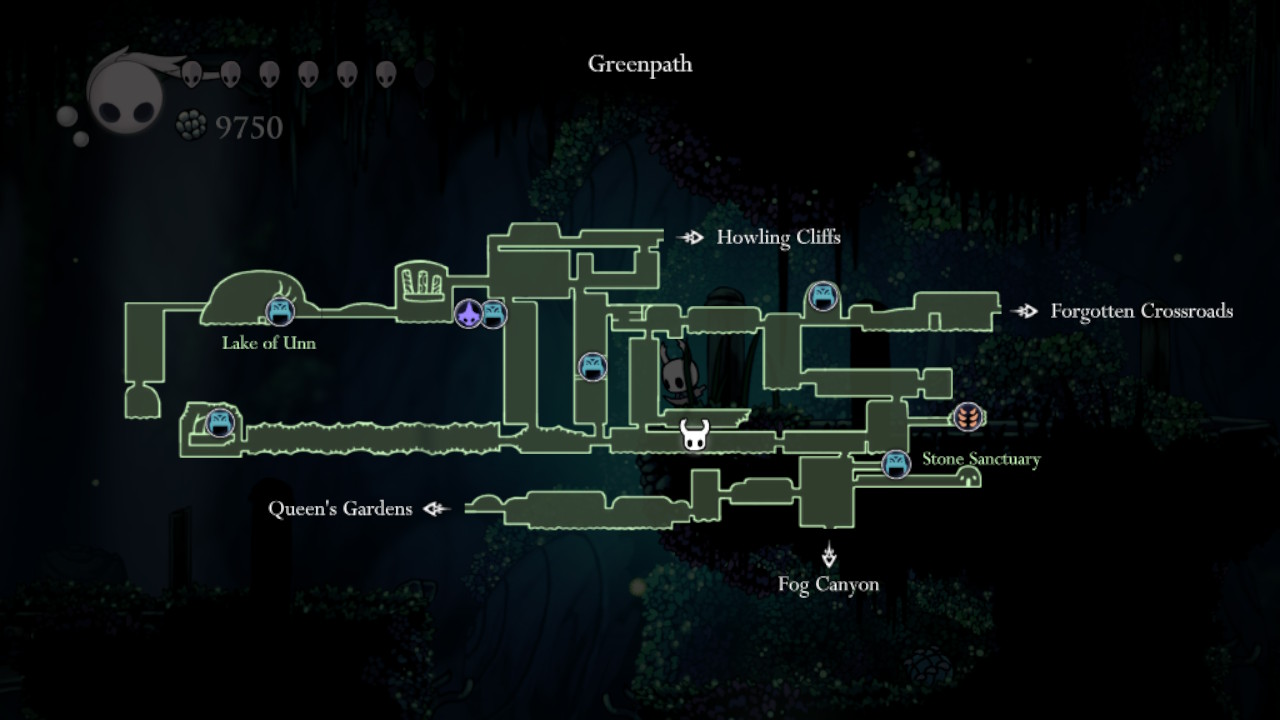
- On the Greenpath map’s lower left, near the center.
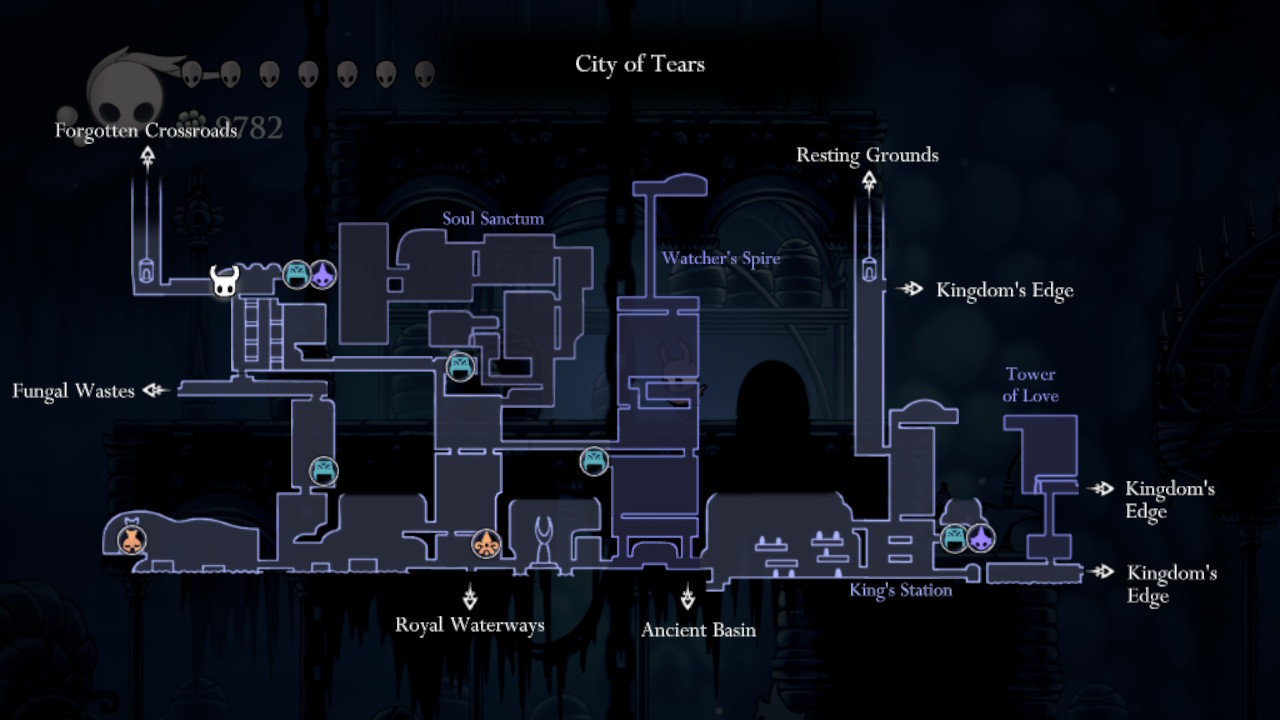
- In the northwest corner of the City of Tears, just west of the City Storerooms Stag Station.
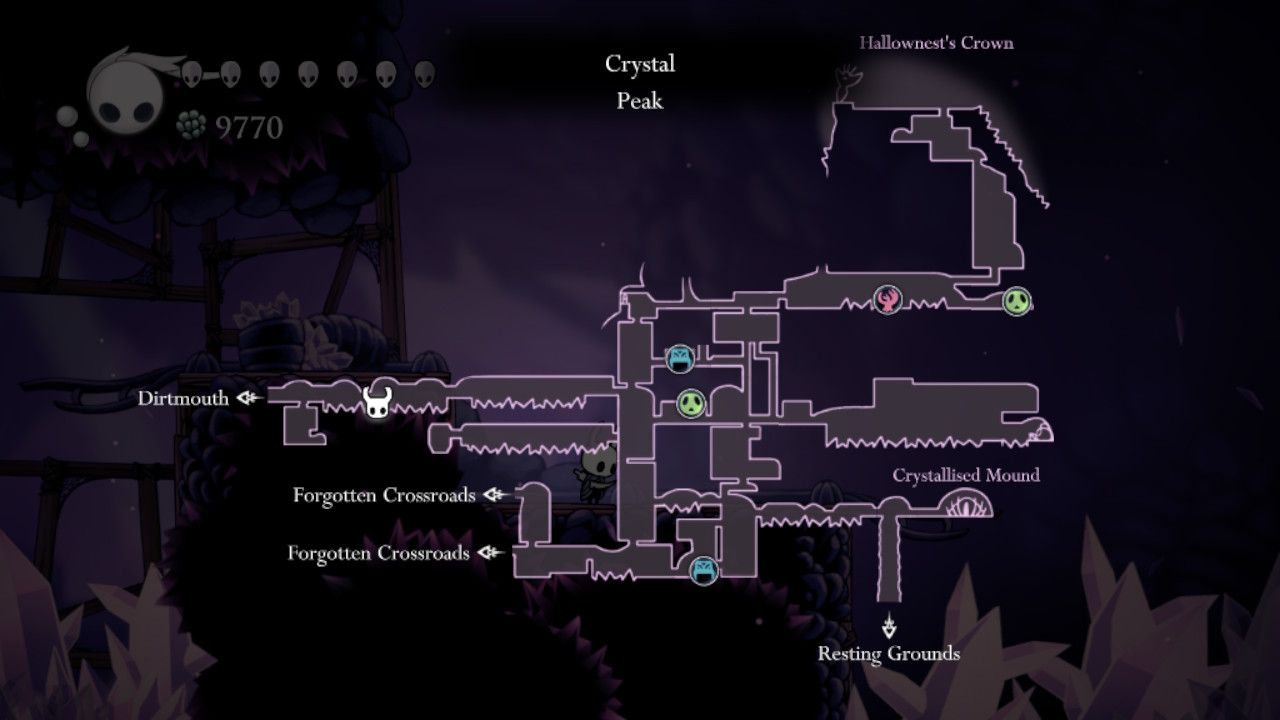
- Near the western part of Crystal Peak, near the center of the path to Dirtmouth.
Go back to Grimm in Dirtmouth after eliminating all three Grimmkin Novices. Grimm will then upgrade the Grimmchild and tell the Knight to obtain three more Flames.
Nightmare Flames: Grimmkin Masters
For the second set of Flames, the Knight must defeat the Grimmkin Masters. The Knight can encounter them in these locations:
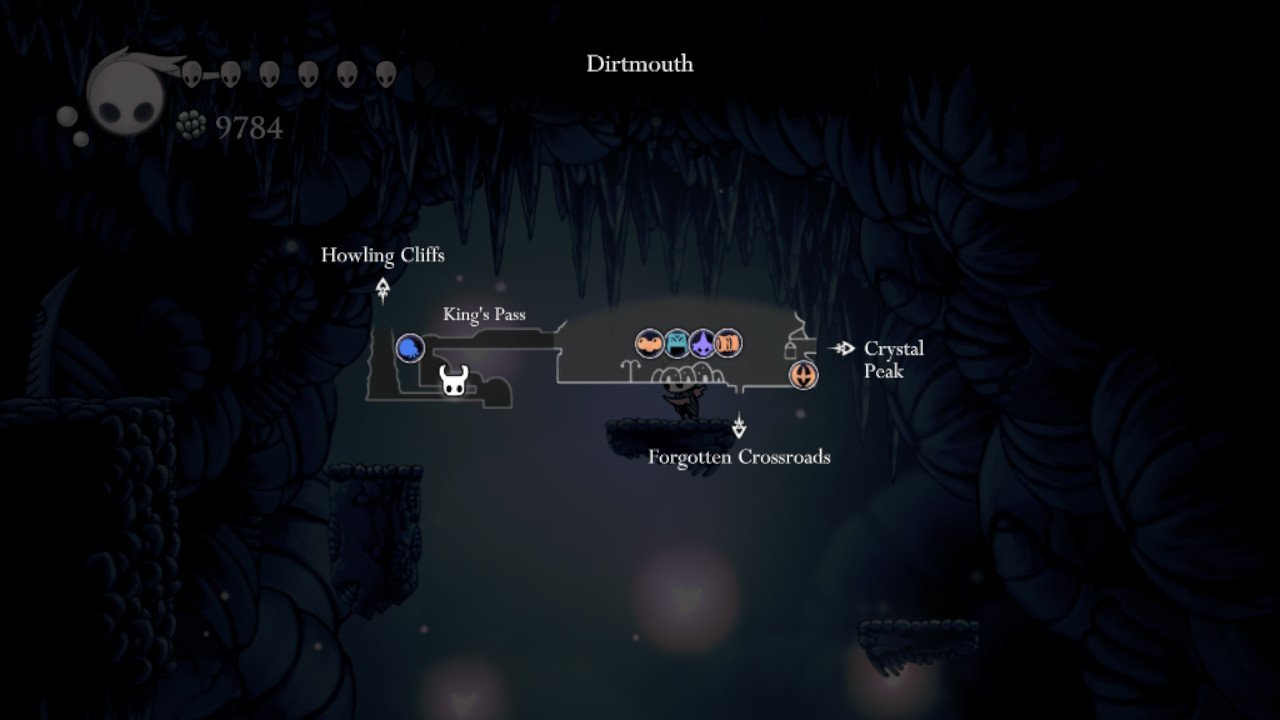
- West of Dirtmouth, in the center of King’s Pass.
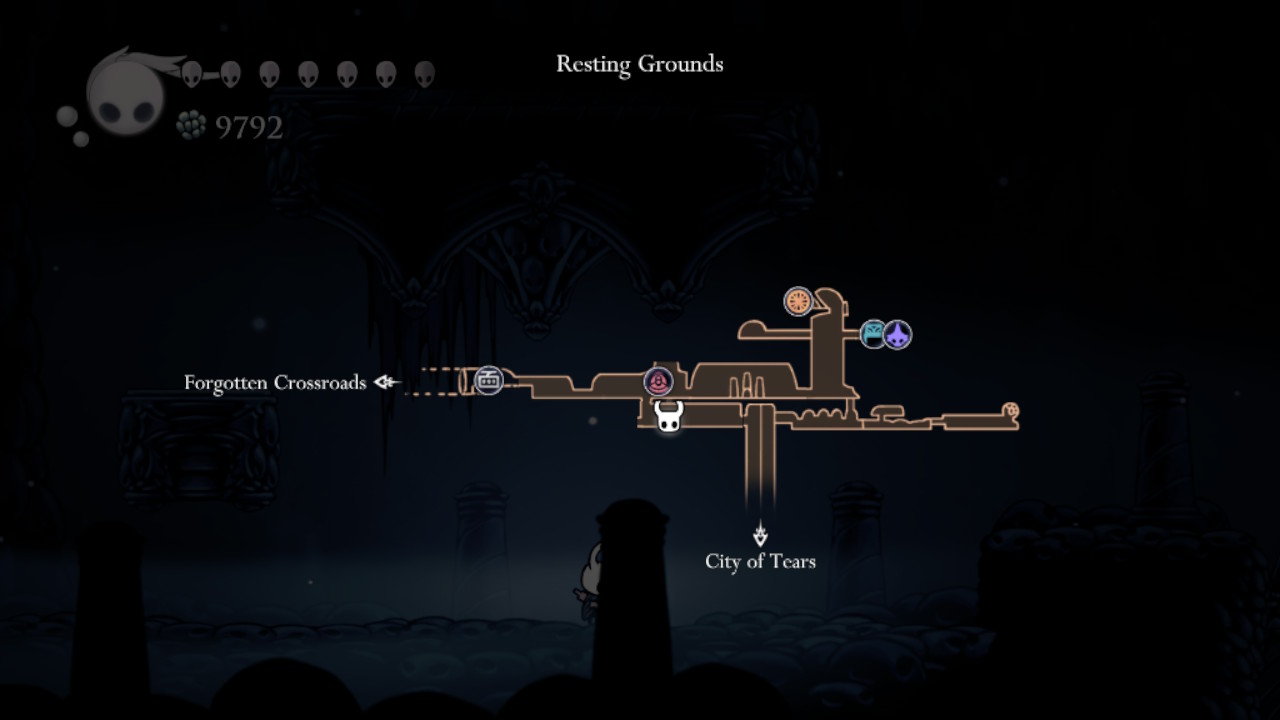
- In the middle of the Resting Grounds.
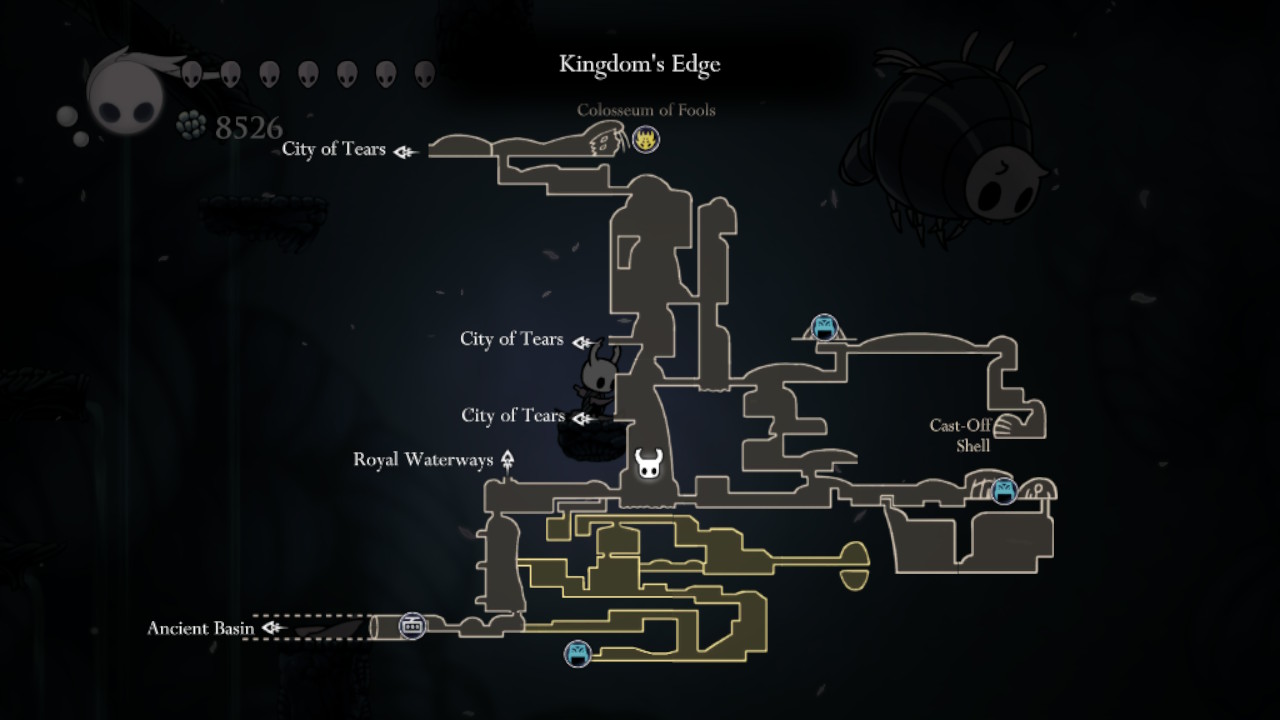
- The bottom section of the central cliff of Kingdom’s Edge.
After defeating all three Grimmkin Masters and gathering the Flames, the Knight can finally face Troupe Master Grimm!
How to Defeat Grimm
The Knight must return to The Grimm Troupe’s main tent in Dirtmouth to find Grimm.
Moves
- Teleport – Grimm will disappear and re-emerge at random throughout the room. Grimm will then follow this with an attack.
- Skitter – If Grimm appears too near the Knight on the ground, and will flee on all fours. Grimm will then follow this with an attack. Grimm may do a ground attack, Skitter, and another ground attack. However, these are uncommon.
- Fire Bats – This boss will unzip his cloak and unleash three Fire Bats on the Knight. The Fire Bats will continue to pursue the Knight. During this attack, Grimm will remain stationary. If the Knight gets within range of Grimm before he launches three Fire Bats, Grimm will teleport to another spot in the arena to launch one more Fire Bat. This Fire Bat can’t be stopped. This implies Grimm may only be able to release one Fire Bat.
- Dive Dash – Grimm will disappear and reappear in the air, disguising himself as a drill and diving for the Knight. He will then land and run to the Knight, his cloak acting as a lance. Grimm will follow the Knight’s position for the first few seconds of the dive. The dive can span the entire arena.
- Dash Uppercut – Grimm will dash through the arena, striking. This boss will then leap into the air and land an uppercut. Grimm will teleport from the uppercut’s peak and shoot five fireballs in an arc downward.
- Cloak Spikes – Tall, thin spikes grow from the ground when Grimm throws his cloak onto the ground. With gaps in between, these spikes will extend to the arena’s ceiling. The spikes are harmless until they reach full height and last around a half-second.
- Pufferfish – Grimm will wrap his cloak over himself before releasing small fireballs throughout the arena. When Grimm’s health hits 75%, 50%, and 25%, he will unleash this strike in the center of the room. The fireballs move in five directions, generally in two groups, and follow the Knight. Grimm fires twelve fireballs, with the fourth batch dropping to the ground. The Knight can not utilize some strikes on Grimm during this attack. Grimm also will not be staggered while doing this move.
Strategy
Grimm teleports and rarely stays in one area for long. Therefore, it’s better to deal as much damage to him as quickly as allowed.
At the start of the fight, Grimm will bow before attacking. If the Knight strikes Grimm during this, Grimm will immediately start the Pufferfish attack right after. The Knight may evade most of Grimm’s Pufferfish attack’s flames by remaining on the right or left edge of the screen and jumping slightly.
The Knight can attack Grimm after double jumping and dashing over the Fire Bats.
It is advised that the Knight uses Focus to heal during Grimm’s Cloak Spikes attack. The Quick Focus Charm can help speed up the healing.
The Knight can evade the Dive Dash and Dash Uppercut attacks using the Shade Cloak ability to dash through the attacks. If the Knight also has the Sharp Shadow Charm equipped, the Knight can dash through Grimm while also dealing damage.
When the Dash Uppercut attack’s five projectiles are shot, they form a cone shape. As a result, when Grimm bursts into fire during this attack, the Knight should stand close to him. This is also a chance to heal, especially if the Knight is equipped with the Quick Focus Charm.
The Knight can use each of the Spells in the game against Grimm. The Knight can use the Vengeful Spirit and Shade Soul Spell while Grimm executes the Fire Bats, Cloak Spikes, and Pufferfish attacks. Also, the Knight may perform the Desolate Dive and Descending Dark Spell as soon as Grimm prepares for the Dive Dash attack. This is so that Grimm dives right into the middle of the spell.
The Knight can also utilize these spells to avoid the Dive Dash attack because it grants the Knight temporary invulnerability. Furthermore, the Knight can use the Howling Wraiths and Abyss Shriek Spells before Grimm’s fireballs emerge during the Pufferfish attack. Because Grimm is taller than the Knight, the Knight can utilize these spells while the Grimm uses the Cloak Spikes attack.
Against Grimm, the Knight can also use Nail Art. The Great Slash and Dash Slash Nail Arts deal 2.5 times as much as the regular Nail damage. Furthermore, these Nail Arts allow a good range to deal damage to Grimm while avoiding danger, particularly during the Cloak Spikes, Dash Uppercut, and Fire Bats attacks.
After taking enough damage, Grimm will stagger for 3.5 seconds. Grimm will scatter as a swarm of bats that imitate the Grimmchild during this period. Grimm is the red-eyed bat in this swarm. Even if hitting Grimm in this form does not remove the stagger, the damage cap is set at 50. The bats return to Grimm after this stagger.
When battling Grimm, the Shape of Unn Charm is extremely useful for healing. It reduces the hitbox of the Knight, enabling them to heal easily while Grimm performs the Fire Bats attack. When coupled with the Quick Focus Charm, this charm allows the Knight to dash while healing if Grimm uses the Dash Uppercut or Cloak Spikes attacks.
With the Shaman Stone Charm equipped, the Knight can repeatedly cast the Abyss Shriek Spell to deal massive damage and quickly deplete Grimm’s health. In this case, the Grubsong Charm is useful as it provides the Knight more Soul to use for casting the Abyss Shriek spell every time the Knight gets damaged.
The Knight can also use this with the Grubberfly’s Elegy Charm to gain more Soul. Remember that Grimm can use the Pufferfish attack numerous times in a row. As a result, if the Knight lacks enough Soul to decrease Grimm’s HP, the Knight will find it difficult to attack or heal in between.
After defeating Grimm, the player will receive a Charm Notch and the Grand Performance Achievement!
Conclusion
In Hollow Knight, defeating Grimm requires patience, precision, and perseverance. The keys to success are anticipating his moves, avoiding quick attacks, and finding openings to strike back. Dodging and countering will be invaluable in this challenging battle.
As we continue to perfect our talents and adjust to his continuous assault, we earn the confidence to emerge triumphant. With effort and perseverance, we can conquer the Troupe Master. So, courageous adventurer, take heart and let the dance of blades and shadows guide you to victory over Grimm, establishing yourself as a true hero of Hollow Knight’s frightening land.