In the magical world of Hollow Knight, players embark on an exciting journey full of mystery, danger, and heartwarming encounters. In this dark and forgotten kingdom of Hallownest, there’s a special mission—to save Bretta, a distressed and lovable character in need of rescue.
Throughout this thrilling adventure, the Knight will face tough challenges. Additionally, the Knight will uncover the secrets of this world while trying to free Bretta from her unique situation. This guide will discuss how to save Bretta in Hollow Knight. Let’s explore the strategies and paths that lead to Bretta’s rescue. We will guide the brave Knight through a memorable journey of bravery, kindness, and victory.
Bretta
Bretta is one of the NPCs the Knight meets in Hollow Knight. She is a beetle from Dirtmouth who has become lost somewhere in Hallownest. Because of that, she is waiting for someone to save her.
According to in-game lore, Bretta will grow to have feelings for the Knight after the Knight saves her. During this, if the Knight sits next to her on the Bench for a while, she will blush. Also, the Knight can find a couple of sketches and dolls of the Knight inside her Dirtmouth home.
Also, the Knight will find a diary in which she talks about the Knight. If Zote is rescued and eliminated in the Colosseum of Fools, he will appear in Dirtmouth. There, he falls in love with Bretta. The dolls and drawings of the Knight that Bretta has in her house will then be swapped for a single painting of Zote.
How to Save Bretta in Hollow Knight
To save Bretta, the Knight must free her from the area she is trapped in. Freeing Bretta is easy. The challenging part is finding Bretta.
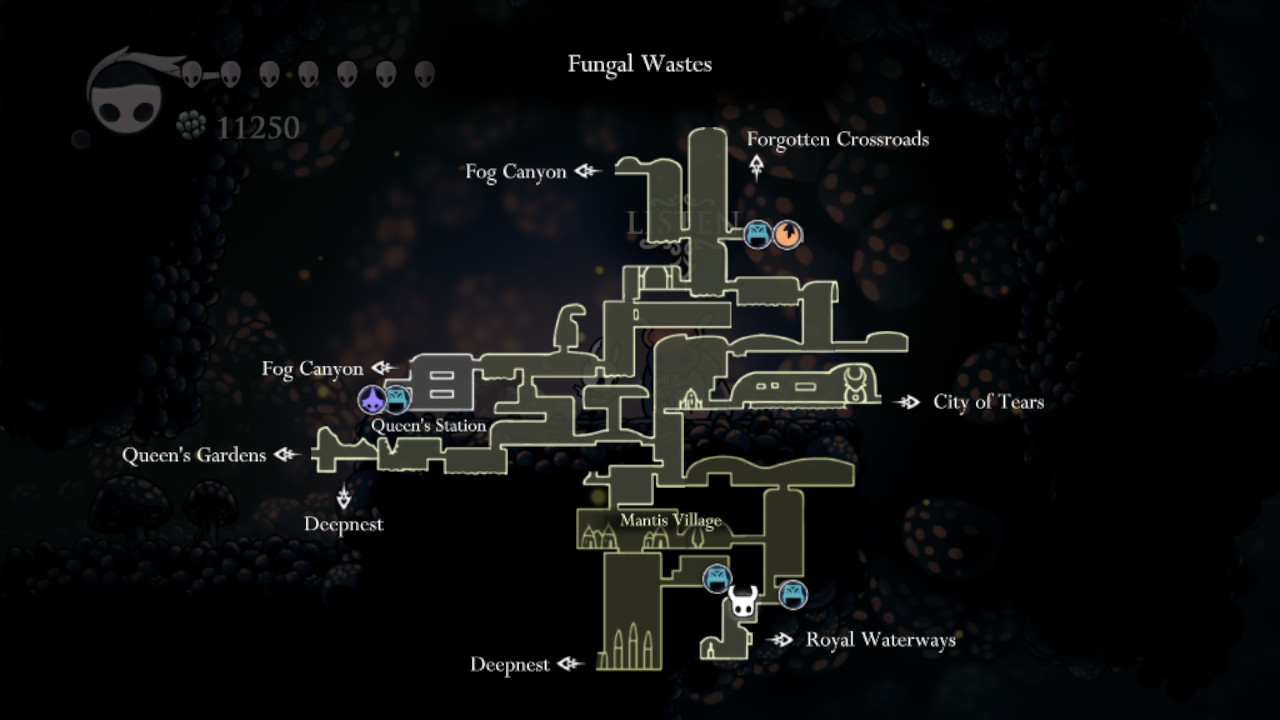
The Knight can find Bretta stuck at the end of a maze. This maze is in the southeasternmost section of the Mantis Village. This sub-area is in the bottom part of the Fungal Wastes area.
Requirements
To find and save Bretta, the Knight must first have a couple of specific abilities. The first necessary ability is the Mothwing Cloak ability. This ability lets the Knight execute a straight dash forward. The Monarch Wings ability is also required. This enables the Knight to do an additional jump while in the air. The last requirement is the Mantis Claw ability. This ability permits the Knight to cling to and jump off vertical surfaces.
Enemies
The Knight will encounter various creatures in the Fungal Wastes and the Mantis Village. The Knight will encounter the following enemies on the way to Bretta’s location: Mantis Youths, Mantis Warriors, Shrumal Warriors, Shrumelings, and a Sporg.
Finding Bretta after defeating the optional boss in the Mantis Village, the Mantis Lords, will become way easier. This is because every Mantis Youths and Warriors will turn friendly to the Knight and only attack if provoked.
Path to Bretta
The Knight must do the following to find Bretta in the Fungal Wastes:
- Begin at the center of the Mantis Village’s main area (the room labeled “Mantis Village” on the map). The Knight will encounter a Mantis Youth to the right. Using the Mantis Claw or Monarch Wings abilities, go up the high platform above the acid pool. Continue to the right, fall down the gap, and then continue to the next platform. Continue to the right until you reach the exit.
- The Knight will encounter a Mantis Warrior in the following room. Continue to the right until the Knight encounters another Mantis Youth. Drop down the gap, then to the bottom of the shaft, then to the left. Leap across the gap where a Mantis Warrior is below. Go to the left, fall down the gap, and follow the path below using the little platform (beware of the acid pool). Take the bottom right exit. It’s worth mentioning that the Knight may heal and save the game on the Bench on the other side of the exit.
- Afterward, go to the left, head down the left gap, and drop down to the right. Fall the left gap, proceed to the left while descending on the platforms, and finally head down utilizing the small platforms. Then, walk to the right and down the platforms to reach the bottom. Go to the left, where there is a statue at the bottom where the Knight can get the Dashmaster Charm.
- Next, go to the wall on the left, where a hidden small path is located at the bottom left. Continue to the left on the hidden path, where the Knight will come across two Shrumal Warriors and a slew of Shrumelings. Continue to the room’s left wall and climb up the wall on the left.
Double jump to the right at the top using the Monarch Wings ability to reach the wall on the left above. Climb up this shaft, then jump to the platform above on the right, where there is a Sporg. - Following that, jump to the right wall and climb it. At the top, jump and dash to the wall on the left and climb it. Jump to the platform on the right above.
- Then, move to the right and dash between the two spikes to reach the right wall. Slide down the shaft while clinging to the right wall and dash for the left wall before hitting the spikes. Continue down the shaft while clinging to the left wall and dash back to the right wall before hitting the spikes.
- Continue sliding down the shaft while clinging to the right side and dash again for the left wall before hitting the spikes. Slide down the shaft while clinging to the left wall, then dash to the platform on the right before hitting the spikes at the bottom.
- After that, go to the right and jump to the slightly raised platform. Before hitting the spikes above, climb up the right wall and jump to the safe spot on the wall to the left of the shaft. Climb the shaft to the safe spot on the right wall above the spikes, then jump to the wall on the left before reaching the spikes.
- Continue ascending the shaft, then jump to the safe spot on the right wall before reaching the spikes. Climb the shaft, then jump to the thin platform on the right above.
- Then, cling to the left wall while dropping down a small shaft on the right. Dash to the right platform before reaching the spikes at the bottom of the shaft.
- Finally, turn right and climb the slightly elevated platform. The Knight will locate Bretta there!
Saving Bretta
When the Knight finds her, speak with Bretta, and she’ll say she has no idea how she ended up there. She’ll be amazed that the Knight wanted to save her when everyone else ignores her. After speaking with Bretta, proceed to the right, where the ground at the end of the path will break, allowing the Knight to depart the maze safely.
After that, the Knight can claim his reward back up in Dirtmouth. The Knight can now enter Bretta’s house, the rightmost residence. When the Knight visits Bretta’s house, the Knight will receive a Mask Shard! Mask Shards are needed to boost the Knight’s health Masks. The Knight has to gather four Mask Shards to make one Ancient Mask. After completing one Ancient Mask, the Knight’s health will increase by one Mask.
Conclusion
In the end, saving Bretta in Hollow Knight is a rewarding accomplishment. By following the steps and strategies we’ve explored, players can successfully navigate the challenges of Hallownest and provide the help Bretta needs.
This quest is about showing kindness, determination, and resourcefulness. As you free Bretta from her predicament, you achieve a personal victory and contribute to the heartwarming tapestry of the game’s world. This, then, makes saving Bretta a very satisfying endeavor.