Stairway Games’ Coral Island is a tropical farming simulation game that strives to stand out from the crowd by emphasizing diversity and inclusivity. It also includes activities such as exploration, underwater diving, and pollution cleanup to help revitalize Coral Island and eventually deal with the imminent danger of Pufferfish Drilling Corporation and a lot more. In the game, the player can catch different types of fish. Some types of fish are harder to find and catch than others. This guide will walk you through how to catch Yellow Moray Eels on Coral Island. Mastering the art of fishing, understanding their habitats, and using precise techniques are key to reeling in these elusive eels. Pursuing Yellow Moray Eels amid abundant marine life guarantees a thrilling fishing adventure and the satisfaction of collecting these captivating creatures in all splendor.
How to Catch Yellow Moray Eels
The player must first be in the right environmental conditions to catch Yellow Moray Eels, as with the game’s other fishes, foragables, and crops. The player must be in the right location, season, dates, weather, and even the right time of day. For the Yellow Moray Eels, these environmental conditions are the following:
Location
The player must head to the ocean (beach) area to catch a Yellow Moray Eel. This area is situated on the south to the southeastern part of the map. The Diving Pier, one of the many piers on Coral Island, divides the beach into two. The player can find the Coral Inn on the northern side of the Diving Pier. On the left side, the player can find the Lookout area.
The player can travel to the Diving Pier Waypoint to get to the area quickly. This is in the Diving Pier area, dividing the middle of the beach. Because of that, this is the nearest Waypoint to the Ocean (Beach) area. Alternatively, the player can also fast-travel to the Beach Waypoint. The player can find this on the northeastern part of the beach near the Abandoned Villa.
It is important to mention that although the Waypoints are available right at the start, the player cannot use them for fast traveling right away. After completing the “Temple Offering” main quest, the player can unlock the fast-traveling function. However, doing so will only unlock a couple of Waypoints.
The player must activate a solar orb in the ocean to unlock the Diving Pier Waypoint. As for the Beach Waypoint, the player must first catch 50 fish using a fishing pole. The caught fishes are not required to be different from each other.
It is also worth noting that the game temporarily disables some waypoints while certain festivals occur. If the waypoints are blocked, such as because of a chest or trap, the player cannot teleport to them.
Season and Dates
The player will only be able to catch Yellow Moray Eels during the game’s spring and summer seasons. However, during these seasons, the player can only fish for Yellow Moray Eels on the 15th to 28th days of the Spring and Summer seasons.
In Coral Island, Spring is the first season the player will experience. The weather warms up during the Spring season, and greenery appears. This season is after the Winter season and before the Summer season.
As for the Summer season, this is the second season the player will experience in Coral Island. Once the Summer season begins, the majority of the spring crops will have withered, and a new crop stock will be available for the player. Also, there are new items for the player to scavenge during this season. The Summer season is after the Spring season and before the Fall season.
Weather
Fortunately, the player can find and fish for Yellow Moray Eels during any weather in the game. This is as long as all the other environmental conditions are met. The player can fish for Yellow Moray Eels during Sunny, Windy, Stormy, Snowy, and Rainy weather.
Time of Day
When trying to catch Yellow Moray Eels, the player must try to fish for them during the Evening and Night. The evening hours are from 4:00 PM to 5:50 PM (or 16:00 to 17:50 if using the 24-hour format). On the other hand, the night hours are from 6:00 PM to 1:50 AM (or 18:00 to 01:50 if using the 24-hour format).
The game divides the times of the day into four to indicate the appearances of fishes. These times are the morning, the afternoon, the evening, and the night. The player can find these times on the Sturdy Computer once the player researches the Fishing Component. It is important to reiterate that these four divisions of the day are for the appearance of fish only.
The day is divided into two, including when insects and sea creatures appear. These are the Daytime, which is from 6:00 AM to 5:50 PM (or 06:00 to 17:50 if using the 24-hour format), and the Nighttime, which is from 6:00 PM to 11:50 PM (or 18:00 to 23:50 if using the 24-hour format).
How to Change the Time Speed
By default, the time in Coral Island ticks at a speed of one in-game hour per 45 real-world seconds. With the default settings, one whole, 24-hour, in-game day equals 1,080 seconds or 18 minutes in the real world.
In Coral Island, the player can change the speed at which the time passes. To do that, the player must do the following:
- First, the player must select the ‘Settings’ option in the pause menu. This is below the ‘Feedback’ and ‘Return to Title’ options.
- After that, in the Settings screen, the player must head to the ‘Game’ tab at the top. This is the leftmost tab on top of the screen.
- Next, on the ‘Game’ tab, the player must navigate to the ‘Game Time Speed’ function. This is below the ‘Allow Usage Tracking’ function and the ‘Display Quest HUD’ function.
- The player can then set their desired rate on the right side of the ‘Game Time Speed’ function. The lowest setting of the function is 50%, and the highest setting is 100%.
If the ‘Game Time Speed’ function is set to 50%, the time in the game will go slower. One in-game hour will become equal to 67.5 seconds in the real world instead of only 45 seconds by default. This means that one whole, 24-hour, in-game day will last for 1620 seconds or 27 minutes in the real world.
With this function, the player will have more time to do things in one in-game day. With that, the player will have more time to try and fish for Yellow Moray Eels.
Fishing Guide
Now that the player knows the conditions to catch Yellow Moray Eels, it is time to fish for one! To catch Yellow Moray Eels, the player must know how to fish.
The player will be able to fish from most of the bodies of water in the game. This includes the ocean, the rivers, the lakes, and ponds. Casting the other end of the line used to catch fish into a body of water is the most basic method of fishing.
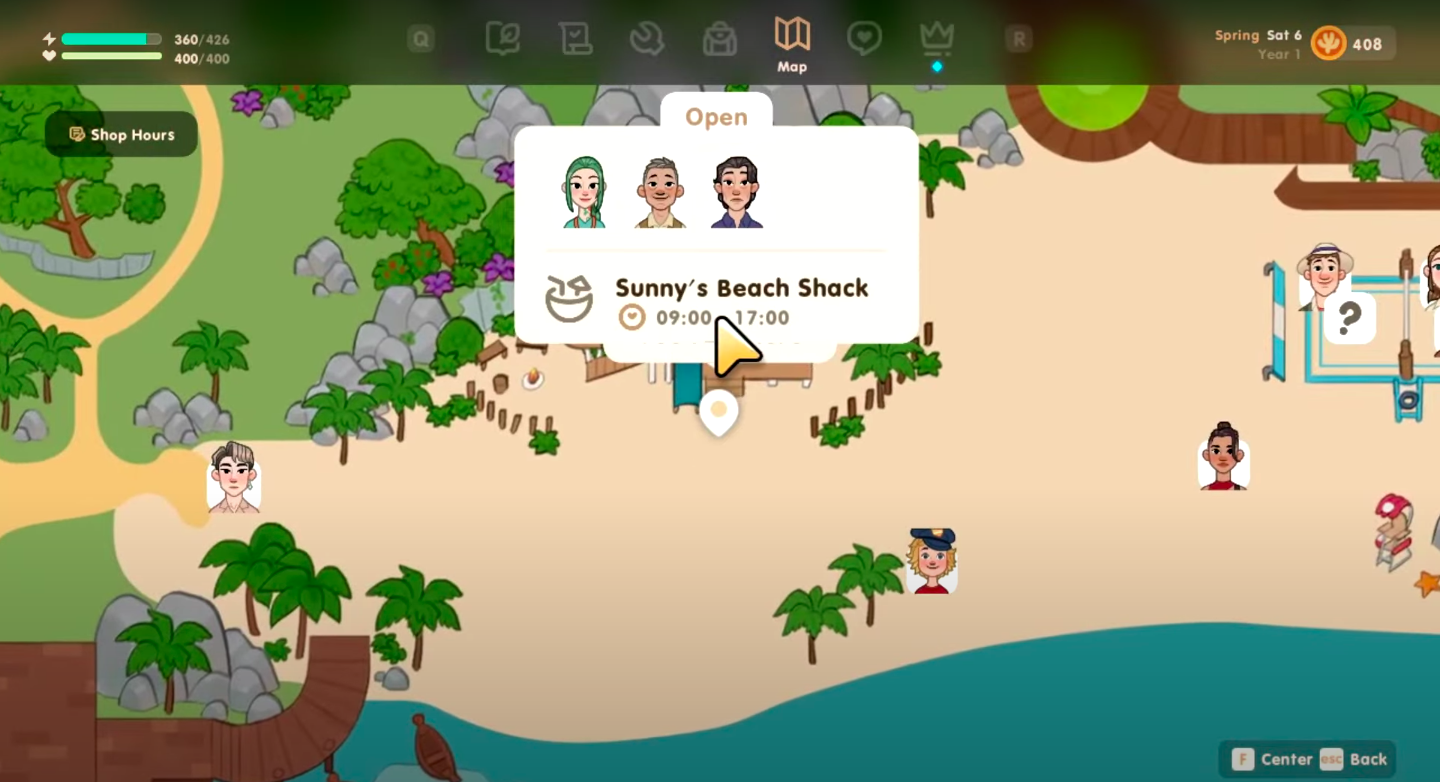
The only requirement to fish in the game is a fishing pole. The “Visit the Beach Shack” main quest will grant the player a free fishing pole. The player can then upgrade their fishing pole at Sunny’s Beach Shack. This is located near the beach in the southeastern part of the map.
The better the fishing pole is, the more durable it is. Better fishing poles have better maximum cast length, maximum tension, tension recovery, tension strength, and reeling speed. Also, better fishing poles enable the player to catch rarer, more difficult fish.
The player does not have to attach bait to the fishing pole in the game. However, attaching bait boosts the player’s chances of catching different sizes of fish. There are three kinds of bait in the game, each with its effects: Small fish bait, Medium fish bait, and Large fish bait. The player can craft bait or buy them from the Beach Shack.
As the player levels up their catching mastery, their fishing proficiency improves. Leveling up also grants the player access to new crafting recipes and points to spend on new skills. The player can go up a total of 10 levels. For that, the player can improve their fishing mastery by catching fish in different bodies of water. The difficulty of the fish caught determines the amount of experience the player gains.
The more difficult the species to capture, the more experience points it provides. The quality of the fish is also a plus. The more advanced the player’s fishing level is, the less energy it takes for the player to use the fishing pole. The player can also use consumables that give a fishing proficiency buff to lower the stamina cost when using the fishing pole briefly.
How to Fish
To fish in Coral Island, the player must do the following:
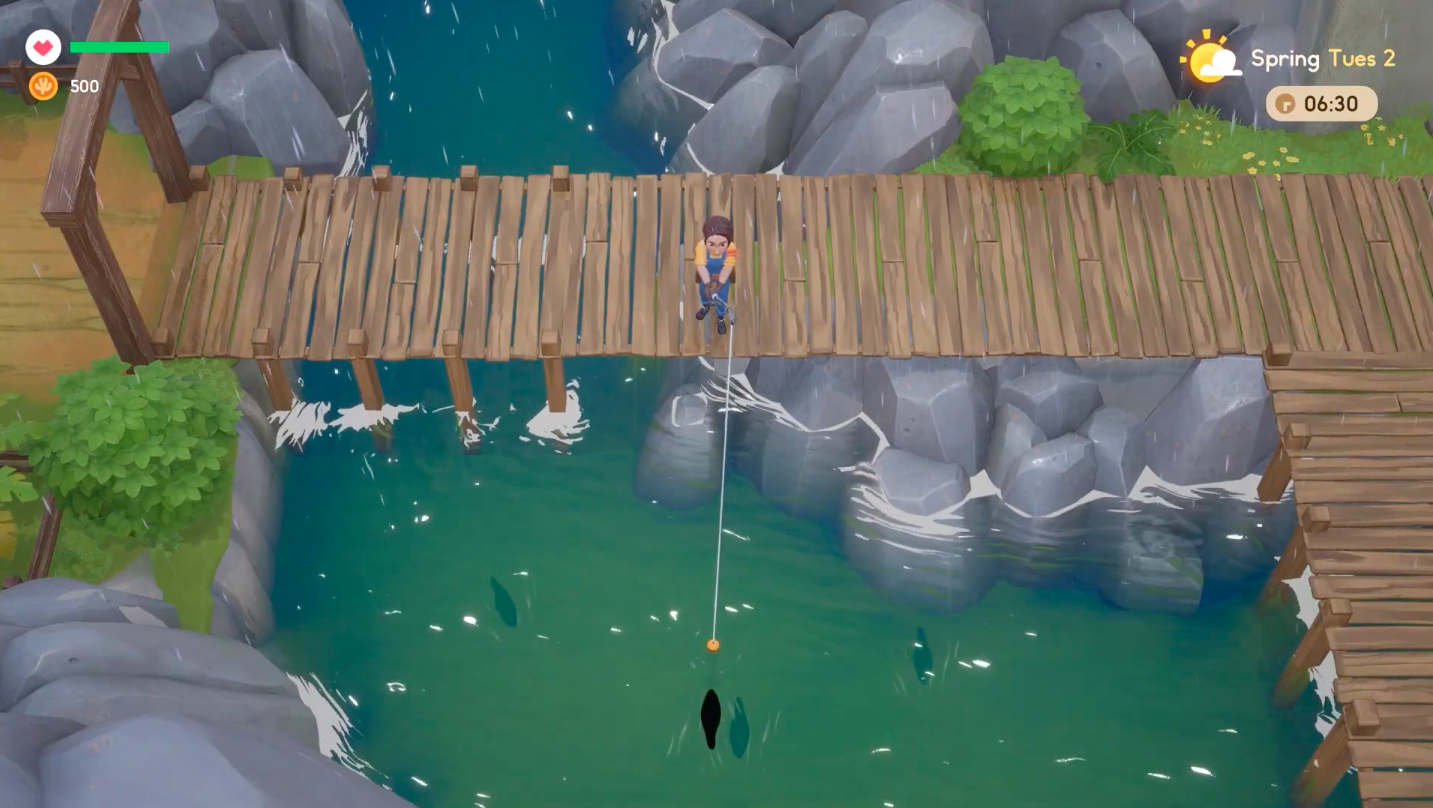
- First, the player must head to a body of water. As mentioned above, the player must head to the Ocean (Beach) area in the southeastern or southern part of the map for the Yellow Moray Eels.
- Following that, once in the desired area, the player must select the fishing pole in the hotbar. Here, the player must press and hold the right mouse button and then release it to use it. The casting gauge fills as the player holds down the right mouse button. Once that is done, the player will throw the fishing line into the water. Once the player releases, a greater cast number will result in a greater distance that the bobber will reach. The length of the cast affects the player’s chances of catching rarer fish and, sadly, trash.
- Next, after the player throws the cast, the player must wait until a shadow of a fish tries to interact with the bobber. Should a shadow of a fish not appear within around five seconds, the player might want to relocate to another spot in the area or attempt to cast again but at a distance. After a shadow of a fish appears, the player must now wait for the fish to bite the cast.
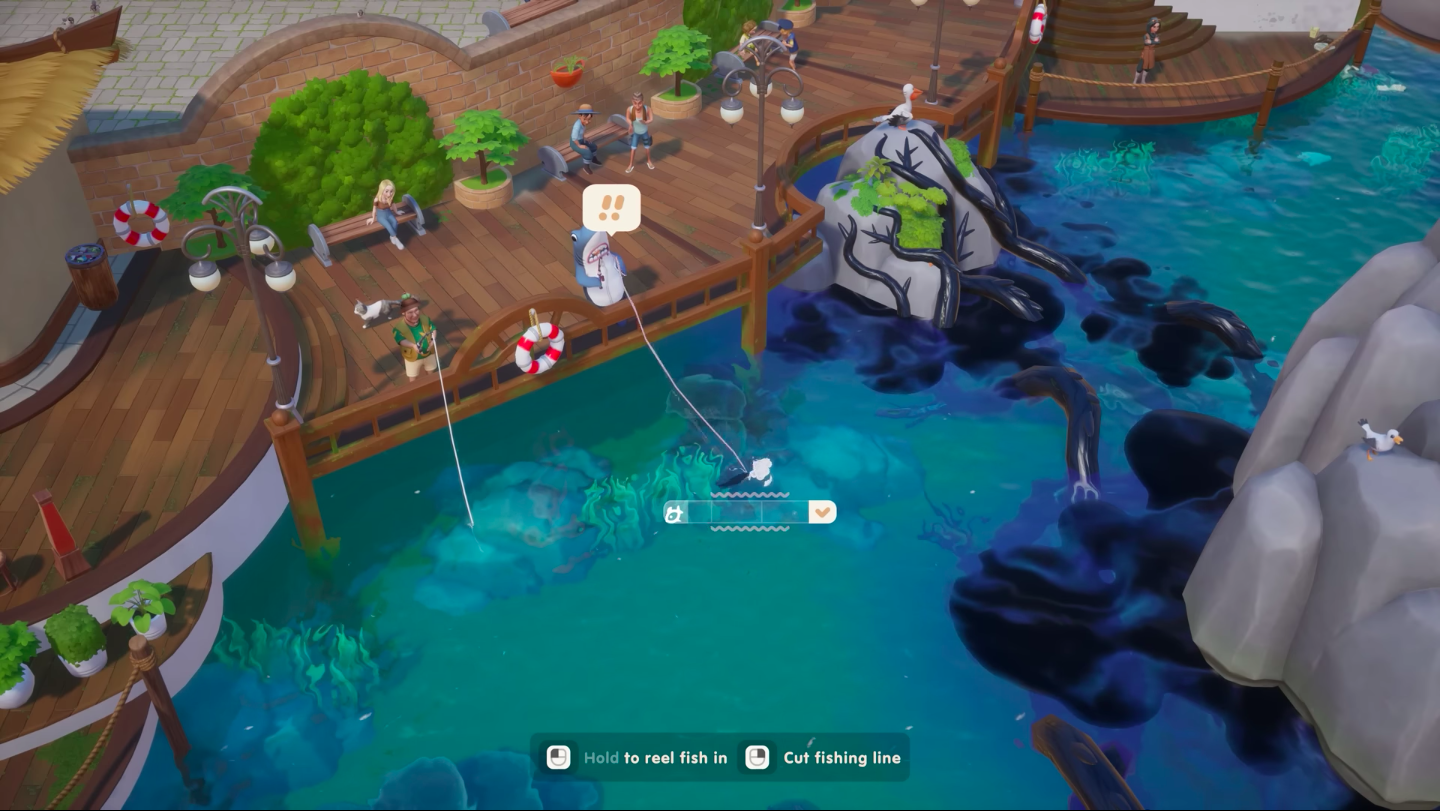
- After that, once the fish bites, the fishing mini-game will begin! Here, the player must reel the fish in to prevent the tension from going too high. If that happens, the line will break and cause the fish to escape. The player must press, hold, or tap the left mouse button to reel the fish. While reeling, a tension zigzag around the fishing meter will appear, which shows how near the line is to breaking. To keep the tension low, the player should reel in the fish when it is not wiggling. The player can do this by pressing and holding the left mouse button, releasing the button to release some tension, and then pressing and holding again. Continue doing this until the fish meter is filled. The rarer the fish is, the longer it will take to reel the fish in. As the Yellow Moray Eel is a Legendary rarity fish, it will take some time to reel it in.
- Then, after successfully reeling in the fish, the player will catch the fish! Here, the player will see the fish’s species and size. The player will then put the fish in their inventory.
Related: Does Coral Island Have Multiplayer? – Answered
Yellow Moray Eel
In Coral Island, the Yellow Moray Eel differs from many fishes as it opens and closes its mouth to breathe. The Yellow Moray Eel is a Large fish with a Straight swimming pattern and is a Legendary rarity. This rarity is the rarest category in Coral Island. Because of that, its difficulty rating is also classified as Hard. If a Yellow Moray Eel bites the player’s casted line, the player will have an exceptionally hard time trying to reel it in.
As the Yellow Moray Eel is a ‘Legendary’ fish, which is the maximum rarity in the game, it would help if the player used bait when trying to catch one. This fish is classified as ‘Large,’ the best bait for catching a Yellow Moray Eel is the Large Fish Bait. This bait allows the player to get a large fish by an additional 25%.
The player will be able to unlock the Large fish bait once the player has reached Fishing level 8. To craft two pieces of Large fish bait, the player must have at least two pieces of Seaweed and at least one of any small fish. Since the Yellow Moray Eel is so difficult to catch, the player should make the task as simple as possible.
Uses
In Coral Island, the player can use the Yellow Moray Eel differently. Among these are to sell it, cook it, breed it, offer it to Lake Temple, give it to other characters, or donate it to the museum.
Sell Them
As mentioned, the player can sell some Yellow Moray Eel for Coral Coins. The Coral Coins earned for selling a Yellow Moray Eel depend on the quality of the fish. The following are the selling prices of the Yellow Moray Eel based on the quality: a regular quality Yellow Moray Eel sells for 745 Coral Coins, a Bronze quality sells for 857 Coral Coins, a Silver quality sells for 969 Coral Coins, a Gold quality sells for 1118 Coral Coins, and an Osmium quality sells for 1490 Coral Coins.
The quantity of beacons that the player has activated and the quantity of corals that the player has healed determine the quality of fish that the player can catch. This means that the more activated beacons and healed corals, the higher the quality of fish the player can catch. The Fishing skill tree’s Quality Fish skill additionally gives the player a 10% chance of improving the quality of any fish the player catches to the next level.
Another skill that affects the selling price of the Yellow Moray Eel and other fish is the Fish Price skill. This skill increases the value when selling any type of fish by 25%. Suppose the player has the Fish Price skill. In that case, it will change the selling price of the Yellow Moray Eel to the following: a regular quality Yellow Moray Eel will then sell for 931 Coral Coins, a bronze quality will then sell for 1071 Coral Coins, a silver quality will then sell for 1211 Coral Coins, a gold quality will then sell for 1397 Coral Coins, and an osmium quality will then sell for 1863 Coral Coins.
The player may sell items through the shipping bin on the player’s farm or directly to shops, which the player can find around the town. It makes no distinction between the money earned for selling items to a shop and selling items through the shipping bin. However, it is important to note that shops usually only buy specific items. Furthermore, the player only gets the money for selling items using the shipping bin at the end of the day. This occurs once the player has gone to bed and slept.
Cook Them
One of the ways that the player can use the Yellow Moray Eel is to cook it into different dishes. The player can add Yellow Moray Eel as an ingredient to make the following dishes: a Fish Sandwich, a Fish Soup, a Fish Taco, a Grilled Fish, a Sashimi, a Seafood Ramen, a Smoke Fish, and a Sushi. Although the player can use a Yellow Moray Eel to cook these dishes, it is not recommended as this fish species is too rare and valuable. Besides, the player can use fish to cook the dishes mentioned.
Breed Them
The player can also breed the Yellow Moray Eels. The player must have a Fish Pond on their farm to do this. The player can purchase a blueprint for the Fish Pond from the Carpenter. This is located in the Hillside area, the small area in the middle of the Woodlands on the east and the Forest on the west. To purchase the blueprint, the player must exchange 20 pieces of scrap, 50 pieces of stone, 20 pieces of seaweed, one piece of gold kelp essence, and 7,000 Coral Coins.
After buying it, the player must then select the blueprint for the Fish Pond in the player’s inventory. Once that is done, the player can place it on an empty 5×5 spot in the player’s farm. The Fish Pond needs two in-game days to finish building. When built, the player can now stock fish in the Fish Pond for breeding.
With the Fish Pond, the player can place a Yellow Moray Eel or any fish they have caught to breed more fish. The player may put several fish of identical type and quality in the Fish Pond. Because of that, the bred fish will come out with the same type and quality as the original one placed. If the player puts different fish species in the pond, the fish will not breed.
The player can keep up to 10 fish in a single pond, including the original. When it reaches that point, breeding will cease until the player removes the fish. The player will also get experience points towards the fishing skill when successfully breeding fish.
The rarity of the placed fish determines how fast the fish will breed. Non-legendary fish breed every two in-game days. On the other hand, Legendary fish breed every four days. Because the Yellow Moray Eel is a Legendary type of fish, it will breed another one every four days.
Offer It to Lake Temple
One of the best things the player can do with the Yellow Moray Eels is to offer it to Lake Temple. This temple is the Goddess’s home and is very important in the game. The player will work from the start of the game to rebuild Starlet Town. This town was devastated because of an oil spill. The player has to make a number of offerings at the temple to boost the town’s connection with the Goddess and Giants.
The player will have access to several altars inside the Lake Temple. Each altar requires six different types of offerings. These offerings typically comprise at least five items that form a single bundle. With that, the player must acquire various resources through different means. When finishing a requested bundle at the Lake Temple, the player will receive a variety of rewards depending on the offering made. The Lake Temple has four accessible altars: the Crop Altar, the Catch Altar, the Advanced Altar, and the Rare Altar.
The Yellow Moray Eel is part of the Rare Fish offering for the Catch Altar. Aside from a piece of Yellow Moray Eel, the Rare Fish offering requires one piece of Sturgeon, one piece of Gator Gar, one piece of Arapaima, and one piece of Giant Sea Bass. The player will get one Fish Pond as a reward for completing the Rare Fish offering.
Once the player completes two offerings for the Catch Altar, the player will unlock the Hillside Waypoint. After completing all six Catch Altar offerings, the player will unlock the Dig Site and get 40 Heritage Points. Not only that, but the Forest Sacred Tree will also be healed.
Gift Them
Another possible use for the Yellow Moray Eel is to give it as a gift to other characters in Coral Island. The player can make friends with the townies and other characters in the game. The more the player learns about other characters, the more stories and dialogues they will reveal. Friendships between the player and other characters do not deteriorate over time.
Aside from chatting with them, gifting is the primary mechanic for gaining Friendship Points with characters. However, the player must give them items they enjoy to do that successfully. Each character can receive a maximum of two weekly gifts in the game.
Aside from that, the player can give one more gift to a character on their birthday. To give an item as a gift, the player must place it in their inventory hotbar and interact with the character to whom they wish to gift it.
The player will be able to give the majority of the items in the game as a gift. Each character has their gift preferences. This means each character has different items they love, like, dislike, hate, or do not react to. Characters will interact with the player differently depending on their preference for the item.
The more the character likes the gifted item, the more Friendship Points the player gains. Items that the character dislikes or hates, however, deduct Friendship Points.
If a character loves the gifted item, the player will get 140 Friendship Points. However, the player will get 70 Friendship Points if they just like the gifted item. If the character feels neutral or has no reaction to the gifted item, the player will only get 35 Friendship Points. However, if the character dislikes the gifted item, the player will lose 35 Friendship Points.
Then, if the character hates the gifted item, the player will lose 70 Friendship Points. It is important to note that if the player’s Friendship Points for a character are deducted, they will never go below the current heart level. This means that the heart level will not decrease and will stay at the minimum Friendship Points for that heart level.
Also, if the gifted item has better quality, the player will gain more Friendship Points. The Friendship Points gained will have a 1.15x multiplier if the gifted item is of Bronze quality. If the gifted item is of Silver quality, the Friendship Points earned will have a 1.3x multiplier. As for Gold quality items, the player will get Friendship Points with a 1.5x multiplier. Lastly, if the gifted item is of Osmium quality, the Friendship Points the player receives are multiplied by 2.
As mentioned, the player can also give characters gifts on their birthday. The Friendship Points the player will receive have a 5x multiplier when doing so.
As for the Yellow Moray Eel, only two characters love receiving this item as a gift: Scott and Theo. Also, two characters like the Yellow Moray Eel as a gift: Bree and Eleanor. Only Jim is neutral or does not react to receiving a Yellow Moray Eel as a gift.
However, there are a lot of characters who dislike receiving Yellow Moray Eel. These characters are the following: Aaliyah, Anne, Antonio, Archie, Ben, Betty, Charles, Chieftain, Connor, Dinda, Dippa, Emily, Emma, Erika, Eva, Frank, Giu, Gong, Grog, Groo, Jack, Joko, Judge Ross, Kenny, Kira, Lily, Ling, Luke, Macy, Mark, Nina, Noah, Oliver, Pablo, Rafael, Raj, Ratih, Sam, Sunny, Surya, Takeba, Valentina, Wakuu, Walter, Wataru, Yur, Zarah, and Zoe. Lastly, seven characters hate receiving Yellow Moray Eel. These characters are Alice Paul, Chaem, Randy, Leah, Suki, and Millie.
Donate Them to the Museum
The last option for the player to use the Yellow Moray Eel is to donate it to the Museum. The player can find the Museum near the middle of the map. This is located west of the Community Center or the southeast of the Carpenter. In the Museum, the player will be able to donate critters, insects, artifacts, fish, and gems to be put on display.
For each donation the player makes, the player will get 3 Museum Points. Additionally, the player will get 40 Museum Points for donating and completing each set of ocean critters, insects, artifacts, fish, and fossils.
With that in mind, the player can donate a Yellow Moray Eel to move one step closer to completing the Fish Collection. To complete the Fish Collection, the player must donate every type of Fish and Sharks. This brings the total number of required items to 69. Again, this is a big deal because the Yellow Moray Eel is a Legendary fish and is difficult to obtain.
Donating a Yellow Moray Eel will tick off one of the game’s difficult-to-catch fishes. Aside from the 40 Museum Points, the player will also receive a Dapper Octopus Suit and the Fishing Mania badge for completing the Fish Collection in the Museum.
Conclusion
Catching Yellow Moray Eels in Coral Island demands fishing prowess, a keen understanding of environmental conditions, and precise timing. Pursuing these elusive creatures within the Ocean (Beach) area during specific seasons, dates, and times of day ensures the greatest likelihood of success.
Remember, reeling in these Legendary fish requires patience, as they are classified as Legendary for a reason. Moreover, once captured, these mesmerizing Yellow Moray Eels offer multiple possibilities: from selling them for Coral Coins to cooking delectable dishes, breeding for Fish Ponds, offering at the Lake Temple, gifting to townies for Friendship Points, or contributing to the Museum’s collection for valuable rewards. Use them and, as they are extremely hard to get a hold of, use them well. Mastering their capture opens a gateway to both in-game riches and enhancing relationships within Coral Island’s vibrant world.