This guide will teach you how to complete the Hawa Koth Shrine in the Legend of Zelda Breath of the Wild!
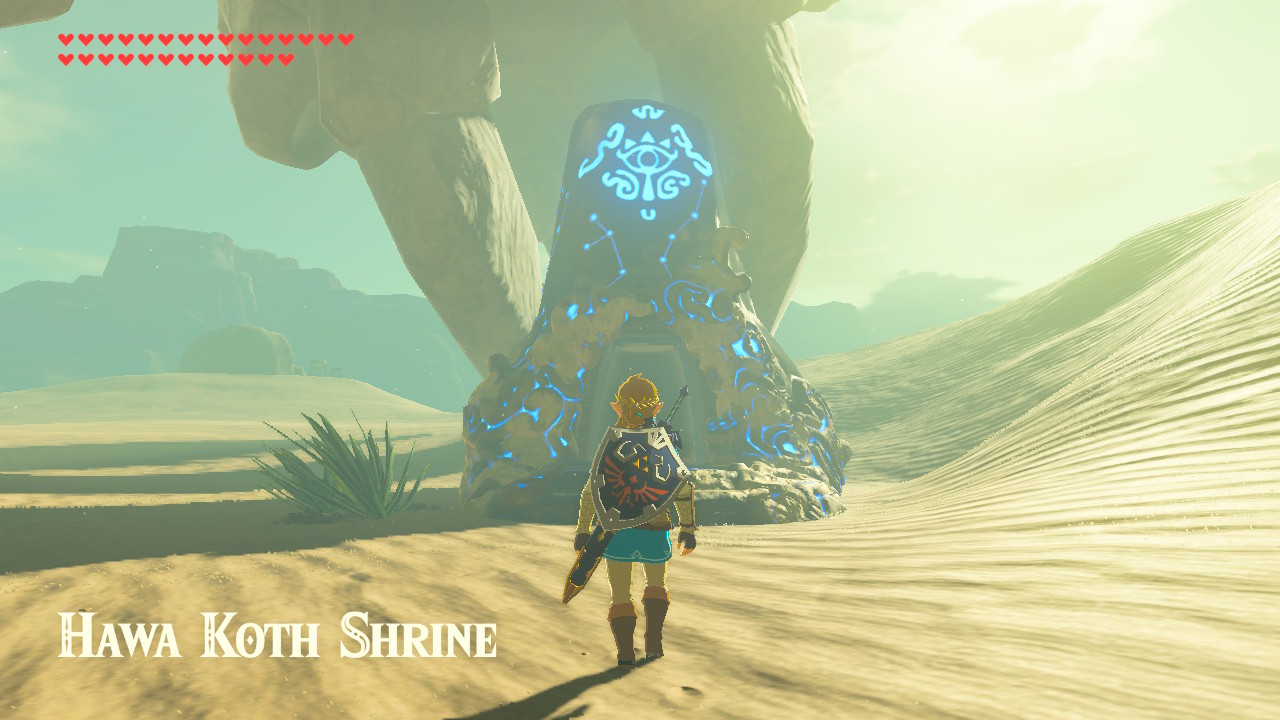
One of the Shrines in The Legend of Zelda: Breath of the Wild is the Hawa Koth Shrine or The Current Solution. This Shrine requires Link to traverse the Shrine by overcoming and solving multiple electricity-based obstacles and puzzles. It may seem confusing and intimidating, but this Shrine is easy to complete. In this guide, you’ll learn how to complete the Hawa Koth Shrine, obtain the chest inside, and claim the Spirit Orb.
Link is rewarded with Spirit Orbs for completing Shrines. You can exchange these orbs for more Heart Containers or Stamina Vessels. As there are 120 Shrines all over Hyrule, Link can obtain 120 Spirit Orbs. You can decide whether you want Link to have more Hearts or Stamina.
Location

The Hawa Koth Shrine can be found just across the Great Fairy Fountain under the Gerudo Great Skeleton in the southwesternmost of the map of Hyrule (the Shrine is southwest of Gerudo Town or west of the Southern Oasis in the Gerudo Desert). The Hawa Koth Shrine is one of 12 shrines in the Wasteland Tower region.
Read: How to Get the Korok Mask in Breath of the Wild
It is worth noting that the weather in the area will be roasting around midday, so make sure that Link has enough heat-resistant armor, food, and elixirs.
The Current Solution

Upon entering the Hawa Koth Shrine, you will see an electric power source, two small pillars, a lamp in the middle of the room, two small metal cubes on the left and right side of the room, and a closed entryway just ahead with gears above it.
To complete the Hawa Koth Shrine, this is what Link must do:
- First, press the up directional button and select the Magnesis Rune ability. Press the L button to aim at one of the small metal cubes, and press the A button to activate the Magnesis Rune ability. Then, using the Magnesis Rune ability, bring one of the small metal cubes to the middle of the room beside the power source and the small pillars. Place it so that the small metal cube will be electrified.
- Next, press the L button to aim the Magnesis Rune ability on the other small metal cube. Then, press the A button to activate the Magnesis Rune ability on the small metal cube and move it next to the last small metal cube. Place this small metal cube so it would be electrified and conduct electricity to the lamp.
- After that, the lamp will turn blue and will cause the gears above the entryway to start turning and open the entryway. Go through the entryway to continue to the Shrine.
- In this next room, you will see a bridge over a part of the platform and a pool of water. Under the bridge on the platform is a power source with a small metal sphere attached to it via a metal chain which is wrapped around one of the pillars of the bridge; on the wall on the left side of the room is a lamp with some gears and a small platform, and deep below the water is a chest. Take out the chest first by pressing the L button to aim the Magnesis Rune ability. Aim on the chest in the water, press the A button to activate the Magnesis Rune ability on the chest, and then pull it out of the water. Open the chest to obtain an Ancient Core.
- After that, press the L button to aim the Magnesis Rune ability and aim at the small metal sphere attached to and electrified by the power source. Next, press the A button to activate the Magnesis Rune ability on the small metal sphere and bring it around the pillar to unwrap it.
- After that, let Link stand on the small platform next to the lamp near the wall on the left side of the room. While the Magnesis Rune ability is activated on the small metal sphere, bring the small metal sphere and place it next to the lamp. The lamp will then be electrified and start turning the gears, resulting in the platform that Link is standing on moving upwards and letting Link reach the bridge’s surface.
- On top of the bridge, you will see a power source inside a metal sphere ahead of Link. On top of the bridge above the pool of water are a bunch of lamps; after the bridge is a platform with a Guardian Scout on the left, right, and just ahead on the center and right. Beside each of these Guardian Scouts is a lamp. Electrifying all the lamps on the bridge using the power source will result in the part of the platform that the lamp is on being rotated and turned over. Before crossing the bridge, Link must first get rid of the Guardian Scouts. To do that, Link can shoot arrows at them or, which is much easier, press the L button to aim the Magnesis Rune ability, aim at the metal sphere power source, and press the A button to activate the Magnesis Rune ability on the power source, bring it across the bridge, and electrify the lamps that are next to the Guardian Scouts. The platform that the Guardian Scouts are on will then be rotated and turned over, letting the Guardian Scouts fall into the water and die. Then, just set down the power source across the bridge near the flight of stairs, and Link can now cross the bridge safely.
- Next, press the L button again to aim the Magnesis Rune ability, aim at the power source, press the A button to activate the Magnesis Rune ability on the power source, and bring it to the pedestal and lamp, which is high up the wall on the right side of the room. This will result in an entryway being opened. Go through the entryway, and Link will be in a small room with a chest. Open the chest to obtain a Gold Rupee (300 Rupees).
- After that, head back to the previous room, and on the northern end of the room, you will see a lamp with another pedestal connected to some gears on the wall, and below the gears is an entryway to the altar. Press the L button again to aim the Magnesis Rune ability, aim at the power source that was placed on a pedestal on the wall earlier, press the A button to activate the Magnesis Rune ability on the power source, and bring it to the pedestal on the northern end of the room. This will then result in the gears starting to start turning. However, one of the gears is missing, so it cannot open the entryway to the altar.
- Next, head to the path on the right side of the entryway to the altar, and you will find a big room with another closed gate with the missing gear and a chest inside. To open the gate, Link must first solve the puzzle just ahead, which can be done by lining up the metal rail so that electricity will flow from the power source on the left to the lamp on the right. First, press the up directional button, select the Stasis Rune ability, press the L button to aim, aim at the bottom-most concrete cube in the middle column, and press the A button to activate the Stasis Rune on that concrete cube.
- After that, quickly let Link step on the pressure plate to slide all the other concrete cubes up, press the up directional button, select the Magnesis Rune ability, press the L button to aim, and aim at the colossal metal block that can only be moved horizontally, and slide it so that it lines up with the middle and right column of concrete cubes (with the left side of the metal block above the concrete cube that was frozen in time by the Stasis Rune ability). This must all be done before the timer for the Stasis Rune ability runs out.
- Then, let Link step off the pressure plate to slide the concrete cube back. This will result in the metal rails being aligned from the power source on the left to the lamp on the right and open the closed gate.
- Next, press the L button again to aim the Magnesis Rune ability, aim at the gear inside the gate, press the A button to activate the Magnesis Rune ability on the gear, and move it away from its spot to reveal another chest. Open the chest to obtain a Sapphire.
- After that, press the L button again to aim the Magnesis Rune ability, aim at the gear, press the A button to activate the Magnesis Rune ability again on the gear, and bring it to its spot above the entryway to the altar in the previous room.
- Finally, all the gears will turn, and the entranceway to the altar will be opened. Go near the altar, talk to the monk, and claim your Spirit Orb!
As mentioned above, the Hawa Koth Shrine, or The Current Solution, is one of 12 shrines in the Wasteland Tower region. The other shrines are the Kay Noh Shrine, or the Power of Electricity; the Daqo Chisay Shrine, or The Whole Picture; the Tho Kayu Shrine, or Tho Kayu’s Blessing; the Jee Noh Shrine, or the On the Move; the Dako Tah Shrine or the Electric Path, the Dila Maag Shrine or Dila Maag’s Blessing, the Raqa Zunzo Shrine or Raqa Zunzo’s Blessing, the Kema Zoos Shrine or the A Delayed Puzzle, the Suma Sahma Shrine or Suma Sahma’s Blessing, the Korsh O’hu Shrine or Korsh O’hu’s Blessing, and the Misae Suma Shrine or Misae Suma’s Blessing.