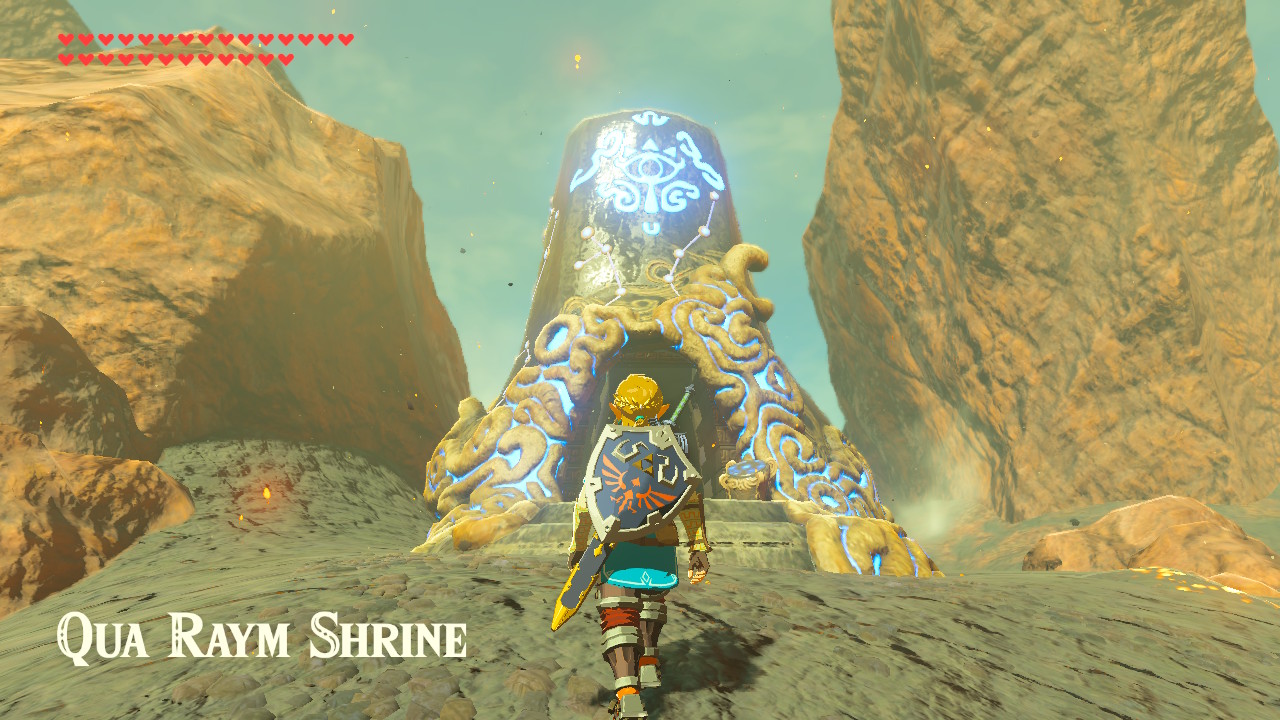
One of the Shrines in The Legend of Zelda: Breath of the Wild is the Qua Raym Shrine or A Balanced Approach. This Shrine requires Link to manipulate a large weighing scale machine to reach the altar and talk to the monk. This shrine may seem intimidating and confusing, but the shrine is very easy to complete, and in this guide, you will learn how to complete the Qua Raym Shrine, obtain the chests inside, and claim the Spirit Orb.
Link will be rewarded with Spirit Orbs for completing Shrines. The Spirit Orbs obtained can be exchanged for more Heart Containers or Stamina Vessels. As there are 120 Shrines all over Hyrule, Link can get 120 Spirit Orbs. You can decide whether you want Link to have more Hearts or Stamina.
Location

The Qua Raym Shrine can be found in the middle of an island on the eastern part of Goronbi Lake, which is just west of the Eldin Tower region (the shrine can be located south of the Southern Mines or northwest of the Maw of Death Mountain and the Foothill Stable). The Qua Raym Shrine is one of nine shrines in the Eldin Tower region.
It is worth noting that it is boiling in the area because the place is surrounded by lava so make sure that Link has armor that has Flame Guard like the Flamebreaker Set (Flamebreaker Helm, Armor, and Boots) or some Fireproof Elixirs so that the heat will not inflict damage to Link.
A Balanced Approach

Upon entering the Qua Raym Shrine, you will see a large weighing scale machine just ahead of Link with a wooden crate on top of the platform on the left and a chest and a couple of concrete barrels on the platform on the right, above the platform on the right is the ceiling of spikes but before that is a platform that is blocked by a couple of breakable concrete cubes that leads to the altar and the monk, just ahead of the weighing scale is a closed gate with three metal cubes inside, on the left side of the weighing scale is another weighing scale machine. Still, it is coming out of the ceiling.
To complete this shrine, this is what Link must do:
- First, Link must set the wooden crate on fire on top of the platform on the left on the weighing scale just ahead so that the platform on the left will be lowered. That can be done with a few methods: Link can shoot a Fire or Bomb Arrow on the wooden crate, or Link can aim a normal arrow and let it touch the fire on one of the torches near the closed gate ahead of the weighing scale to turn it into a fire arrow and shoot it on the wooden crate.
- After the wooden crate is burnt out, the platform on the right with the chest and the concrete barrels will be lowered. Get on the platform and open the chest to obtain a Small Key.
- Next, go to the closed gate and open it using the Small Key obtained earlier.
- Then, press the up directional button, select the Magnesis Rune ability, press the L button to aim, aim at the metal cube closest to the newly-opened gate, press the A button to activate the Magnesis Rune ability on it, then bring it to the top of the platform on the left of the weighing scale on the left side of the room to weigh that platform down.
- After that, press the L button again to aim, aim at another one of the metal cubes, press the A button to activate the Magnesis Rune ability on it, then bring it in between the newly-weighed down platform and the small flight of stairs near the entrance of the shrine.
- Next, head up the small flight of stairs, jump and get on top of the metal cube you just put down, then jump and get on the weighed-down platform.
- Then, press the L button again to aim the Magnesis Rune ability, aim at the metal cube that is with Link on the weighed-down platform, press the A button to activate the Magnesis Rune ability on it, and set it down on top of the platform on its opposite side to weigh that platform down and raise the platform that Link is on.
- After that, face the south of the shrine, and you will find a platform with another chest. Open the chest to obtain a Knight’s Claymore.
- Next, jump and glide off the platform, get on top of the platform on the right of the weighing scale in the middle of the room with the concrete barrels, press the up directional button, select either of the Remote Bomb Rune abilities, press the L button to conjure a Remote Bomb, and set it down on the side as close to the wall as possible on top of that platform with the concrete barrels.
- Drop down from the platform, press the up directional button, select the Magnesis Rune ability again, press the L button to aim, aim at one of the metal cubes, press the A button to activate the Magnesis Rune ability on it, then set it down on top of the platform on the left to lower that platform and raise the platform with the Remote Bomb and the concrete barrels.
- Then, press the up directional button, select the Remote Bomb that was selected earlier, then press the L button again to detonate it and destroy the breakable concrete cubes blocking the altar.
- After that, press the up directional button, select the Magnesis Rune ability again, press the L button to aim, aim at the metal cube on top of the platform on the left, and press the A button to activate the Magnesis Rune ability on it, then remove the metal cube from the platform and place it near the platform on the right with the concrete barrels which will cause the platform on the right to be weighed down by the concrete barrels and the platform on the left to be raised.
- Next, let Link get on top of the platform on the right, press the L button to aim the Magnesis Rune ability, aim at the metal cube that was previously placed down, press the A button to activate the Magnesis Rune ability on it, then set it down on top of the platform on the right to weigh that platform down and raise the platform that Link is on. Then, quickly jump off the platform and onto the platform with the altar before the platform with the concrete barrels hits the spiked ceiling.
- Finally, go near the altar, talk to the monk, and claim your Spirit Orb!
As mentioned above, the Qua Raym Shrine or A Balanced Approach is one of nine shrines in the Eldin Tower region. The other shrines are the Mo’a Keet Shrine, or the Metal Makes a Path, the Daqa Koh Shrine or the Stalled Flight, the Shae Mo’sah Shrine or the Swinging Flames, the Shora Hah Shrine or the Blue Flame, the Sah Dahaj Shrine or the Power of Fire, the Gorae Torr Shrine or Gorae Torr’s Blessing, Tah Muhl Shrine or the Passing the Flame, and the Kayra Mah Shrine or the Greedy Hill.