While Necromunda Hired Gun might be a fast-paced FPS game, there is a lot of stuff that players can find throughout the world that tell a story about the world, but on top of that, there are chest that can be found, which are filled with weapons and gear. That is a theme in almost all levels of the game. If you’re just starting the game, follow along, since we will outline all level 1 or Kaerus chest locations!
Kaerus Chest Locations – Necromunda Hired Gun
There are multiple chests in the first level of the game. The first time you run the level, there will be five chests, since one only appears the first time that the player plays through the Kaerus level.
Now, since pinpointing the exact locations in Necromunda Hired Gun is pretty much impossible, since there are no coordinates or any other variable that helps in determination of a location. Since that is the case, we will try to be as clear as possible.
Here are all five Kaerus chest locations in Necromunda Hired Gun:
Chest Location #1
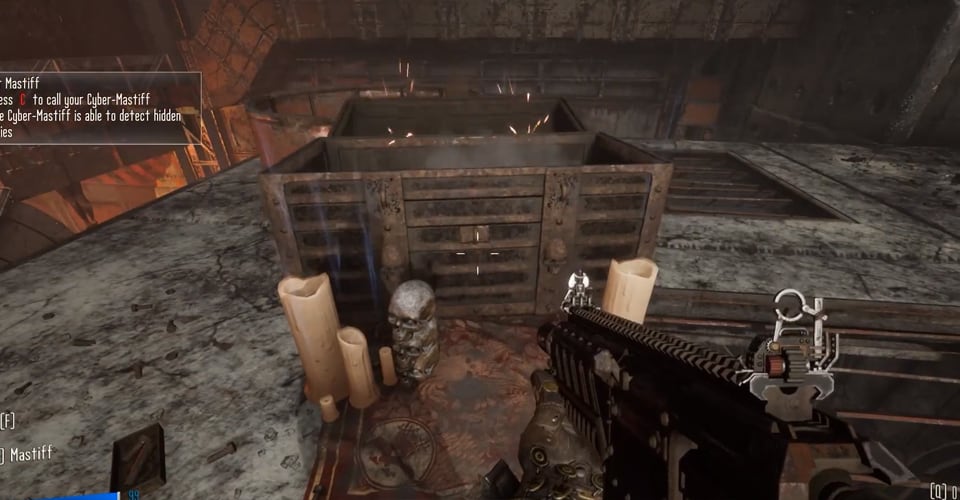
On the path to the Manufacturum, there will be a chest left in a what appears to be a broken pipe. The pipe is vast in size, with a cupboard inside. The exact location for this chest can be seen on the following reference picture:
Chest Location #2
Once you go through the small opening towards the Manufacturum, after the last chest’s location, take an immediate left. Climb on to the vents on the left side, and follow the path of the vents.
Once you pass the ‘Steel Forge’ billboard, on the right side, you will see a chest, jump to it.
Chest Location #3
Go to the Escher HQ waypoint. From there, take a right and go to the end of the hallway. Jump from the ledge on the left, to the bottom.
Then, climb the stairs behind you, and continue to go underneath the platform that you climbed onto. Meaning, once you climb the stairs, you will see an opening in the floor in front of you. There, drop down to where the melting metal is. On the other side, you will see a chest. Jump to it to get it!
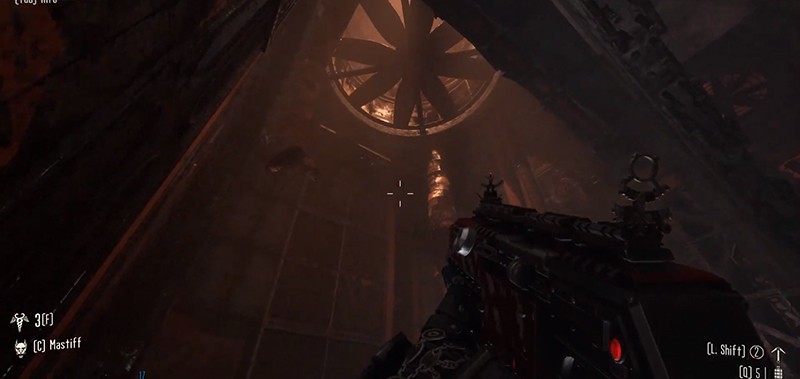
Chest Location #4
This one is harder to pinpoint. Players will need to the area in which there will be a huge fan in the ceiling, like the picture below:
There are platforms on all sides of the walls here, and you need to use the grapple to go as high in this location as possible. Once you’re high enough, look for a platform on the walls, and you will see a chest somewhere.
Chest Location #5
Go to the Slag Waste Well and open the door using the controls that hang on a chain. Once the door is open, go through it, and take a right. Go to the end of the platform and look down from the edge.
You should see a pipe that you can drop down to. Kindly do so, and then go through it, and at the end go right. You will dropdown to another platform, at which you will see the fifth and last chest in the Kaerus level of Necromunda Hired Gun!
Lastly, if you’re having trouble with a certain chest, take a look at the video above, and also increase your volume to hear the sounds of chests more clearly.
READ NEXT : All Codes in Super Animal Royale: How to Redeem Coupon Codes