Oxenfree Overview
Welcome to the Oxenfree Walkthrough! In Oxenfree, you play as Alex, the blue-haired, high school teen. Alex joins her friends for an overnight party on the peculiar Edwards Island. After strange events start to unfold, Alex and her friends must uncover the secrets of the island.
To get the maximum potential out of this game, 3 playthroughs is needed. The first quick, run of the mill will take roughly 3 hours to finish. The second (most important) run is where you will find your collectibles and appreciate what the game has to offer. This run will take roughly 5 hours to finish.
The runs are very similar aside from dialogue options, but these variants are really important to getting the most of out the game. Let’s get to it!
Tips & Hints
- Talking: A lot of movement or action will interrupt the current dialogue. There’s certain points in the game you will reach that will trigger new dialogue to start, like specific points in the road. Interacting with items will also cut off the dialogue. If you want to listen to the dialogue, try to keep your movements and interactions to a minimum during conversations.
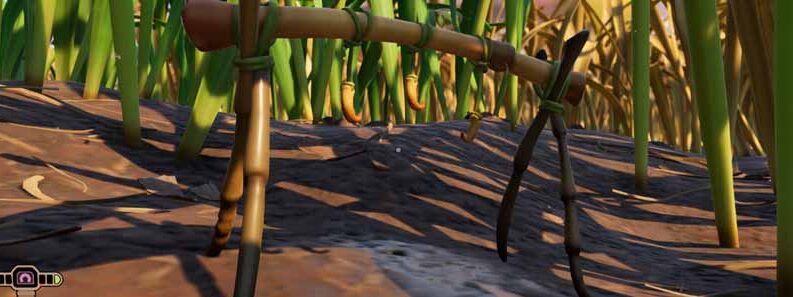
- Collectibles: Collectibles all need to be gathered in the same playthrough of the game. Anomalies, which look like rocks, can be obtained early on in the game. To obtain them, walk up to them and tune your radio to the correct frequency. Letters, which will look like sparkles on the ground, don’t come until later in the game. You’ll be able to collect these once you get a second radio with a higher frequency range.
- There is usually 1 Anomaly and 1 Letter per area.
Characters
We’re going to go over the characters, since some of the achievements are based on how you treat them.
- Nona – Clarissa’s friend and Ren’s crush.
- Clarissa – Michael’s ex-girlfriend. She has a grudge against Alex, but you’ll find out why.
- Michael – Alex’s Brother. You won’t see much of him until the end.
- Ren – Alex’s really good friend. He practically orchestrated the entire trip.
- Jonas – Alex’s step brother. Alex’s mom and Jonas’ dad just got married. This is their trip to get to know each other as teen siblings.
Oxenfree Story Walkthrough
Please note: There will be spoilers in this walkthrough. They will be hidden under a tab you’ll have to click to reveal. As long as you don’t click on them, you won’t see them.
As I stated above, we’ll need 3 playthroughs to get all of our Achievements: the nice run, the mean run and the silent run.
The Nice Run:
*Will give you the achievements:
• Matchmaker – Get Ren & Nona To Date.
• New Beginnings – Jonas Is Your New Step Brother
- Always pick the sweetest dialogue options.
- Say kind things to Ren about Nona and kind things to Nona about Ren. When the group splits up, leave them alone together.
- Be nice to Jonas. You’ll want him by your side.
- Don’t accept the proposition that comes late in the game.
- Don’t let anyone die. Only one person can die in this scenario, but I’ll let you know who it is below.
The Mean Run:
*Will give you the achievements:
• I’m The Firestarter – Make enemies with all your friends.
• You’d Just End Up Hating Each Other – Keep Nona & Ren from dating.
- Choose the rude or “I don’t care” options. Refuse to help anyone and make yourself look like the bad guy.
- Accept the late-introduced proposition.
- Don’t let Nona and Ren get close. Butt in and drive them away from each other.
- You still can’t let anyone die. You can’t be hated by a dead person.
The Silent Run:
*Will give you the achievements:
• Thicker Than Water – Bring Michael back from the dead.
• The Strong, Silent Type – Play the whole game without saying anything.
- Just be silent. Let all the dialogue’s expire.
- You can interact with objects, even though it causes Alex to speak. It doesn’t count.
- The last choice in the game will not fade away. You’ll be forced to say something, but it doesn’t count against you.
Now to get to the Walkthrough!

Part 1 – Arriving
Beginning The Boat Ride
You begin on a ferry with Ren and Jonas. Here, you’ll have some time to get to know how the game operates. White circles appear over items you can interact with. Three dialogue options appear when it’s your turn to talk. Sometimes they fade out very fast, so pay attention.
Almost immediately, you’ll notice that some of your dialogue is affecting Jonas. This is indicated by your face appearing in a thought bubble above Jonas’ head. This won’t tell you if the person likes what you said, but that’s usually pretty obvious. Walk around the ship and move to the end of the boat when Ren wants to take a picture.
You’ll then be prompted to pull out the radio, which you’ll be using quite often. You can then tune the radio to the frequency Ren gives you.
Reaching The Dock
Soon after you arrive at the dock, Jonas will ask you to talk alone. If you’re trying to be nice, accept it. Refuse if you’re not. Follow Ren once you’re done. You’ll need to push the dumpster into the fence at the top of this area to proceed further.
For the next area, you’ll meet up with the rest of the crew. Climb and jump when obstacles are in your path. The game never lets you fall, so don’t sweat that. If you want to listen to the conversation to its end, don’t leave the area until it’s over.
Getting Your First Achievement
In the next part, you’ll be able to get your first achievement (unless you’re doing silent playthrough). When the group starts chatting about Truth or Slap, make sure you participate. As soon as the game starts playing out, Clarissa asks Ren if he likes Nona.
When you’re able, say “He’s lying!” or anything you can to exploit him. When you’re done throwing him under the bus, walk up and slap him in the face. Although this is extremely rude, it won’t hurt a nice playthrough.
After playing this out, you earn the achievement:
- Renjamin Spanklin – Slap Ren in the face.
Search For Signal
Now, if you’re being friendly, make sure you go chat with Nona and say nice things about Ren. When you’re ready, jump over the fence with the guys; there will be rock piles here. When Ren mentions it, pull out your radio and search for the activation signal. Turn the dial slowly or else you might miss it.
When you hear static and see the dial glow red faintly, you’ve got it. In this case, you’ll also see a light flicker inside the cave. Continue with the other two and then follow Jonas.
Exploring Your First Cave
Make your way through the cave to catch up to Jonas and keep going right. When Jonas asks, tune into the three signals and enjoy.
After the craziness, follow Jonas up until you reach the very top of the tower. If you try to open the door, Jonas will eventually open it for you. Once you’re inside the room, use the generator. When the phone rings, answer it. When it rings again, switch to the other line.
Now, you’ll have a choice to make: find Clarissa or find Ren. If you’re trying to be nice, go for Ren. If you’re trying to be mean or silent, go for Clarissa.
In either case, you’ll be traveling in a circle to find both of them, so you’ll be going to the same areas.
Once you pass through the de-electrified fence, go left to the Towhee Woods for Ren, or right to Milner Outpost for Clarissa. In this case, we’re going to go left.

Part 2 – Finding Ren
In the Towhee Woods, get to the point where you can climb down to the level below, but don’t do it. Instead, move toward the gap farther left. Then jump it to get your next achievement.
- It’s A Me – Jump the crazy chasm in the woods.
After that, head left. *Anamoly*: Before you exit the area, climb down. You’ll see an anomaly below. You’ll need to stand next to it and tune the radio to activate it. Tune it to the station 103.5 to unlock the anomaly (1/12).
Next, we’re going to exit left.
If you’re not searching for Anomalies, in the Bridge Stand area, head to the left and then climb up.
*Anomaly* Or keep going left before climbing. You’ll see another rock pile between the water and the graveyard. Tune it to 99.9 to collect it. (2/12).
*Anomaly* Climb up to the top of this area. There’s another anomaly on the right. Tune it to 101.1 to collect it (3/12).
Go into the building with the red door. Head to the far right side of the central level. Hit the circuit breaker and then use the radio near the lamp to continue. Go to the left and activate the cable car. This will get you to the next area.
Keep walking to the left until you see a football or soccer ball. Kick it a few times and then keep walking left once it’s gone. Eventually, a tape player will show up by the tent. To activate it, you’ll need to get the music to play at the right tempo, which may be slow or extremely fast. The icon will start to glow white when you’re close.
After that, go left and climb up to where you can cross over the bridge.
*Anomaly* You’ll see another anomaly just off the path, to the left of the bridge. Tune it to 91.5 to collect it (4/12). To the right of the bridge, walk toward the bench. There’s another anomaly here as well. Tune it to 97.5 to collect it (5/12).
After the bridge, head down. You’ll run into Nona. No matter how you treat her, Jonas will take care of her. Continue going right to get to the next area.
As you head right, you’ll run into the next anomaly.
*Anomaly* It’s right next to three trees. Tune your radio to 106.7 (6/12).
Make your way to the top and go into the building. When the next loop starts, follow Ren. Make the two tape players play and find him in the top left. Here, you’ll use the radio three times. After the encounter, go all to way to the right. This will take you to the next location.
Part 3 – Searching For Clarissa
Our next location is the Milner Outpost. Once you get here, go right and then down. You’ll then climb up the tower; there will be a red light flashing. Use your radio on it.
*Anomaly* Once you’re done with that, go left on the bottom path. There’s an anomaly next to the targets. Tune it to 104.7 (7/12).
Go through the door you opened on the right. You’re now in the Facilities. Jonas will take you through the area. When you lose him, and you will, go to the floor above and hit the light switch on the wall. Once you’re done with that, go rescue Jonas below. Read the codes posted on the wall in this room, then retreat back to the bottom floor. Alex will use the code on the door to your right. Continue on through.
Go through the classroom and descend down the ladder.
*Anomaly* There’s an anomaly on the left. Tune it to 94.3 (8/12). Go through the building on the right. Use the radio on the other red light. You’ll be asked some questions based on if you’ve paid attention up to this point. You don’t have to be correct, that is not the point of this. Jonas will be upset if you miss every single question, but oh well. Just try your best. Use the radio on Jonas at the end of the questioning. When you’re done, head through the door on the right and up the ladder.
Use the radio in this room. Keep entering the room, starting up the tape player and go back down the way you came after the shock. The door on the left should now be open. Go through it to get back to the Milner Outpost. Keep going left to get to the area after that. Go up the incline and you’ll notice that you are back at the tower. Climb up there again to meet Nona and Ren.
Part 4 – Getting A New Radio
*Once you’re reunited, this is one of the most important decisions in the game. If you’re being nice, side with Jonas in the argument that will take place and choose to have him come with you. This will help continue building your relationship with him. If you’re being mean, take neither side in the argument and take Nona with you. You won’t have a lot of mean dialogue to choose from, but do your best.
Now, we’re going to return to the first place we saw at the beginning of the game by the docks. Climb down and go through the fence. In the next area, go the direction you just came from. A little ways down, you’ll see a fork in the road with both choices heading down. Both lead to the same place.
*Anomaly* If you take the left path, you’ll see another anomaly at the turn near the bunker door. Tune your radio to 102.3 (9/12).
Continue as far down as you can go. Then go all the way to the left out of Epiphany Field.
*Anomaly* You’ll see the next anomaly by a lamp post on the way over there. Tune your radio to 105.1 (10/12).
Once you reach Discovery Cliffs, keep walking left into our next area. Here, we’ll make our way down to the middle level. You’ll need your radio once again. Once this sequence is over, you’ll need to get the green door open on the side of the brown building. On the desk, there is a box holding the new radio. This radio has a much larger frequency range than the one you currently have. This radio is required to continue the story and to get all of the collectibles we haven’t found yet.
The first letter you’ll collect is the radio you just picked up, so we can check that off the list (Letter 1/13). The second is close by. The 2nd letter is on the right side of the Antiques and Gifts shop. (Letter 2/13).
Once you’re done, leave Main Street at the top. When you’re done with that scene, you’ll be in Epiphany Field. Your next letter will be at the base of the Lighthouse (Letter 3/13).
Once you’re done with that, continue walking to the right until you reach the gate. You’ll need to use the radio to open it. The icon next to the gate will have one bar light up when you’re close to the signal. You’ll then need to fine tune the dial slowly from there to get all three bars to light up. Once you’ve completed that, go through to the estate.
Keep following your friends here. After the boat talk, go up and open the door to the house with the radio and walk inside. After the conversation inside, go back outside. Go through the door on the right on the level below to enter the basement. Here, you’ll find a code when you interact with the desk. The chest that Alex mentions is where the boat key is hiding. Before you go back into the estate, talk to Nona about how great Ren is if you want them to date.
Go back into the house and pull on the string on the ceiling of the second floor to get to them. As you head outside, you’ll be thrown into a whirlwind of illusions. Your choices here won’t affect any part of the game.
After the game, activate all three tape players to end the vision. Now, go back to the basement where you got the code. Get the reel from the bookshelf, place it on the projector, and run through the slides to figure out what needs to happen next. Jonas will accompany you in the next part, even if you say you don’t want him to. Leave the area on the left using the stairs that go upward (for non-collectors). Use the stairs going down and you’ll end up on the beach. Another letter will be available at the bottom of the stairs (Letters 5/13).
*Anomaly* Now you can go left back to Discovery Cliffs. Open the door to the smaller building at the top of this area to find the anomaly. Tune your radio to 100.3 (11/12). In the same building, you’ll find (Letter 4/13). It’s to the left of the colored brush, next to the building.
*Now you’ll get the achievement Adler’s Letter, Pt 1 – Collect 4 of Maggie’s letters.*
Once you’re done with this, keep going right until you’re back to the gate.
Part 5 – Station Searching
At the gate, travel upwards. We’re going to go the same way we did to find Ren. First, make your way to the radio tower area by crossing through the electric gate at the top of Epiphany Field. Your next letter is next to the plaque below the ladder (Letter 6/13).
After you’re done, go back down to Epiphany Field. Go to the top left side of Epiphany Field to enter into the Towhee Woods. Your next letter is by the fallen tree, which is the log at the bottom (Letter 7/13).
Once we’ve completed that, head to the Bridge Stand through one of the two entryways on the left. Your next letter will be next to the tombstones at the bottom left (Letter 8/13).
* You’ll now get the next achievement Adler Letters, Pt 2 – Collect 8 of Maggie’s Letters.*
The station we’re looking for is at the top of hill. You’ll get stuck in a loop on your way up. To advance, walk back down the way you came and watch the sequence.
When you’re teleported into the building, there’s an important dialogue option that comes up. The ghosts will offer you a proposition. If you’re playing friendly, reject it. If you’re playing mean, take it.
You’ll be stuck in the loop again. This time, go left across the bridge. Before you get the three tape players going, you need to talk to Nona if you want her to date Ren. Tell her that Ren knew she liked him.
Another important choice here. If you’re playing mean and accepted the proposition, let Jonas know the first chance you get by picking “I traded Clarissa for our safety.” If you rejected it, then you can tell him, but the other options are fine in that case.
Now’s the time to get to the station at the top of the hill. Open it with the radio. Use the stationary radio system inside.
If you accepted the proposition, tell Ren and Nona by choosing “I traded Clarissa for our lives.” This is how you finally get Nona really mad at you. Keep defending your position until you get to the actual moment of decision at the very end of the game.
Send the call to open up the bunker back at Epiphany Field. At this time, we’re going to round up the last of the collectibles. If you’re not going for them, head back the way you came to the bunker and skip down to Part 6. You’ll have another talk with Michael, but this isn’t the important one so say whatever you’d like.
Use the cable car on the bottom left to get to the Camp Grounds for your next letter. Go to the left side of the area and climb as high as you can (Letter 9/13).
Next, exit on the top right. (Letter 10/13) is next to the well on the bottom right. Exit on the top right once again to get to the Milner Outpost. (Letter 11/13) is at the bottom of the tower.
Next, go through the door on the right. In Facilities, you’ll see another door you can open with your new radio below. Inside is the final anomaly. Tune your radio to 89.9 (12/12).
*You’ll now get the achievement Ghost Stories – Find all the hidden anomalies.*
(Letter 12/13) is by the beds in the room below you. For your final letter, go through the door on the right. (Letter 13/13) is at the base of the sign.
*You’ll now get the achievement Adler Letters, Pt 3 – Collect all Maggie’s Letters.*
Now exit through the doors on the left and make your way back to the bunker (the middle right of Epiphany Field). Like I said before, you’ll have another sweet segment with Michael before you get there, but what you say isn’t important in this one.
Part 6 – Wrapping It Up
Double check that you’ve done everything you want, take the picture with the group, and give some hugs if you’d like. If you talk to Ren, he gives you an indication of whether or not he’s decided to date Nona so you’ll learn here if you were successful. He and the others will be either mad or happy at you, letting you know how you did there as well. Enter the bunker when you’re ready. Continue on the only way you can, ignoring the tape player for now and using the radio at the end of the hall.
Another important conversation begins. After you get the tape player working, help Jonas if you’re being kind to him by using the radio on the tape player. Go against him and move to the the door if you’re on the mean playthrough.
Once you’re through the door and the encounter that follows, tune into the signal to start the final sequence. In the darkness, walk to the right.
This part is extremely important. If you’re staying silent, there will be no way to save Clarissa, but you CANNOT leave through the red portal without saving her if you’re being nice or mean. You can only do so by picking the dialogue options that lead up to it (easy to figure out — most options lead there anyway as long as you don’t give up and leave). Letting the ghosts take Clarissa will keep her relationship with you from factoring into some of the final achievements, which blocks you from getting them.
Now you get to be the player on the other side of the three reflections you found earlier, where you can guide a past version of Alex that will be played by another gamer.
The final major decision follows., this one with Michael. If you’re silent, Michael will decide to stay, which ultimately leads to him avoiding his death as you know it, meaning that your parents never got divorced and you never met Jonas. You need Jonas to be there at the end in the other two playthroughs, so tell him to leave.
That’s it. If you’re playing on silent, remember that you’re forced to pick a dialogue option after the game-end stats are shown to you – it will never fade away. All of the story achievements you’ve been going for will pop now if you made the right choices, along with the basic story completion achievement if this is your first time.
*You’ll now get the achievement This House Is Clear – Complete the story.*
Congrats and thanks for reading! Be sure to check out all of our other Game Guides and more!