Learn how to build a flying machine in Tears of the Kingdom!
In the mystical realm of Hyrule, where courage, wisdom, and power converge, the quest to overcome challenges and unlock new horizons has always been at the heart of The Legend of Zelda series. Players face extraordinary freedom in The Legend of Zelda: Tears of the Kingdom. With this freedom, Link can create different machines to explore Hyrule.
This guide will walk you through how to build a flying machine! We will unravel the secrets of this awe-inspiring machine that promises to redefine how players explore and conquer the landscapes of Hyrule. So, ready up, equip your sword and shield, and prepare to embark on an adventure that will take you soaring to new heights like never before!
Flying Machines in Tears of the Kingdom
In Tears of the Kingdom, Link can create different machines and gadgets. Link has many parts and materials for these machines and contraptions in the game. With that, the sky is the limit for what kind of contraption Link can create! Keeping that in mind, Link can build flying machines in Tears of the Kingdom! Link can use these flying machines to traverse the ever-expanding kingdom of Hyrule!
He will most likely spend much time traveling through the Sky Islands above Hyrule in the game. Link can easily travel from Sky Island to Sky Island by building a flying machine. This then makes exploring the horizons of Hyrule faster and with a more beautiful view.
The Ultrahand Ability
Link needs to acquire the Ultrahand ability before gaining the ability to build flying machines in Tears of the Kingdom. This ability allows Link to grab and move objects, rotate, and attach them to other objects. This is similar to the Magnesis Rune ability in Breath of the Wild. The Ultrahand ability, on the other hand, is not confined to metallic objects and has extra possibilities.
Link must visit the Ukouh Shrine, or “The Ability to Create,” to acquire the Ultrahand ability. This Shrine is located on top of a rock on the northern side of Great Sky Island, southwest of the Temple of Time. Link can discover this Shrine via the following coordinates: 0274, -0913, 1460. The Ukouh Shrine is Link’s first interaction with a Shrine in the game.
Zonai Devices
Zonai Devices are the most crucial materials in building flying machines in Tears of the Kingdom. These are ready-made devices with various effects and applications. Link can use simple fans and carts to huge rockets and cannons as examples of these devices.
These Zonai Devices, like any other device, require power to function. This power comes from Link’s Batteries, also known as the Energy Cell. The more Zonai Devices in use, the more power Link’s Energy Cell consumes.
Link can locate Zonai Devices all across Hyrule. Unfortunately, Link is unable to keep them in his inventory. To do so, Link must acquire Zonai Devices in the shape of capsules. However, he cannot return them to his inventory after Link puts them on the ground. To obtain capsules of Zonai Devices, Link needs to swap a few Zonai Charges for them in Zonai Device Dispensers scattered across Hyrule.
It is vital to note that the capsules dropped from Zonai Device Dispensers are completely random. This means that while a Zonai Device Dispenser may drop a few specific Zonai Devices, there is no guarantee that it will drop the one you want.
As a result, it is advised to swap five Zonai Charges rather than just one. Dropping one Zonai Charge will result in one capsule. However, swapping five Zonai Charges or even Large Zonai Charges significantly increases the quantity of capsules released. This increases the likelihood of receiving a specific Zonai Device.
Steward Constructs is another option for getting Zonai Device capsules. However, instead of Rupees, these Steward Constructs will want Crystallized Charges. This is not a recommended strategy because Crystallized Charges are also required to boost the capacity of the Link’s Energy Cell. This option is always available if the player has acquired the maximum batteries or simply wishes to.
How to Build a Flying Machine in Tears of the Kingdom: Requirements
There are many different ways to build a flying machine in Tears of the Kingdom. The most basic requirements, however, are the following:
1. Base Platform
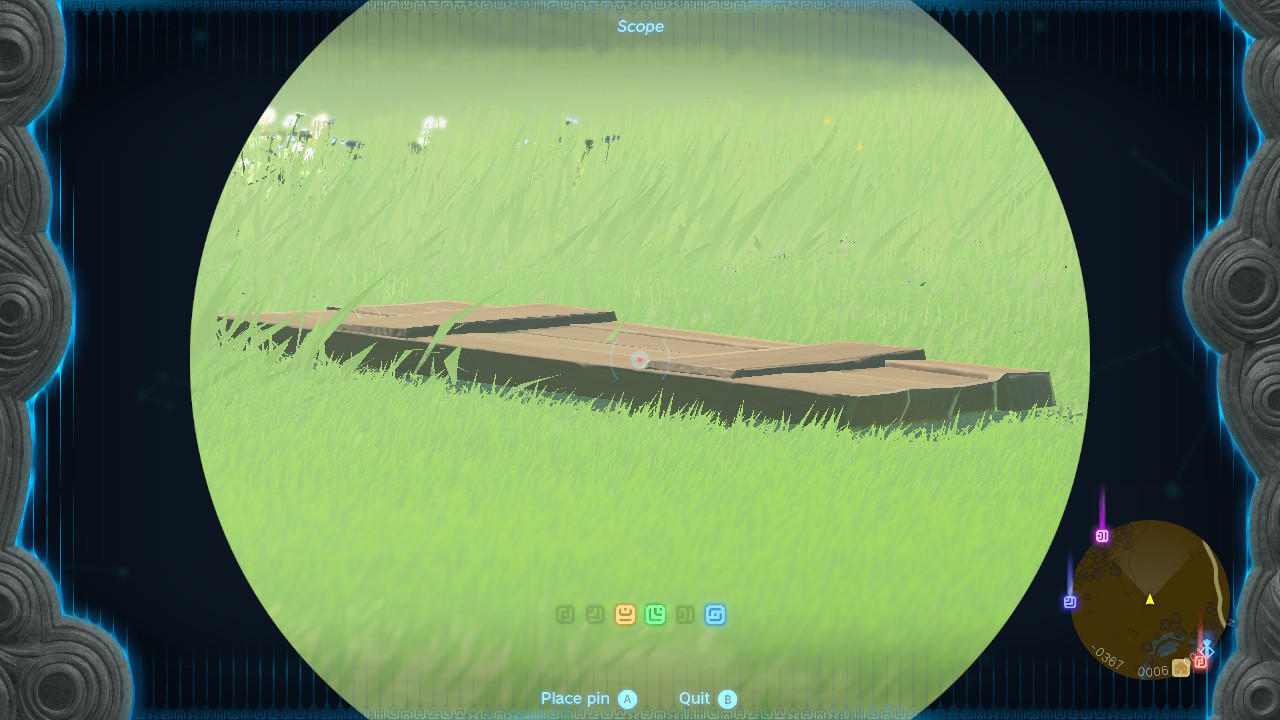
The first material required is the machine’s base, which Link will stand on. Link can use a variety of materials for this. For example, Link may utilize wooden platforms, concrete slabs, or Zonai Devices such as the Zonai Sled, Zonai Wing, and Zonai Cart. Link can use anything as a base platform if he can stand on it and attach other things to it.
The wooden platforms are undoubtedly the most accessible items that Link can utilize as a base platform. Link can easily find wooden platforms scattered around Hyrule as part of the Hyrule Restoration Materials.
However, it is important to mention that you should choose your base platform carefully to ensure the whole machine is as light as possible. The heavier the machine is, the harder it has to work to lift off the ground and gain altitude.
2. Steering Stick
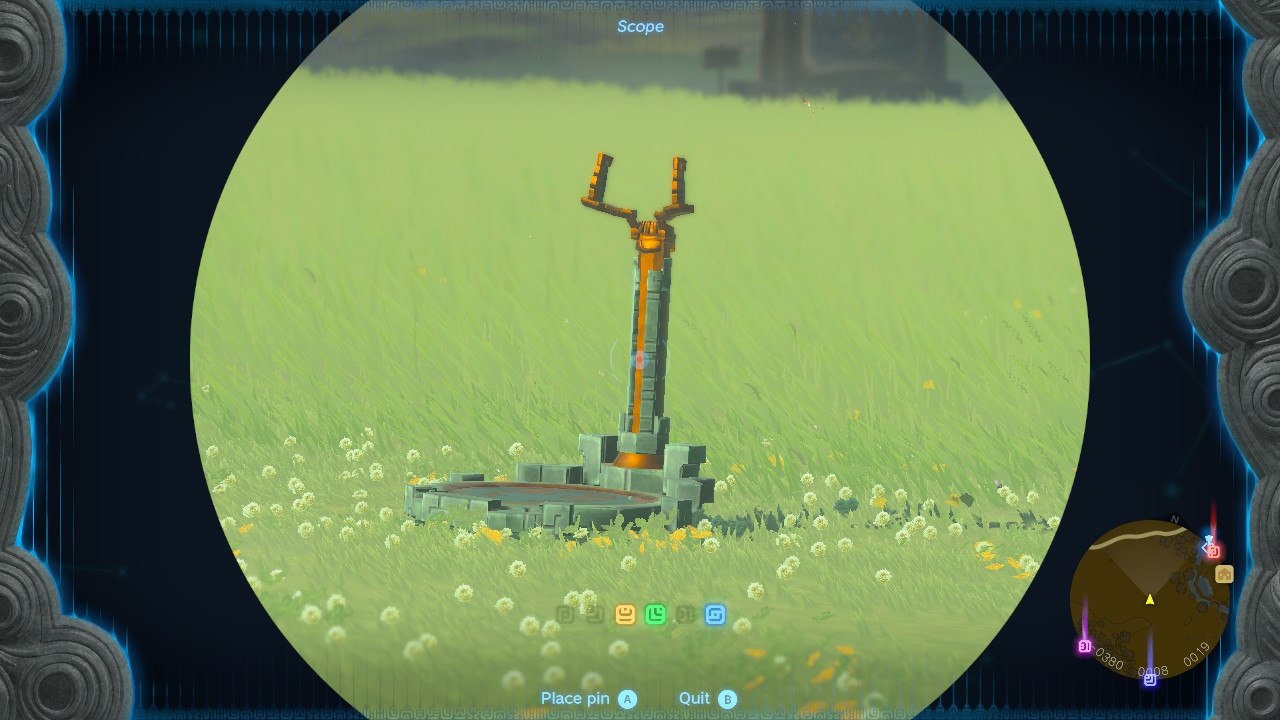
One very important part of the flying machine is its steering device. To steer your flying contraption, Link must acquire a Zonai Steering Stick. Link can get capsules of Zonai Steering Stick in these Zonai Device Dispensers:
| Zonai Device Dispenser | Region | Coordinates |
|---|---|---|
| Mayam Shrine Device Dispenser | Great Hyrule Forest Sky | 0436, 2821, 1820 |
| Sihajog Shrine Device Dispenser | Lanayru Great Spring Sky | 4505, -0811, 1117 |
| Kumamayn Shrine Device Dispenser | East Necluda Sky | 2851, -2951, 1212 |
| Rakashog Shrine Device Dispenser | Gerudo Highlands Sky | -1777, -2027, 1148 |
| Joku-u Shrine Device Dispenser | Faron Grasslands Sky | 1390, -3231, 0417 |
| Hudson Construction Site Device Dispenser | Akkala Highlands | 3801, 1564, 0091 |
| Mustis Lightroot Device Dispenser | Death Mountain Depths | 2186, 2634, -0962 |
| Left-Leg Depot Device Dispenser | Faron Grasslands Depths | 1052, -2316, -0552 |
Link can also obtain capsules of the Zonai Steering Stick by eliminating a Flux Construct I, Flux Construct II, or Flux Construct III.
Link must attach the Zonai Steering Stick to a machine using the Ultrahand ability to use it. This Zonai Device is compatible with contraptions equipped with Zonai Wheels or Zonai Fans. After that, Link can get on the steering wheel and control the movement of the contraption.
3. Getting Altitude
The next required material to make a flying machine is the device that will lift it off the ground. The recommended Zonai Devices for this are Zonai Fans and Zonai Rockets.
Zonai Fan
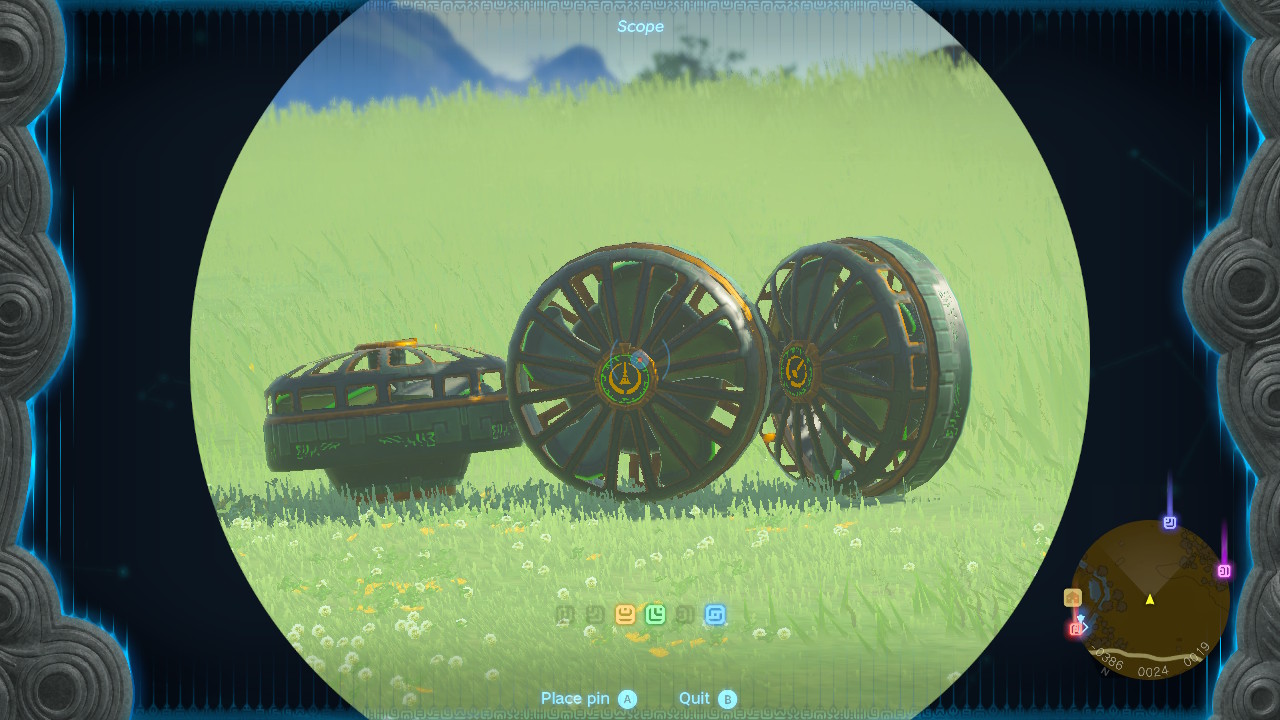
This Zonai Device generates wind through the use of the propeller within. Link can use the Zonai Fans to generate thrust and propel things or contraptions forward.
Link can attach a Zonai Fan below a base platform to lift it using the generated wind. It is important, however, to take note of the weight of the whole contraption. The more materials added to the machine, the heavier it will be. The heavier it is, the more Zonai Fans need to lift the machine off the ground.
Link can obtain a Zonai fan by visiting the Zonai Device Dispensers listed below:
| Zonai Device Dispenser | Region | Coordinates |
|---|---|---|
| Taunhiy Shrine Device Dispenser | Hyrule Ridge Sky | -2365, 0787, 0611 |
| Kadaunar Shrine Device Dispenser | Eldin Canyon Sky | 1976, 1220, 1251 |
| Jirutagumac Shrine Device Dispenser | Lanayru Great Spring Sky | 2913, 0510, 0951 |
| Gutanbac Shrine Device Dispenser | Great Sky Island | 0073, -1265, 1579 |
| Nachoyah Shrine Device Dispenser | Great Sky Island | 0440, -1680, 1443 |
| Igoshon Shrine Device Dispenser | Lanayru Great Spring Sky | 3433, 0641, 1316 |
| Taninoud Shrine Device Dispenser | Hebra Mountains Sky | -1726, 3377, 0949 |
| Joku-u Shrine Device Dispenser | Faron Grasslands Sky | 1390, -3231, 0417 |
| Joku-usin Shrine Device Dispenser | Faron Grasslands Sky | 1097, -3334, 0828 |
| Makasura Shrine Device Dispenser | West Necluda | -0250, -0131, 0018 |
| Hudson Construction Site Device Dispenser | Akkala Highlands | 3801, 1564, 0091 |
Zonai Rocket
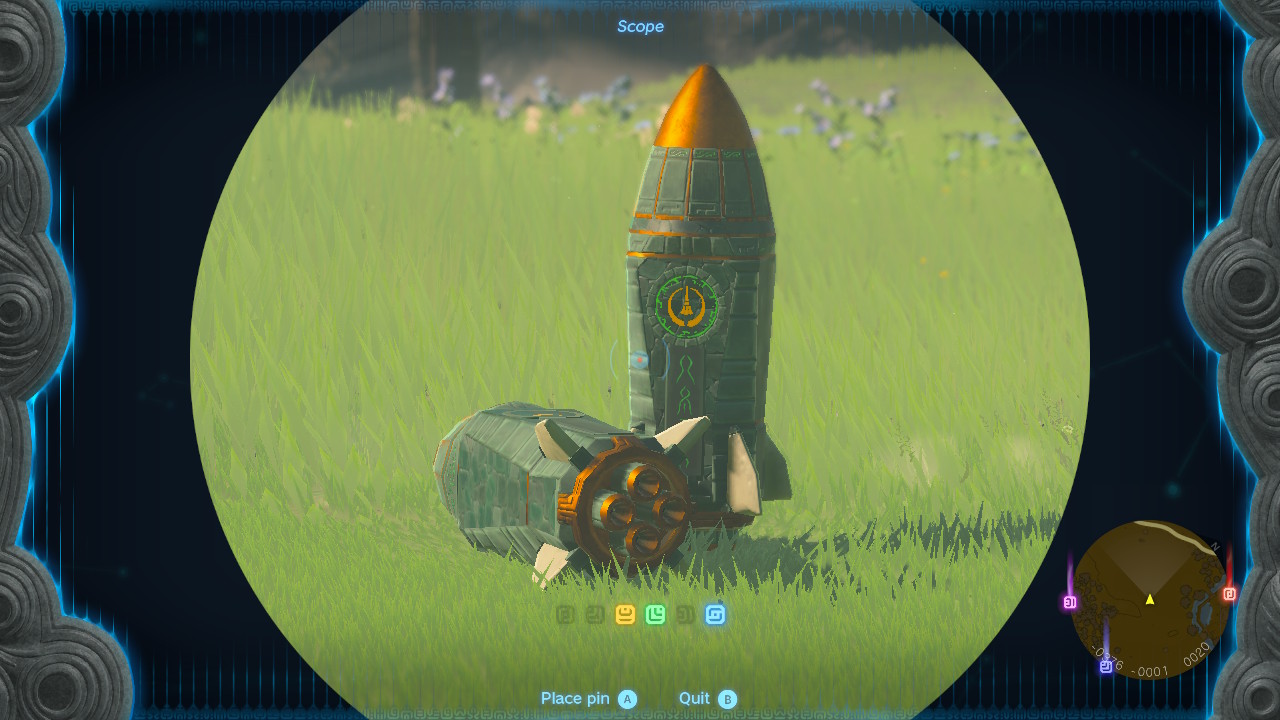
The Zonai Rocket produces tremendous thrust. Link may attach this to various items to move them in a specified direction. This Zonai Device, on the other hand, goes out quickly.
Link can attach Zonai Rockets under base platforms with the devices pointed up. When activated, the Zonai Rockets will quickly propel the machine upwards. However, as this Zonai Device quickly burns out, it is not recommended as the main propeller for the machine. The Zonai Rocket is only recommended to quickly get to a high altitude or quickly move forward. Link can pair this with the Zonai Fans.
Link can get a Zonai Rocket from any of the Zonai Device Dispensers listed below:
| Zonai Device Dispenser | Region | Coordinates |
|---|---|---|
| Jinodok Shrine Device Dispenser | Central Hyrule Sky | -1220, -1584, 1007 |
| Ijo-o Shrine Device Dispenser | Hebra Mountains Sky | -3807, 2760, 0702 |
| Hudson Construction Site Device Dispenser | Akkala Highlands | 3801, 1564, 0091 |
| Left-Leg Depot Device Dispenser | Faron Grasslands Depths | 1052, -2316, -0552 |
4. Batteries
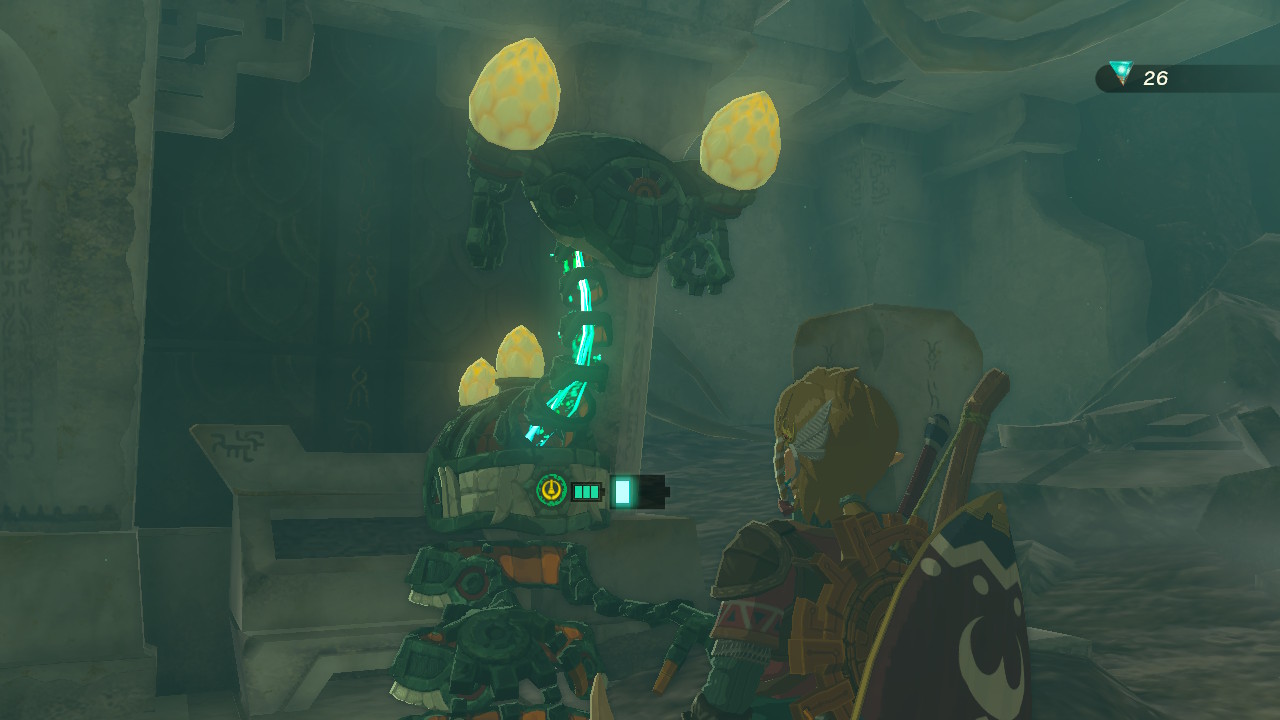
As mentioned, the more Zonai Devices added to the build, the more battery it needs to work. Also, if the player wishes to use it longer, Link needs more power in his Energy Cell. It is technically possible to build it and have it work with Link’s default amount of one battery icon. However, Link can only use it for a limited period. Link needs to upgrade his Energy Cell to use it longer.
Energy Well
Link must accumulate Energy Wells to improve his Energy Cell and gain additional batteries. One-third of the battery icon is equal to a single Energy Well. To put it another way, three Energy Wells correspond to one battery icon. Link can earn an additional 45 Energy Wells in the game for an overall of 48, equal to 16 battery icons.
Link must collect 100 Crystallized Charges to obtain a single Energy Well. Then, proceed to a Crystal Refinery and exchange them for an Energy Well.
Crystallized Charge
The game has three varieties of Crystallized Charges: regular Crystallized Charges, Large Crystallized Charges, and Huge Crystallized Charges.
Link can get Crystallized Charges from various chests and bosses, including Flux Constructs and Froxes. However, the most popular way to obtain Crystallized Charges is to purchase them from Forge Constructs. Instead of Rupees, Link must exchange Zonaite for Crystallized Charges.
Normal Crystallized Charge
This is the most fundamental form of Crystallized Charge. To obtain one, Link must pay three Zonaites to Forge Constructs. Link must acquire 300 Zonaites to gather 100 Crystallized Charges for one Energy Well.
Large Crystallized Charge
One Large Crystallized Charge is equal to twenty Crystallized Charges. So, instead of 100 Crystallized Charges, Link may utilize 5 Large Crystallized Charges to create one Energy Well. Link must exchange three Large Zonaites to Forge Constructs to earn a single Large Crystallized Charge. To obtain one Energy Well, Link must collect 15 Large Zonaites to yield 5 Large Crystallized Charges.
Link may also earn Large Crystallized Charges by defeating a Stalnox, Black Hinox, and Frox.
Huge Crystallized Charge
The Huge Crystallized Charge is the same as 100 Crystallized Charges. This means that one Huge Crystallized Charge piece is all needed to get one Energy Well.
Sadly, Link cannot buy Huge Crystallized Charges from Forge Constructs. After defeating Master Kohga in the Great Abandoned Central Mine, the Abandoned Gerudo Mine, the Abandoned Lanayru Mine, and the Abandoned Hebra Mine, Link can obtain Huge Crystallized Charges. In addition, Link can get a Huge Crystallized Charge for defeating four regional monsters for the first time in a rematch in the Depths. Colgera, Marbled Gohma, Queen Gibdo, and Mucktorok are the bosses in question.
Crystal Refinery
After gathering the required Crystallized Charges, Link can now convert them into Energy Wells. Link can do so via visiting the Crystal Refinery. In front of the Nachoya Shrine, there is a Crystal Refinery. This Shrine is near the Room of Awakening in the southernmost part of Great Sky Island. Link may find the Crystal Refinery in these coordinates: 0363, -1652, 2298.
Temporary Battery
Link can receive temporary batteries similar to his heart and stamina. Link has to use Zonai Charges to get them. The Zonai Charge gives Link a temporary Energy Well. This means that once Link has emptied the temporary Energy Well, it won’t recharge.
It should be remembered that Zonai Charges only supply Link with temporary power if consumed with a full battery. If not, the Zonai Charge will refill power equivalent to one Energy Well.
Another kind of Zonai Charge is the Large Zonai Charge. This item replenishes three Energy Wells or grants three temporary Energy Wells. Again, three Energy Wells are the same as one battery icon.
Zonai Charges and Large Zonai Charges are both acquired through purchasing them from Forge Constructs. Link can get one Zonai Charge for every two Zonaites and one Large Zonai Charge for every one Large Zonaite.
Link can obtain Zonai Charges as loot from Soldier Constructs and buy them. Soldier Construct I, Soldier Construct II, Soldier Construct III, Soldier Construct IV, Captain Construct I, Captain Construct II, Captain Construct III, Captain Construct IV, Training Construct, Flux Construct I, Flux Construct II, and Flux Construct III may yield Zonai Charges.
Link can obtain Large Zonai Charges by defeating a Soldier Construct IV, a Captain Construct III, a Captain Construct IV, a Flux Construct II, and a Flux Construct III.
Zonai Devices
There are also Zonai Devices that can add batteries to built machines. These are the Zonai Battery and the Zonai Big Battery.
Zonai Battery
The Zonai Battery can hold concentrated Zonai-charge energy. Link can use this to temporarily power the Zonai Devices that are attached to it.
Link is going to be able to get a Zonai Battery from the following Zonai Device Dispensers:
| Zonai Device Dispenser | Region | Coordinates |
|---|---|---|
| Simosiwak Shrine Device Dispenser | Great Hyrule Forest Sky | 0212, 1988, 0755 |
| Kadaunar Shrine Device Dispenser | Eldin Canyon Sky | 1976, 1220, 1251 |
| Igoshon Shrine Device Dispenser | Lanayru Great Spring Sky | 3433, 0641, 1316 |
| Mayanas Shrine Device Dispenser | Lanayru Sea Sky | 4670, -1024, 1789 |
| Joku-usin Shrine Device Dispenser | Faron Grasslands Sky | 1097, -3334, 0828 |
| Digdogg Suspension Bridge Device Dispenser | Hyrule Field | -1627, -1888, 0002 |
| Mustis Lightroot Device Dispenser | Death Mountain Depths | 2186, 2634, -0962 |
Zonai Big Battery
The compression rate of this Zonai Device is greater. Compared to the ordinary Zonai Battery, the Zonai Big Battery stores more temporary energy.
This is one of the few Zonai Devices that Link cannot obtain via Zonai Device Dispensers. Instead, Zonai Big Batteries are obtained from chests within the Bamitok Shrine, Ikatak Shrine, Jochisiu Shrine, Minetak Shrine, and Momosik Shrine. After Link’s Energy Cells have been completely upgraded, he can obtain Zonai Big Batteries from Forge Constructs.
How to Build a Flying Machine in Tears of the Kingdom: Hover Bike
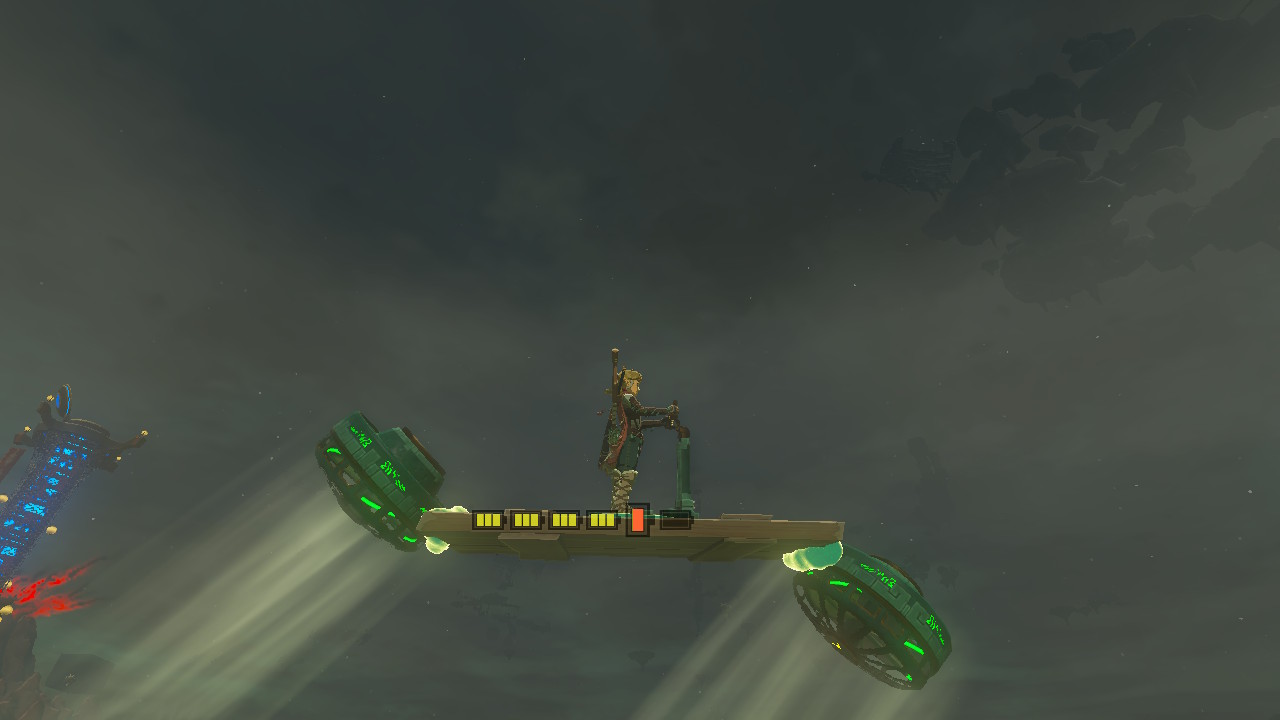
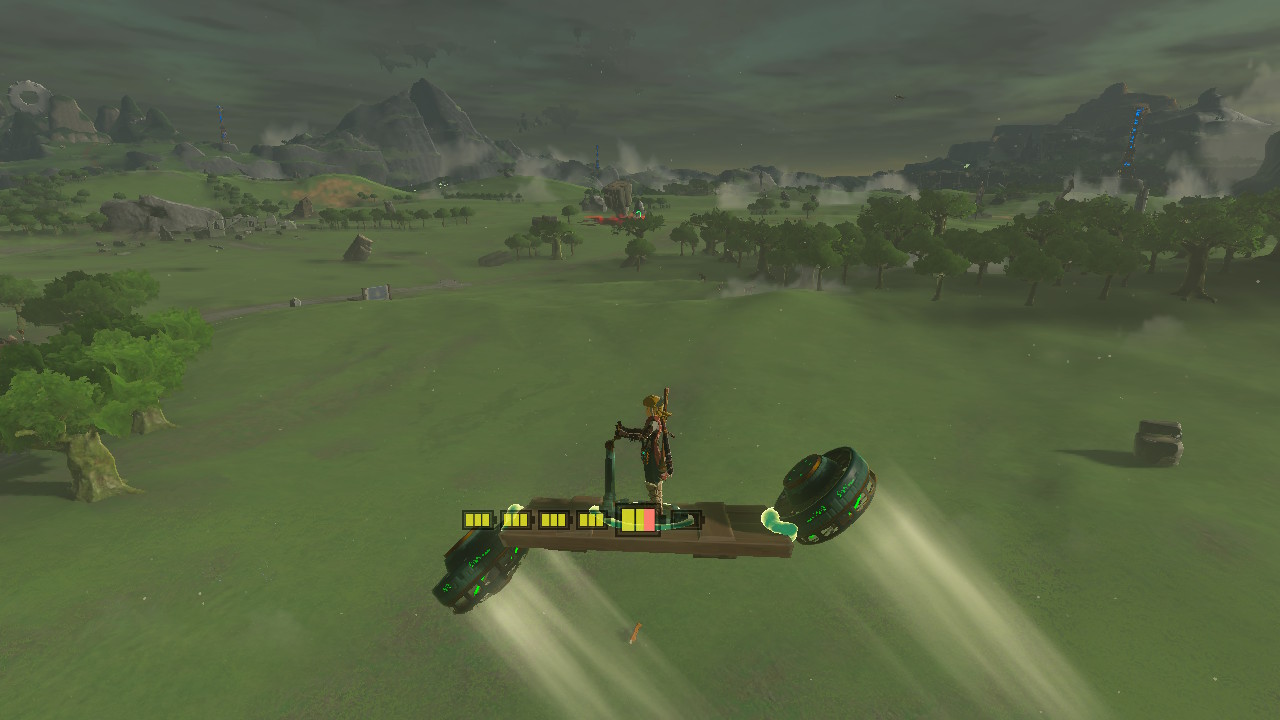
Here, we will make the most basic flying machine that Link can build in Tears of the Kingdom. As this is a simple build, it can only carry Link’s weight. This makes it great for traversing Hyrule’s lands, skies, and depths.
For this build, Link will need the following materials:
- One small and thin base platform. For this, Link can use the thin wooden platforms from the Hyrule Restoration Materials
- One Zonai Steering Stick
- Two Zonai Fans
To build this flying machine, Link must do the following:
- First, drop down all the materials on the ground. As there are a few materials to use, it is better to hold them one by one through Link’s inventory and drop them rather than using the up-directional button to drop an item.
- After that, hold the L button and use the right stick to select the Ultrahand ability. Aim on the small wooden platform and press the A button to grab it. Bring the wooden platform close to the other materials and lay it flat on the ground.
- Then, press the L button again to ready the Ultrahand ability. Aim on the Zonai Steering Stick and press the A button to grab it. Bring it on the small wooden platform with the Zonai Device facing one of its shorter sides. Hold the R button and use the directional buttons to rotate if necessary.
- Following that, press the L button to ready the Ultrahand ability. Aim on the small platform again and press the A button to grab it. Hold the R button and use the directional buttons to rotate the attached items and lay them on its side. The shorter side of the small platform should be standing vertically, with the steering stick helping it stand up. Link can lay the attached items on either the left or right. However, we will lay it on the right side to easily understand this tutorial.
- Next, press the L button again to aim the Ultrahand ability. Aim on one of the Zonai Fans and press the A button to grab it. Hold the R button and use the directional button to rotate the Zonai Fan. Rotate this Zonai Device so that it is upright. Then, bring it to the front of the small platform and the Zonai Steering Stick. Move the Zonai Fan so that the fan is facing the opposite side of the Zonai Steering Stick.
- Rotate the Zonai Fan so that it is at a 45-degree angle from the front side of the platform and Zonai Steering Stick. Ensure the Zonai fan is perfectly centered on the small platform before pressing the A button to attach it. The Zonai Fan should be facing the platform side of the machine with the front nearer the platform side.
- After that, press the L button again to ready the Ultrahand ability. Aim on the other Zonai Fan and press the A button to grab it. Hold the R button and use the directional button again to rotate it again. Just like the other one, this Zonai Fan should also be upright, but instead of the front, bring this Zonai Fan to the rear of the small platform and Zonai Steering Stick. Move the Zonai Fan so that its back side is facing the side with the Zonai Steering Stick.
- Rotate the Zonai Fan so that it is also at a 45-degree angle. Ensure the Zonai fan is perfectly centered on the small platform before pressing the A button to attach it. The Zonai Fan should avoid the Steering Stick and the small platform. But, because it is at an angle, the back of the Zonai Fan should face the side with the Zonai Steering stick.
- Finally, press the L button to aim the Ultrahand ability. Aim on the small platform and press the A button to grab it. Hold the R button and use the directional buttons to set the machine to the right side. Press the B button to deactivate the Ultrahand ability, and Link has now built a simple flying machine!
To use this flying machine, simply approach the Zonai Steering Stick and press the A button to use it. Once Link embarks, the Zonai Fans will activate and lift the machine off the ground. Then, Link can now roam around Hyrule using the Hover Bike!
Make sure to attach the Zonai Fans perfectly centered on the small platforms. Otherwise, the whole machine will fly at an angle. Because of that, the flying machine may become hard to use and steer.
Link doesn’t need much battery because this flying machine only has a few Zonai Devices. However, as mentioned above, if the player wants to use it longer, then adding more Energy Wells is necessary. Link can also attack Zonai Batteries to the contraption, making the whole machine heavier.
Also, if the player wishes it to be faster or to carry more weight, Link can add more Zonai Fans. For that, Link must add two Zonai Fans to both sides of the rear Zonai fans. This is to preserve the balance of the flying machine.
How to Build a Flying Machine in Tears of the Kingdom: Improved Fan Plane

After getting the Autobuild ability, Link will get a Schema Stone for a Fan Plane. This is a slightly more complex flying machine than the Hover Bike. However, we will make minor changes to improve this flying machine. This version is great for traveling from one Sky Island to another. Because of the Zonai Wing, however, Link can only use this flying machine one at a time for a specific amount of time.
To build this flying machine, Link will need the following materials:
- One Zonai Steering Stick
- One Zonai Wing
- One Zonai Cart
- Three Zonai Fans
Zonai Cart
Thanks to its four tiny wheels, the Zonai Cart is designed to move smoothly over flat surfaces. Link can utilize the power to keep it moving if there is a power source.
Link can obtain a Zonai Cart from any of the Zonai Device Dispensers listed below:
| Zonai Device Dispenser | Region | Coordinates |
|---|---|---|
| Jirutagumac Shrine Device Dispenser | Lanayru Great Spring Sky | 2913, 0510, 0951 |
| Ukoojisi Shrine Device Dispenser | West Necluda Sky | 1349, -2144, 0585 |
| Natak Shrine Device Dispenser | Akkala Highlands Sky | 3748, 1538, 1157 |
| Taninoud Shrine Device Dispenser | Hebra Mountains Sky | -1726, 3377, 0949 |
| Joku-u Shrine Device Dispenser | Faron Grasslands Sky | 1390, -3231, 0417 |
Step-by-Step
Link must do the following to create an improved Fan Plane:
- First, drop all the materials mentioned above on the ground. To do that, it is recommended to use the hold and drop feature to drop all materials on the ground.
- Hold the L button and select the Ultrahand ability with the right stick. Aim on the Zonai Wing and press the A button to grab it. Move the Zonai Wing towards an open space away from the other materials. Lay the Zonai Wing on flat ground and upside down. Press the B button to let go of the Zonai Wing.
- Then, press the L button to ready the Ultrahand ability. Aim on the Zonai Cart and press the A button to grab it. Bring the Zonai Cart on top of the Zonai Wing. Hold the R button and use the directional buttons to rotate it so that the wheels of the Zonai Cart are on top. Set the upside-down Zonai Cart facing in the same direction and the middle of the upside-down Zonai Wing. Press the A button to attach them.
- After that, press the L button again to aim the Ultrahand ability. Aim on the upside-down Zonai Wing and press the A button to grab it. Hold the R button and use the directional buttons to rotate the Zonai Wing and Cart on the right side up. Press the B button to let go of the attached items. Set it flat so the Zonai Wing and Cart will not roll away.
- Next, press the L button to ready the Ultrahad ability. Aim on the Zonai Steering Stick and press the A button to grab it. Hold the R button and use the directional buttons to rotate the Zonai Steering Stick upright. Place it on top and in the middle of the Zonai Wing. Press the A button to attach the Zonai Steering Stick to the Zonai Wing. Ensure the Steering Stick faces the Zonai Wing’s direction before attaching them.
- Following that, press the L button again to aim the Ultrahand ability. Aim on one of the Zonai Fans and press the A button to grab it. Hold the R button and press the directional buttons to set it upright. Bring it to the left side of the Zonai Wing with the Zonai Fan facing the back of the whole machine. Set the Zonai Fan on the middle of the rear of the left side of the contraption. Once ready, press the A button to attach the Zonai Fan.
- Then, press the L button to ready the Ultrahand ability. Aim for another unattached Zonai Fan and press the A button to grab it. Hold the R button and press the directional buttons to set the Zonai Fan upright. Bring it to the right side of the Zonai Wing with the Zonai Fan facing the back of the contraption. Set the Zonai Fan on top of the middle of the back of the right side of the Zonai Wing. Once ready, press the A button to attach this Zonai Fan.
- After that, press the L button to ready the Ultrahand ability. Aim on the last unattached Zonai Fan and press the A button to grab it. Hold the R button and press the directional buttons to set the Zonai Fan upright. Set the Zonai Fan on top of the middle of the back of the Zonai Wing. The Zonai Fan should be facing behind the machine. Once ready, press the A button to attach this Zonai Fan.
- Finally, Link has built an improved Fan Plane!
Using this flying machine, use the Ultrahand ability to move the Fan Plane. Make it face the general direction of where you want to head towards. This flying machine works best when placed on the edge of a Sky Island in Tears of the Kingdom.
Next, approach the Zonai Steering Stick on top of the Zonai Wing. Press the A button to embark on the Zonai Steering Stick. Doing so will activate the Zonai Wing and the Zonai Fans. Link can now use this flying machine to a different Sky Island!
You might be wondering, what is the Zonai Cart for? The Zonai Cart underneath the Zonai Wing helps with taking off on any surface and landing.
As mentioned above, Link can only use this flying machine temporarily. This is because of the Zonai Wing, which disappears after a little over a minute.
Link can also attach Zonai Rockets to both sides of the Zonai Wing to gain more initial thrust and speed.
This flying machine has a time limit, so Link can have only a few Energy Wells. However, more batteries are required if you add more Zonai Devices like the above rockets.
Set As Favorite
Link can set the built flying machine as a favorite if the player desires via the Autobuild ability. This allows Link to rapidly construct a specific flying machine from the same resources. If one or a few materials are unavailable, Link must use a Zonaite to obtain them and continue with the build.
To set the created flying machine as a favorite, the player must do these:
- To begin, hold down the L button while using the right stick to pick the Autobuild ability.
- Then, navigate to the desired and finished flying machine build in the history section.
- Press the Y button to set the build as a favorite. The build is going to be added to the favorites list.
Conclusion
Building flying machines in Tears of the Kingdom demonstrates the player’s creativity and determination, reflecting the series’ longstanding themes of courage and resourcefulness. This is more than just a technical achievement; it symbolizes Link’s perseverance and the vast skies waiting to be explored.
As you take to the skies in your creation, remember that in Tears of the Kingdom, the skies offer the promise of unending discovery, representing the essence of the Zelda series – a timeless tale of heroism and the search for the unexpected.


