Photo mode is back in The Legend of Zelda: Tears of the Kingdom! Taking pictures can be a fun and exciting way to remember your adventures. With the new Purah Pad, Link can take pictures of anything! They can be creatures, places, or any moment that catches your eye.
This guide will discuss how to take photos in Tears of the Kingdom. Players can then better understand how this mechanic works. With that, Link can snap great shots and even complete game objectives! Let’s delve into the world of photography in the ever-expanding kingdom of Hyrule!
The Camera Ability
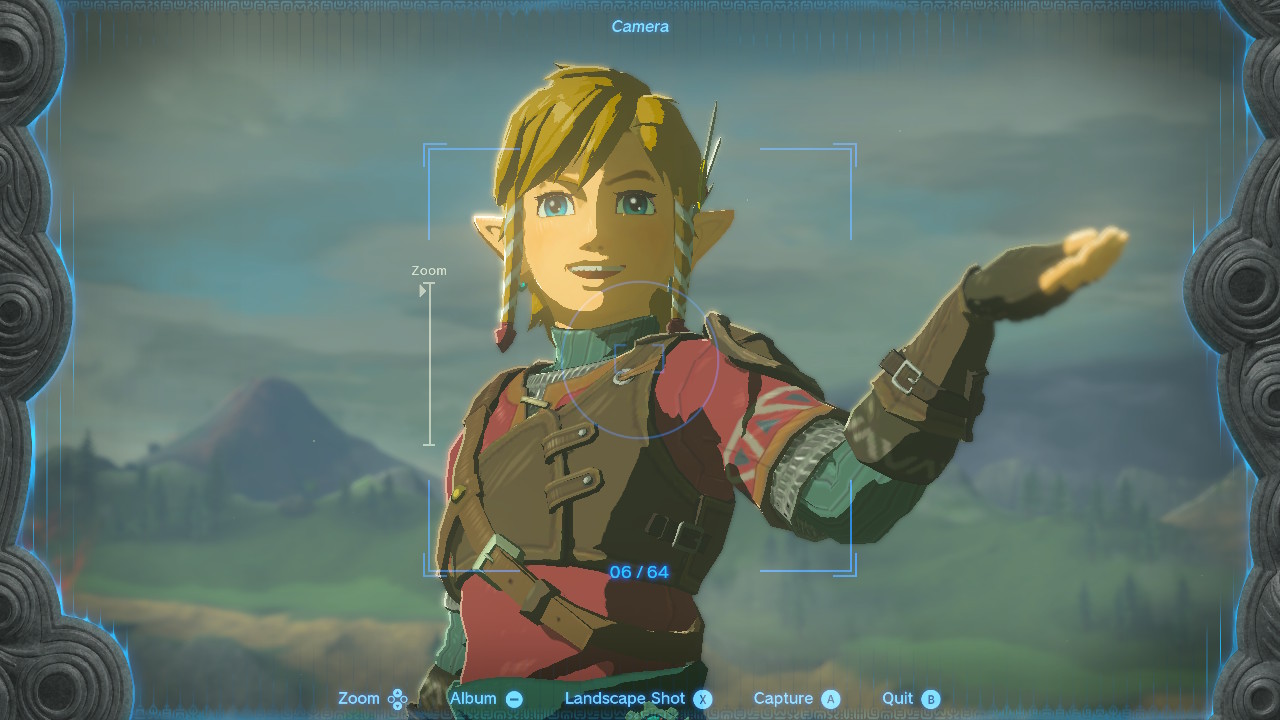
In Tears of the Kingdom, Link can take photos using the Camera ability in his Purah Pad. Link can use the Camera to photograph anything he can find all over Hyrule. With the Camera ability, Link can even take a selfie, tweak the camera angles, and have Link perform various poses.
One of the uses of taking photos using the Camera ability is to fill up the Hyrule Compendium. Link uses the Hyrule Compendium to gather photos and data for an encyclopedia of almost everything in the game. With the Camera ability, Link can take photos of different creatures, enemies, weapons, shields, bows, materials, and even treasures scattered all across Hyrule.
After Link takes a photo of an apple, for example, the photo and data for the apple are added and saved to the Hyrule Compendium. Completing the Hyrule Compendium, or even just taking a photo of a few specific creatures, yields a few rewards.
Aside from getting rewards for completing the Hyrule Compendium, Link has another great use for the Camera ability and the Hyrule Compendium. Link can use the photo and data gathered in the Hyrule Compendium to track and find more in the overworld.
To do this, Link must have the Sensor+ function. With this, the Sensor+ will scan the surrounding area for the item or creature registered to it. If the item or creature is nearby, Sensor+ will react. The reaction will depend on the distance Link is from it. With this, Link will be able to farm items and materials.
How to Take Photos in Tears of the Kingdom
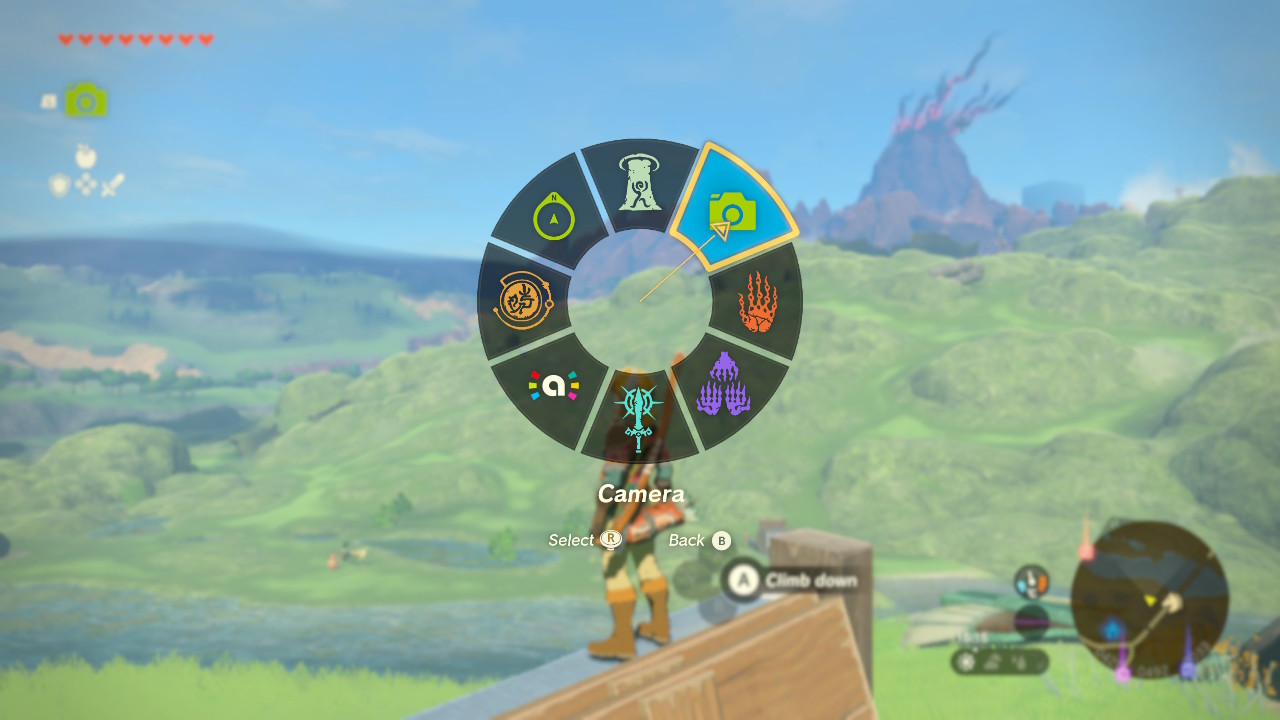
To take photos using the Camera in Tears of the Kingdom, Link must do the following:
- First, hold the L button and use the right stick to select the Camera ability in the upper right part of the wheel.
- Next, the player can use the right stick or the Nintendo Switch’s gyroscope to change the angle of the shot. Also, the player can press the up and down directional buttons to zoom in or out.
- Once ready, press the A button to take the photo.
- If the player is satisfied with the photo, select “OK” to save it to the Purah Pad’s album.
When taking pictures, you will probably see an item or creature in the shot being highlighted. Taking the picture with the highlight means registering that item or creature to the Hyrule Compendium. You will know if the item or creature is already registered through the color of the highlight. If the highlight is orange, it has not yet been registered to the Hyrule Compendium. If it is blue, it means it is already registered.
Link can also take selfies using the Camera ability! Press the X button to switch to Self-Portrait mode when aiming the shot. In this mode, Link can perform a few poses. Move the left stick to the left, down, right, or up to pose.
If Link has a shield, weapon, and/or bow equipped, he will also pose with it if you hold the ZL button while moving the left stick. When in Self-Portrait mode, it is worth mentioning that the NPCs will look directly at the camera if they are in the shot.
How to Get the Camera Ability
Like in Breath of the Wild, Link doesn’t immediately have access to the Camera ability in the game. In Tears of the Kingdom, Link can start taking photos after the “Camera Work in the Depths” Main Quest.
Link must activate the Skyview Tower in Lookout Landing to get this Main Quest, then head back to Purah. After that, Link can now start this Main Quest.
Camera Work in the Depths
To start this Main Quest, Link must head to the first floor of the northern part of Lookout Landing. There, Link will find Josha and Robbie. Tell them, and Josha will say she wants to investigate the Depths. However, Robbie thinks it is too dangerous for her. Josha will then try to persuade him that she needs more info on the figure to understand the Depths.
Select “What figure?” on the prompt, and she will explain that their survey team found some artifacts from the Depths. One of these artifacts caught her attention. She thinks that the figure in the artifact is proof that mysterious people once lived in the Depths.
Then, Robbie will say he will go down there himself with Link and find anything about it. Robbie will tell Link they’ll use the Purah Pad’s camera to photograph their findings for Josha. Select “Camera?” on the prompt, and Robbie will explain that it is one of the Purah Pad’s basic features. He will explain that with it, Link can capture nearby scenery as an image and store it in the Purah Pad.
He will also continue counting on Link to keep him safe from the monsters in the Depths. After that, he will say they should reach the Depths through the chasm in the south of Lookout Landing. He will say he will wait for Link in the Depths and leave.
Josha will then give Link 10 Brightbloom Seeds and a bundle of five Arrows. She will explain that these can help light up the pitch-black area that is the Depths. After that, the “Camera Work in the Depths” Main Quest has begun!
1. Going to the Depths
After getting this Main Quest, head to the south of Lookout Landing. Here, Link will find the Hyrule Field Chasm. This chasm is near the Jiosin Shrine. So, if Link has already completed this shrine, he can simply fast-travel to that.
Once Link finds the Hyrule Field Chasm, go to its southwestern part to find a floor free of damaging Gloom. From here, jump down the hole of the chasm. Make sure not to hit the Gloom-filled walls of the chasm while dropping down. Once Link is far from the bottom, press the X button to use the Paraglider and glide softly. At the bottom, Link will arrive in the Depths and find a member of the Zonai Survey Team named Ponnick next to a campfire.
Talk to Ponnick, and he will say that Robbie instructed him to guide Link. However, because Robbie rushed to explore, Ponnick had already run out of Brightbloom Seeds and lost sight of him. Ponnick will then show Link a glowing area where he thinks Robbie went. However, he will continue and say that Robbie just continued exploring as identified by the various campfires.
Ponnick will then say that the last time he saw Robbie was when he was heading to the west. Then, Ponnick will ask if Link has Brightbloom Seeds, so select “I do” on the prompt. Then, he will explain that Link can use them to light up areas. To do that, Link can fuse them with arrows, shoot them out, or just throw them.
2. The Lightroots
Next, head for the glowing structure Ponnick showed earlier, the Nisoij Lightroot. Link can light up the dark parts of the area using Brightbloom Seeds. Upon reaching the Nisoij Lightroot, go to the center under the glowing symbol and press the A button to examine. After that, the Nisoij Lightroot will activate and light up a large part of the area. This will also show its area on Link’s map.
Afterward, go to the nearby campfire, and Link will find a note on a small table that Robbie wrote. Go to the next campfire found in the west. Link will have to pass through some Gloom on the way to it. Link can head up the large rock nearby to cross it, then jump and glide. On this campfire, Link will find another note.
In the west, beyond the area illuminated by the Niosij Lightroot, Link will find another Lightroot in the distance that is not activated yet. Head for this new Lightroot. Although it is possible to reach this Lightroot in the dark, it is recommended to light up the path using Brightbloom Seeds. This is to help the player see if there are Gloom or enemies in the way.`
Upon reaching the new Lightroot, the Iayusus Lightroot, head under the glowing symbol and examine it. Doing so will activate the Iayusus Lightroot and light up the surrounding area. This will also unlock this area in Link’s Map.
3. Robbie and the Camera
Just southwest of the Iayusus Lightroot, Link will find Robbie next to a campfire. Talk to Robbie; he will be amazed by how the Lightroot lit up the area. Then, he will show Link the large statue that he found that looks like the figure Josha wanted to study. Because of that, Robbie will ask Link to take a photo of the statue using the Camera ability. He will then take the Purah Pad from Link and unlock the Camera ability and the Hyrule Compendium.
Next, take a picture of the large statue nearby. Ensure the quest marker is on the shot before taking a photo. After that, Robbie will look at the photo and tell Link that Josha will be satisfied. So, Robbie will say that it’s time to return to the surface, and they’ll see each other in Lookout Landing. He will then leave.
4. End
After that, head back up to Lookout Landing. To quickly do that, press the – button to open the map, press the up directional button to navigate to the map of the surface, and select Lookout Landing Skyview Tower’s travel point.
Once in Lookout Landing, head back to the first floor of the northern part of the area. There, Link will again find Josha and Robbie. Speak with Robbie, and he will tell Link to show Josha the photo he took. Josha will then look at it and confirm that it is the same as the figure she was referring to. So, she will thank Link and say that it confirms her theory. After that, Josha will also give Link five pieces of Zonaite.
After a few more bits of dialogue, Link will complete the “Camera Work in the Depths” Main Quest! Thanks to that, Link now also has the Camera ability!
Conclusion
With the Purah Pad’s camera in Tears of the Kingdom, Link has the power to capture the beauty and wonder of Hyrule. Not only that but taking photos also has great uses. Whether it’s a stunning landscape, a quirky NPC, or a fearsome enemy, don’t hesitate to take a photo and create your gallery of memories. With that, explore, experiment, and enjoy the mechanics of taking photos in this beautiful world of Hyrule!