In Borderlands 3, finding the perfect Moze build can be the difference between being a run-of-the-mill Vault Hunter and a force to be reckoned with. Moze, the Gunner, is known for her impressive firepower and mechanized Iron Bear suit. This makes her a formidable character to master.
With numerous skill trees, weapon combinations, and play styles to choose from, this guide delves deep into the arsenal of possibilities to help you get the best Moze build tailored to your preferences.
Whether you seek to unleash a storm of bullets, harness the power of high-tech weaponry, or focus on crowd control, we’ve got you covered. Join us as we explore how to maximize Moze’s potential and become an unstoppable force in the chaotic world of Borderlands 3.
Let’s be honest: the best Moze build the player can use is the one that entirely suits their play style. Before deciding on which build is best for you, it is important first to understand Moze:
Action Skill
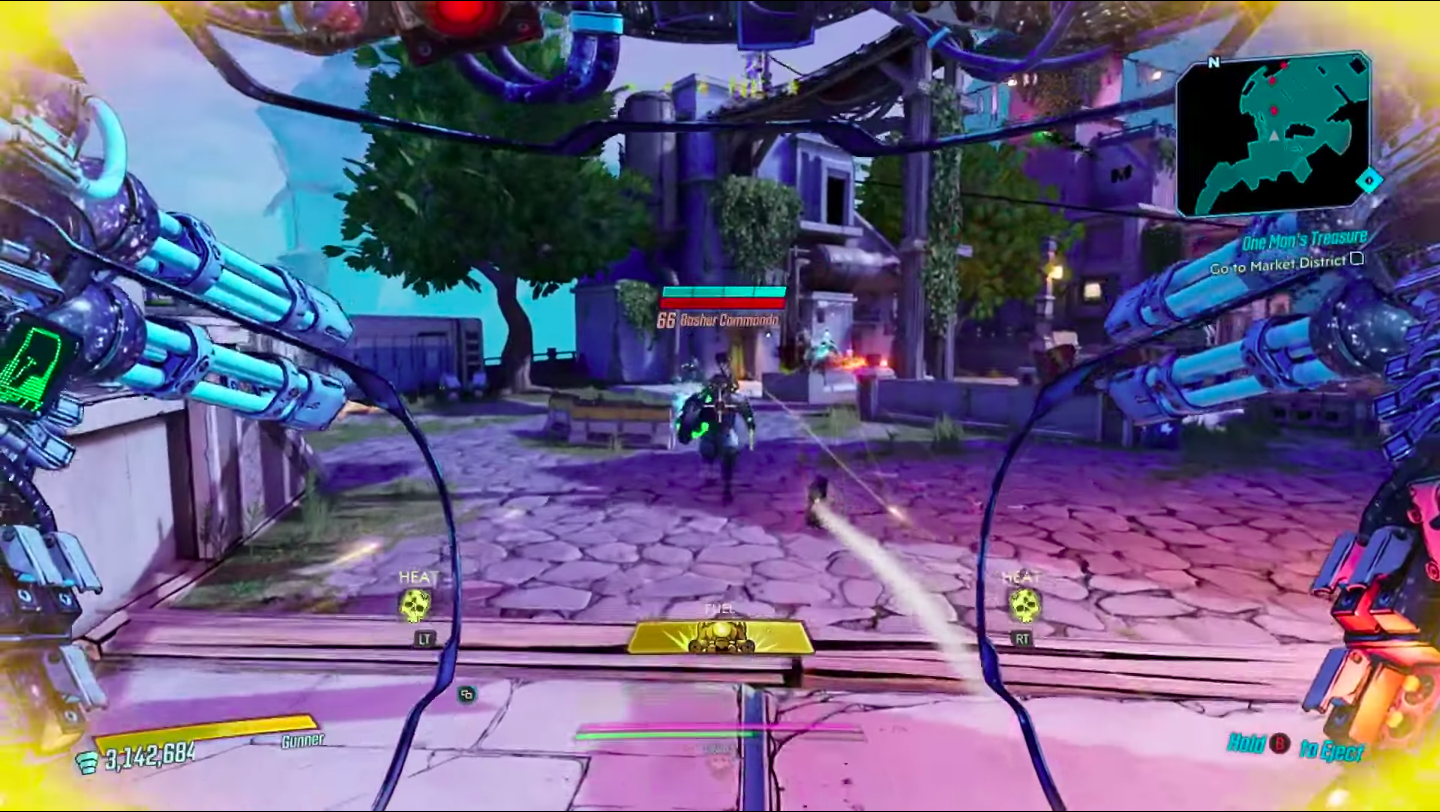
Instead of selecting from three Action Skills like the other characters in the game, Moze’s main Action Skill unleashes her mech called Iron Bear. This mech has its health made up of armor, and it can battle with or without the player piloting it.
Iron Bear has a fuel bar that gradually drains while it is operational. If the player activates its main weapon, the mech will deplete more fuel. Other maneuvers do not use up fuel. The consumption of fuel is also affected due to the mech’s weapon fire rate. The action skill will stop if the fuel bar or the health bar is emptied.
Moze’s Iron Bear can sprint, jump, and even double jump, which enables it to float and get momentum. Double jumping enables greater movement speed than sprinting. If the player pilots the Iron Bear, hitting the melee button allows it to execute a strong stomp that inflicts damage. The player will not be able to crouch, slide, grab ledges, slam, emote, or revive teammates while piloting the Iron Bear.
Iron Bear’s base cooldown time is 110 seconds. If the player holds down the crouch button, the player will exit the Iron Bear. Then, doing so will grant the player less cooldown duration depending on the fuel remaining in the action skill.
Each one of Moze’s four skill trees has supplementary Action Skills that enable the player to pilot the Iron Bear while using various weapons. Each kind of weapon has a unique rate of fuel consumption. The player may carry any two of these weapons at once.
Moze has seven action skills spread across four skill trees. Each skill tree includes one action skill accessible from the start and another that the player may unlock. This is apart from the Bear Mother Skill Tree, which has only one action skill called Iron Cub.
Moze’s Iron Bear features two action skill slots. The player may place two distinct action skills in both slots or just one action skill in both slots.
Skill Trees
As mentioned, Moze has four skill trees, each having action skills. The following are Moze’s skill trees and their respective action skills:
- Demolition Woman
Demolition Woman is a skill tree to level up for an explosive build. This is due to its emphasis on massive splash damage and being able to spam grenades.
Demolition Woman’s related weapons initially include the V-35 Grenade Launcher. This is a semi-automatic grenade launcher that fires projectiles that bounce and explode after a brief delay or when they come into contact with an enemy. Grenade mods do not affect this weapon.
The other weapon that the player can unlock is the Vanquisher Rocket Pod. This is a rocket launcher that can rapidly shoot unguided explosive rockets at high speeds. Although it is not being shot, it instantly starts reloading.
- Shield of Retribution
This skill tree focuses on providing Moze with a build that gives the player the most chance to survive. This is because it compromises health for enormous quantities of shields that protect the player from damage.
With the Shield of Retribution skill tree, the player will initially get the Railgun. After a brief charging period, this weapon shoots supercharged high-velocity projectiles that inflict shock damage.
Eventually, the player can unlock the Bear Fist. This is a close-range pneumatic-driven fist with enormous damage capabilities.
- Bottomless Mags
This skill tree will give Moze a massive magazine size and renewable ammo. With this, the player would never have to stop firing.
Initially, the player can get the Minigun from the Bottomless Mags skill tree. This weapon can fire shots quickly and continuously. If the player shoots the Minigun for an extended time, it will overheat and become useless for a brief period.
The player will also unlock the Salamander. This flamethrower inflicts burning damage, and the player can use it continuously if there is fuel.
- Bear Mother
The player can only get this skill tree if the player has the Designer’s Cut DLC. With this skill tree, the player can get the Iron Cub. This is a scaled-down, unmanned variant of the Iron Bear that consumes less fuel but also delivers less damage.
The Iron Cub will equip two weapons in the player’s remaining Action Skill slot. The Iron Cub will accompany Moze and attack adversaries for the entire duration of the action skill. It’s worth noting that skills that impact the Iron Bear also influence the Iron Cub.
Best Moze Build
With all of these action skill trees, the player has a plethora of diverse combinations of in-game Moze builds to master throughout their adventures in Pandora. The following are the best builds recommended for Moze:
Build 1: Damage Output Focused
This build intends to damage all foes and Bosses encountered throughout the game, regardless of weapon choice. The main purpose of this build is to boost Damage-per-Second (DPS) output regardless of the weapons Moze uses! To be sure, some weapons benefit more than others from this setup due to unique characteristics such as cumulative Critical Hits or infinite Splash Damage.
However, suppose the player simply wishes to have some senseless enjoyment. In that case, choosing this build guarantees that the player can continue to enjoy playing as Moze if the player becomes tired of utilizing the same weapons constantly over harder campaigns. The player can use this if the player wants a fairly balanced and run-and-gun build.
Skill Trees
For this build, the player must put Skill Points on Moze’s Bottomless Mags and Demolition Woman Skill Trees. The player can also put Skill Points on the Skill Tree. However, that should be the player’s least priority compared to the previous two. If the player has a few skill points, they can also use it on the Bear Mother Skill Tree.
Demolition Woman Skills
The following are the recommended skills for this Skill Tree:
- Fire in the Skag Den
If the player inflicts splash damage, this passive skill includes incendiary damage. It is recommended to completely rank it up to its 5th maximum rank to boost the extra incendiary damage to 15%.
- Means of Destruction
The player can recover ammunition and grenades if the player inflicts splash damage. The player must rank it up to its 3rd maximum rank to raise the chance the player can recover ammo to 10% and a chance to recover a grenade to 6%.
- Torgue Cross-Promotion
With this passive skill, the player can double the splash radius if the player inflicts splash damage. When ranked up to its 5th, the player will have a 15% chance to double the splash damage. The doubled splash damage will be equal to 30% damage.
- Stainless Steel Bear
This passive skill will raise the player’s armor and maximum Fuel. When ranked up to its 5th maximum rank, the skill will boost the player’s Iron Bear armor by 30% and the player’s maximum Fuel by 20%. This will also increase the damage of Moze’s Iron Bear by 20%.
- Pull the Holy Pin
This passive skill enables the player to deal critical hits when using grenades. The player can rank it up to its 3rd rank to boost the critical hit chance to 30%. It is important to note that critical damage bonuses do not affect the grenade critical hits.
- Auto Bear
The player can get this passive skill to enable the Iron Bear to attack enemies automatically and briefly after Moze ejects. The Iron Bear mech will attack enemies for 15 seconds. After that, the Iron Bear will charge at an enemy and self-destruct.
- Vampyr
With this passive skill, the player will restore some health if the player’s thrown grenade deals damage to an enemy. When ranked up to its maximum, this skill will restore the player’s health by 20% per damaged enemy.
- Explosive Punctuation
When the player inflicts splash damage, this passive skill will momentarily increase the Action Skill cooldown. The player can rank it up to its 5th rank to increase the Action Skill Cooldown Rate to 25%.
- Short Fuse
If the player inflicts damage using guns, the player will have a chance to create an explosion centered on an enemy. The explosion will deal 75% of the gun damage. With this passive skill, the player will get an explosion chance of 20%.
Bottomless Mags Skills
The player must get the following skills in this Skill Tree for this build:
- Cloud of Lead
With this passive skill, gunshots from Moze and Iron Bear can sometimes deliver extra incendiary damage and do not use ammo. On its 5th rank, the player will get an extra incendiary damage of 11.25%. The player will not consume ammo for every fourth shot.
- Stoke the Embers
This passive skill will boost Moze and the Iron Bear’s incendiary damage. The player can rank it up to its 3rd rank and get an extra incendiary damage of +30%.
- Redistribution
This passive skill will momentarily regenerate the player’s ammo and health after receiving a critical hit. This skill will regenerate the player’s ammo by 5% of the player’s magazine and regenerate up to 2.5% of the player’s missing health. The effect will last for three seconds after a critical hit.
- Scrappy
When the player moves, this passive skill will boost the player’s weapon damage, weapon swap speed, and mode switch speed. When on its 5th rank, the player will get an additional 30% of weapon damage, an additional 48.7% weapon swap speed, 48.7% mode switch speed, and an additional 37.5% handling.
- Rushin’ Offensive
The player can get this passive skill to enable the player to shoot while sprinting. While sprinting, the player will also get an extra 8% of life steal.
- Scorching RPM’s
This passive skill will boost the player’s fire rate and critical hit damage. When ranked up to its maximum, this skill will boost the player’s fire rate by 15% and critical hit damage by 20%. This will boost the damage output of the Iron Bear by 25%.
- The Iron Bank
This passive skill will boost the player’s magazine size. The player can rank it up to its 5th rank to increase the player’s magazine size by 35%.
- Some For The Road
With this passive skill, the player will get infinite ammo for five seconds after ejecting from the Iron Bear.
- Forge
This is a passive skill that will allow the player to replenish ammo for the player’s currently equipped weapon continuously. This skill will replenish 5% of the player’s magazine per second.
Shield of Retribution Skills
It is recommended to get the following skills for this skill tree:
- Security Bear
This is a passive skill that grants the player’s Iron Bear a shield that can absorb damage. The shield deactivates after taking enough damage and then activates after a while. This skill grants the Iron Bear a shield capacity of 20% of its maximum health. It also has a 5-second shield recharging delay.
- Armored Infantry
This passive skill will reduce the damage the player receives and boost the damage output of the player’s gun when shields are active. The player can get an extra 13% damage reduction and 15% of gun damage at the skill’s fifth rank.
- Drowning in Brass
This passive skill will reduce the player’s fire rate and increase the damage output of the player and their allies’ guns. The effects of this skill also stack whenever the player kills an enemy. When ranked up to its maximum, the player will get a reduced fire rate of -2.5% and an extra gun damage of 20%. The effects of this skill last for 15 seconds and can stack up to three times.
- Vladof Ingenuity
The player can get this passive skill to give the player shock resistance and boost the player’s maximum shield. When leveled up to its 5th level, the skill will give the player an extra 47% shock resistance and an extra 30% of the player’s maximum shield.
- Experimental Munitions
The player can get this passive skill for incendiary damage to critical hits. The extra incendiary damage equals 10% of the damage the player dealt.
Bear Mother Skill
As mentioned, the Bear Mother skill tree is exclusive to a DLC expansion. The player can get the following skill from this skill tree if there are a few skill points to spare:
- Big Surplus
This passive skill allows the player to inflict extra incendiary damage when Moze’s Action Skill is still cooling down. When ranked up to its third maximum tier, the extra incendiary damage equals 15% of the gun damage.
Action Skill
If the player does not have access to the Bear Mother skill tree, they can utilize any Moze Action Skill they wish. If the player does have the Bear Mother skill tree, the Iron Cub Action Skill is highly recommended. The player can change its weapon to a Salamander and the augment to Molten Roar. Each time the player summons Iron Cub, it will almost instantly kill itself, and with the Big Surplus skill activated, it will do incredibly outrageous fire damage.
Weapons
As mentioned, this build works regardless of the player’s weapon choice. Some weapons, however, still work better than others. The following weapons are recommended for this build:
- Trevonator
This is a shotgun with a Legendary rarity that Maliwan manufactured. The burst fire mode allows the weapon to shoot nine rounds in less than half a second. It can provide enormous damage in close to mid-range combat when paired with the dual element of Maliwan weapons and a rapid-fire rate. It also has a special weapon effect that fires a burst of three elemental orbs that will explode when it hits a target. This effect does not have a weapon charge-up time.
The player can get the Trevonator at random from any eligible loot source. However, this weapon has a higher probability of dropping from Private Beans in Athenas.
- Flipper
This weapon is a Legendary rarity submachine gun that Maliwan made. The Flipper’s projectile pattern and ammo efficiency suit close to medium-range combat. However, it can be cumbersome for crit-dependent builds until faced with an enemy with a huge critical hit spot.
This submachine gun also has a unique weapon effect in which it fires several rounds in a three-by-three diamond pattern. The projectile count begins at one and develops to nine while the player holds the trigger down.
The player can only find the Flipper submachine gun in the game’s DLC expansion, Bounty of Blood. Here, the player can get this weapon randomly from any eligible loot source. However, it has a higher probability of dropping from Minosaur in Bloodsun Canyon.
- O.P.Q. System
This is an assault rifle with a Legendary rarity that Atlas manufactured. The O.P.Q. System builds on the Q-System’s already remarkable metrics. In addition to a high damage per shot and efficient ammo use, the O.P.Q. System can boost its damage output by switching to an alternate firing mode.
Although, it loses the capability to track foes using tracking rounds. Even so, it is an extremely powerful weapon in general and is often regarded as one of the strongest weapons in Borderlands 3.
The O.P.Q. System also has a special weapon effect that significantly boosts stats. When hit, this weapon can sometimes generate a shock explosion. It is worth mentioning that at close range, the shock blasts might easily knock the player down. In its alternative Fire mode, a hovering drone replica of the gun accompanies the wielder and shoots at targets. It also slows down alt-fire regeneration.
This weapon is available only during the Revenge of the Cartels seasonal event. The player can only get the O.P.Q System randomly from any appropriate loot source. However, it has a higher chance of dropping from Josie Byte, Franco Firewall, and Joey Ultraviolet in Villa Ultraviolet.
- Kyb’s Worth
This weapon is a submachine gun of Legendary rarity that Maliwan manufactured. Kyb’s Worth combines the elemental capacities of Maliwan with the precision and weapon shield of Hyperion. This also has a unique weapon effect in which fallen opponents create a healing aura every 10 seconds.
The player can employ the healing aura to heal characters who are low in health swiftly. The healing aura appears only when an adversary is killed through projectile damage. The aura is not created when the enemy is killed through an elemental status effect.
At any given time, only one healing aura may be present. It then spawns with a weapon shield in the style of Hyperion.
The player can get the Kyb’s Worth as a drop from Wotan the Invincible.
- Roisen’s Thorns
This weapon is a pistol of Legendary rarity that Torgue manufactured. Roisen’s Thorns is a strong pistol that works in the same way as a Masher in that it releases numerous bullets per shot. This makes it exceptionally deadly in proximity.
Its explosive quality provides it with a large area of effect damage. This pistol’s alternate fire also makes it flexible. Although it lacks incendiary bullets, the fire rate and speed are significantly higher. This is good for adversaries that move quickly and are far away.
This weapon has a unique weapon effect, which is that it is always corrosive. Its impact-firing mode shoots an extra four incendiary shots.
The player can get the Roisen’s Thorns randomly from any acceptable loot source. This weapon, however, has a higher probability of dropping from Princess Tarantella II.
- D.N.A.
This weapon is another Legendary rarity submachine gun that Maliwan also manufactured. The D.N.A. submachine gun works similarly to a Cutsman but with randomized capabilities and separate directions. Because its bullets travel slowly and require a while to split, it is best employed against sluggish enemies.
While its initial damage is average, it can quickly build elemental damage on mid-range enemies over time. This enables the player just to tag them and let the elemental damage kill them off. It is often useless at close range since its missiles only deal basic damage and have little time to split.
The player can only get the D.N.A. submachine gun from General Traunt at Mayhem 6 and above.
- Anarchy
This is a Legendary rarity shotgun that Tediore made. The Anarchy shotgun has a gradually rising damage output while compromising its accuracy. This is trying to emulate the Anarchy-based play style from Borderlands 2. The weapon’s damage output will add an extra 30% while decreasing its accuracy each time the player uses it to kill or reload.
The effect may stack significantly, which enables the shotgun to do exceptionally significant damage that may even surpass rocket launchers. The damage increase effect can stack up to 10 times! When using a scope, shooting at great distances with big stacks is still possible.
The damage bonus will reset once the gun is switched out. Because of that, the player should try to use the weapon as much as possible. The player should also take into account the weapon’s reload mechanic. Certain versions could have the “explode when shot” module. This may cause the player to eliminate all stacks due to unintentional downs. The effect will also reset if the player changes zones.
The Anarchy shotgun’s base damage type is a constant splash. Its rounds ricochet off the environment once before bouncing back at foes, and its Critical hits also bounce toward foes.
The player can get the Anarchy shotgun randomly from enemies in the Guns, Love, and Tentacles downloadable content pack. However, it has a higher probability of dropping from Kukuwajack in Negul Neshai.
- Boogeyman
The Boogeyman is a Legendary rarity sniper rifle that Vladof manufactured. This sniper rifle is an extremely useful weapon, as it is one of the few snipers that can do splash damage while having very good base stats without depending on a limiting gimmick. It has significantly improved fire rate, accuracy, and handling.
It also has a chance of spawning a Boogeyman on kill, which is a targeting pink skull that explodes when it comes into contact with an adversary, does non-elemental grenade damage, and has a guaranteed chance of spawning a new Boogeyman after bursting.
The skulls deliver a lot of damage, rendering this weapon an excellent mobbing weapon. This is because each skull that hits an adversary usually generates a new skull, which can swiftly lead to the death of many adversaries. Its high stats and remarkable precision make it a powerful weapon against bosses, especially when critical hits land.
The weapon is capable of nearly infinite magazine size if the player uses any items or skills that offer ammo regeneration, such as Moze’s skills in the Bottomless Mags skill tree. The 60% possibility of not using ammo works effectively with ammo regeneration.
The Boogeyman fires lasers that inflict splash damage. Because of her multiple skills that improve splash damage, ammo regeneration skills, and overall weapon power, the Boogeyman is one of the greatest weapons in the entire game for Moze.
The Boogeyman sniper rifle is only available in the Designer’s Cut DLC. The player can find this weapon randomly from an appropriate loot source in Stormblind Complex during the Arms Race mode. The player can carry the weapon outside the region when extracted with a Gear Extractor.
Shield
Moze possesses the Iron Bear mech to aid in crucial instances, but that is not enough to render anyone less vulnerable. Defense is also essential for keeping the player in combat for a prolonged time. The following are the recommended Shields for this build:
- Transformer
This is a Legendary rarity absorb shield that Hyperion manufactured. The Transformer’s distinguishing feature is its capacity to absorb shock damage and use it to recharge itself. The Transformer has shock damage to shield charge conversion of 100%.
This also has a projectile absorption of 40%. This gives the player an interesting strategic edge against adversaries who inflict shock damage. In such cases, it may be advantageous to focus on any shock damage adversaries last to use their damage output as an improvised source of health. The Transformer, being an absorb shield that has a high absorption chance, also aids in the preservation of ammunition levels in prolonged battles.
The player can get the Transformer to absorb the shield from the ‘It’s Alive’ mission. This is situated on Nekrotafeyo in Desolation’s Edge. Furthermore, the player can obtain this absorption shield from any acceptable loot source. However, it has a higher chance of dropping from Queen Ant Wanette. The player can find her in The Splinterlands on Pandora.
- Super Soldier
The Super Soldier is a Legendary rarity shield that Anshin made. This shield gives the player a 5-second protective barrier if it is completely charged. As long as the shield is full, it will boost the fire rate, enable the magazine to replenish ammo and improve movement speed.
The effects of the Super Soldier are extremely useful in and out of combat, with improved movement speed enabling enhanced mobility and better fire rate, which allows for higher DPS. The ammo regeneration feature is very useful in combat, allowing more bullets to be used without reloading.
Although each effect is briefly gone once the shield breaks, the shield regeneration bubble enables the player to utilize the full advantage of the perks for a brief period without fear of receiving damage.
The player can only obtain this shield in the Director’s Cut DLC expansion. Here, the player can only get the Super Soldier shield after unlocking the Fallen Heroes Vault Card.
- Old God
This is a Legendary rarity shield that Hyperion manufactured. This shield gives 20% more elemental damage for each element it is immune to. It also reduces damage by 25% against all elements. It can spawn with three shield augments.
The player can only get this shield in the Guns, Love, and Tentacles DLC expansion. There, the player may find the Old God shield from any enemy at random.
- Infernal Wish
The Infernal Wish is a shield of Legendary rarity that Anshin made. When the shield is not depleted, it adds one projectile per shot. If the player shoots a weapon, it may result in Self-Combustion. The likelihood of this happening rises with each Infernal Stack. The stack is reset on a second wind.
The player can only get the Infernal Wish shield in the Director’s Cut DLC expansion. There, the player can obtain it at random from any appropriate loot source. The player, however, has a higher chance of finding it in Arm’s Race.
Grenades
Grenades can help the player take out lots of enemies. There are no strict grenades that the player should use, and they can use whichever grenade they want. The following grenades, however, are the recommended grenades to use for this Moze build:
- Cloning Maddening Tracker
This grenade can reproduce itself while bouncing around foes. It will detonate and deal splash damage. Another significant advantage is that it follows nearby foes, improving their likelihood of hitting them. If the player chooses Demolition Woman’s Vampyr skill, the player will experience continuous Health Regeneration via throwing grenades.
This type of grenade, however, is extremely rare, and it does not have a specific loot source.
- Hex
The Hex is a Legendary rarity grenade mod that Atlas manufactured. This is a tracking grenade that produces an elemental beam for the nearest enemies.
The player can get a Hex grenade mod randomly from any appropriate loot source. However, the player has a better chance of finding it from Sky Bullies, situated in The Anvil on Eden-6.
Anointments
The player can easily obtain +100% bonus elemental damage for the next two magazines for Moze. Because the player rarely needs to reload, this additional damage can be considered functionally permanent. To trigger it, the player can just use the Iron Bear mech and back out or release the Iron Cub and let it die.
If the player uses a Deathless 1-life or general low-life build with less than 50% health, the 100% additional radiation damage anointment is still an excellent choice.
Another recommended anointment is the ‘consecutive hits increase weapon damage‘ and the ‘Bonus elemental damage‘ after using an Action Skill. The Consecutive Hits is a fantastic anointment for any vault hunter, and it’s also an excellent anointment for Moze. If desired, the player can apply the 12.5% Weapon Damage and Reload Speed for 25-second anointment.
The player can also get the ‘Bonus Incendiary Damage‘. This is only available to Moze while Demolition Woman’s Auto Bear skill is active. The player may utilize this anointment if the player has the Demolition Woman’s Auto-Bear skill rather than Bear Mother’s Big Surplus skill.
The +25% damage on grenade throw is a good choice for the player’s grenade. With this build, the player will most likely be continually tossing grenades.
Class Mod
Each of Moze’s class modes is great to have. However, the following remarkable class mods are recommended for the player to use for this build:
- Flare
Flare is a Legendary class mod recommended for those who like to use the Iron Bear. This class mod will give the player 100% of the damage output if Iron Bear is active. The additional damage output will decrease as the Iron Bear consumes fuel.
- Eternal Flame
The Eternal Flame is another Legendary class mod that is also great. This Moze-exclusive class mod will give the player a 15% chance to reset the action skill if the player ignites an enemy. It is easier to do this if the player uses weapons with high fire rates.
- Blast Master and Mind Sweeper
Moze’s Blast Master and Mind Sweeper class mods are extremely powerful and easy to acquire. Either one of these is excellent for getting the player moving. The Blast Master is a Legendary class mod that allows the player to inflict more splash damage the longer that the player does not reload.
The bonus damage can go up to 100% of splash damage. This class mod is fantastic for clearing off enemies, but it encourages the player to shoot conservatively. However, suppose the player uses a mix of weapons and skills that allow Moze to have a large amount of ammo in her clip while simultaneously continually regenerating it to prevent reloading. In that case, this can work quite well for the player.
The Mind Sweeper class mod, on the other hand, enables the player’s critical hits to have a chance of dropping a grenade that will explode. When utilizing Assault Rifles and SMGs, this class mod performs fantastically. This player can use this to eliminate both mobs and bosses easily.
The passive rolls on the Blast Master or Mind Sweeper class modifiers will determine whether or not it is good to have. Aim for +weapon type damage that corresponds to the gun type that the player will use the most.
If the player intends to utilize the Trevonator shotgun, search for +shotgun damage. Look for +SMG damage if the player intends to use Kyb’s Worth. Weapon-type enhancements, such as +SMG, are applied independently from the usual gun damage in the game’s damage equation. This implies it gives the player a larger increase in overall damage than it appears.
- Green Monster
If the player wants to do corrosive damage, the Green Monster class mod is also a good choice. This Legendary class mod allows the player to get extra corrosive damage after shooting a weapon for a few seconds. The extra damage will increase the longer the player uses the weapon.
This is very useful against Hemovorous, the DLC boss. This class mod also includes a hidden effect that increases splash damage by +2% every second as long as the player holds down the trigger, reaching a maximum of +100% after 50 seconds.
Artifact
Some Artifacts in the game hold a lot of promise for a damage-focused Moze build. Some even increase the player’s total Damage-per-Second (DPS) output. The following are the recommended Artifacts to get:
- The Pearl of Ineffable Knowledge
This Legendary rarity artifact gives the player a 1% damage boost for each consecutive successful hit. The effect can stack up to 15 times, and at its maximum stack, the player will get an extra 90% gun damage bonus. This works best if the player uses submachine guns.
The player can get this artifact in the last mission of the Guns, Love, and Tentacles downloadable content pack. This mission is called ‘The Call of Gythian’. The player can get ‘The Pearl of Ineffable Knowledge’ artifact from Claptrap at the start of the mission.
- Otto Idol
The Otto Idol is a Legendary rarity artifact that will restore a percentage of the player’s max health after the player eliminates an enemy. This artifact will also give the player three bonuses: grenade damage, elemental resistance, elemental damage, weapon reload speed, weapon magazine size, shield capacity, health regeneration, and luck.
The player can get the Otto Idol artifact randomly from any acceptable loot source. However, it also has a higher chance of dropping from Rachael, The Anointed. The player can find her in Pandora’s Cathedral of the Twin Gods.
- Toboggan
This Legendary rarity artifact will spawn a bubble that protects the player while they are sliding. The player’s next shot will then consume the bubble and get amp damage. All in all, the Toboggan artifact will boost the player’s slide speed, reduce damage, and boost amp damage.
The player can only get this artifact through the Designer’s Cut DLC expansion. Here, the player can get this artifact randomly inside the Stormblind Complex. However, the player has an increased chance of finding the Toboggan artifact in the Plunderdome red chests.
- Victory Rush
The Victory Rush is another Legendary artifact that will boost the player’s movement speed and damage output once activated. This will activate after the player eliminates a Badass. The player will have plenty of Badasses to sustain the effect indefinitely as they get more common as the game progresses.
The player can get this artifact from any loot source. It also has an increased chance of dropping from Azalea. The player can find her in Jakob’s Estate on Eden-6.
Related: When to Farm Legendary Weapons in Borderlands 3
Build 2: Grenade Splash Damage Build

With this build, the player can immediately defeat enemies with a couple of grenade tosses due to the extraordinarily strong splash damage. With the correct weapons, this strong damage build may quickly eliminate bosses and enemies.
For this build, it is recommended that the player equip two of the Vanquisher Rocket Pods as an action skill for each slot. This is the unlockable Action Skill in the Demolition Woman Skill tree. The player can also use Torgue Weapons, like the Roisen’s Thorns pistol. Because splash damage is the goal of this build, these types of weapons are the most effective.
The recommended shields are the ones mentioned for the previous build: Transformer, Super Soldier, Old God, and Infernal Wish. The extremely rare Cloning Maddening Tracker and Hex are also the recommended grenades for this Moze build.
As for Class Mods, one of the recommendations is the Flare class mod. If Iron Bear is enabled, this Legendary class mod will increase the player’s damage output by 100%. As the Iron Bear burns fuel, the increased damage output decreases. Another recommended class mod is Eternal Flame.
If the player ignites an enemy, this Legendary class mod will offer the player a 15% chance to reset the action skill. Finally, the Blast Master class mod is also recommended. This Legendary class mod enables the player to deal more splash damage the longer they go without reloading. The added damage could amount to up to 100% of the splash damage.
Lastly, the Otto Idol artifact is recommended for this Moze build. After defeating an enemy, this Legendary artifact will restore a percentage of the player’s maximum health.
Skill Trees
The skills needed for this build are slightly similar to the previous build. This build also requires skills from the Demolition Woman and Bottomless Mags Skill Trees.
Demolition Woman Skills
The following are the recommended Demolition Woman skills for this build:
- Fire in the Skag Den
The recommended rank for this skill is its maximum rank. With this, the player can get an extra 15% of incendiary damage to all of the player’s splash damage.
- Torgue Cross-Promotion
It is recommended to get the 5th level of this skill to get an extra 15% chance of doubling the splash radius when the player inflicts splash damage.
- Stainless Steel Bear
The recommended rank for this skill is at least the 2nd rank. With that, the player can get at least 12% of Iron Bear armor and an extra of at least 8% of maximum Fuel.
- Pull the Holy Pin
The player must have the maximum rank of this skill. So, the player will have a 30% chance of inflicting a critical hit when using grenades.
- Active Tracking
The player must also have the ‘Active Tracking’ Augment type skill. This skill will boost the reload speed of the Vanquisher Rocket Pod and allow it to shoot homing rockets. This will boost its reload speed by an extra 25%.
- Vampyr
It is recommended that the player completely rank this skill up. This will restore 20% of the player’s missing health per enemy whenever the player damages enemies using thrown grenades.
- Why Can’t I Carry All These Grenades
This is a passive type skill that will boost the player’s maximum grenade capacity. For this build, the player must fully level up this skill. This is so that the skill will expand the player’s grenade capacity to 3.
- To the Last
This is another passive type skill that enables the player to toss grenades even when crippled. If the player tossed a grenade before earning Second Wind, the grenade is returned.
- Hammerdown Protocol
Another Augment type skill that the player must have is the Hammerdown Protocol. This skill enables the Vanquisher Rocket Pod to shoot a rocket with a nuclear warhead. This rocket will inflict an increased radiation damage of an extra 380%. This skill, however, will reduce the magazine size to just 1.
- Explosive Punctuation
The player must fully rank up this passive skill. With that, it will momentarily increase the player’s Action Skill cooldown by 25% if the player inflicts splash damage.
- Short Fuse
The player must also get this skill for this build to get a 20% chance of causing an explosion centered at the target whenever the player inflicts gun damage. If ever an explosion does happen, it will deal a damage output of 75% of the gun damage.
Bottomless Mags Skills
For this build, it is recommended that the player get the following skills from the Bottomless Mags skill tree:
- Cloud of Lead
The player must completely rank this passive skill up. With it, the player and the Iron Bear’s gunshots may inflict an extra 11.25% incendiary damage. This will also not consume any ammo.
- Matched Set
This passive-type skill will boost the player’s magazine size and reduce the heat per shot for each piece of the player’s equipped gear that has the same manufacturer as the weapon that is currently provided. The player must rank it up to its 5th rank. With that, the player will get an extra 10% of the player’s magazine size and lessened heat per shot of -11%.
- Stoke the Embers
This is another passive skill that will boost the incendiary damage that the player and the Iron Bear inflict. The player can level it to its maximum rank to get an extra 30% of incendiary damage.
- Redistribution
The player must also get this skill to restore 5% of the player’s magazine and up to 2.5% of the player’s missing health for three seconds whenever the player lands a critical hit.
- Scorching RPM’s
It is recommended to fully rank this passive skill to boost the player’s fire rate by 15% and its critical hit damage by 20%.
- The Iron Bank
The player must level up this passive skill to at least the second level. That will boost the player’s magazine size by 14%.
- Specialist Bear
The player must also get this skill to boost the weapon damage output of Moze’s Iron Bear by an extra 60% if both of its weapon slots are equipped with the same weapon.
Build 3: Double Minigun Build
The main focus of this build is for the player to get sustained fire while inflicting high sustained damage. For that, the main Skill Tree that the player must use is the Bottomless Mags. The player must also use that skill tree’s first Action Skill, the Minigun, for both Action slots. That allows the player to fire continually throughout a fight, both on and off Moze’s Iron Bear.
This is a build centered around never letting go of the fire button. Moze thrives at this, and when the player is sufficiently integrated into this build, the Iron Bear mech will easily eliminate any enemy who happens to come in the player’s way.
Several weapons mentioned previously are also recommended for this Moze build. These are the Flipper submachine gun and the O.P.Q. System assault rifle, the Kyb’s Worth submachine gun, and the D.N.A. submachine gun. As for shields, the Transformer absorb shield, Super Soldier shield, and Infernal Wish shield are recommended for this Moze build.
Several Anointments work best with this Moze build. The following are the recommended Anointments: the next two magazines have a 10% increased fire rate, 100% increased critical damage after exiting Iron Bear, and 150% increased Minigun damage.
At the same time, Iron Bear is active, with 100% increased weapon damage once the action skill ends, and the next two magazines have 100% bonus elemental damage once the action skill ends.
For Class Mods, the Flare, and Eternal Flame class mods are once again recommended for this build. Aside from that, the Mind Sweeper class mod is also advised. This class mod gives the player’s critical hits a chance to drop a grenade that explodes.
One of the recommended Artifacts for this build is The Pearl of Ineffable Knowledge. This Legendary artifact increases the player’s damage by 1% for each successful strike. Another recommended artifact is the Otto Idol. After defeating an enemy, this Legendary artifact will give back a percentage of the player’s maximum health.
Skill Trees
As mentioned above, the player must mainly level up the Bottomless Mags Skill Tree for this build. The player can also invest skill points in the Demolition Woman and Shield of Retribution skill trees to increase mech usefulness and resilience. The player can allocate these points if the player wants to while in the middle of the Bottomless Mags tree’s steady leveling.
Bottomless Mags Skills
The following are the recommended skills for the Bottomless Mags Skill Tree:
- Cloud of Lead
The player must rank up this passive skill. It allows the player and the Iron Bear’s gunshots to do 11.25% more incendiary damage. This additionally will not use up any ammo. This skill is one of the first skills that the player must get.
- Matched Set
The player must level up this passive skill to the fifth level. With it, the player will receive an additional 10% of their magazine size and a -11% reduction in heat per shot.
- Let Off Some Steam
For this build, the player must get the ‘Let Off Some Steam’ Augment skill. With this, the player’s Minigun will deal more damage the more it heats up. This skill will also enable the Minigun to last longer before it overheats. The player will get an extra damage output of 80% extra heat capacity of 35% for the Minigun.
- Stoke the Embers
The player must get this skill up to its 3rd level. With it, the player will get a boost of 30% to the incendiary damage that Moze and Iron Bear inflict. Along with the Cloud of Lead skill, the Stoke of Embers skill is one of the first skills the player must get and fully level up to give the player some good damage outputs early on.
- Redistribution
The player must acquire this skill to restore 5% of the player’s magazine and up to 2.5% of the player’s missing health. When the player makes a critical hit, the effect of this skill continues for three seconds.
- Scorching RPM’s
It is advised to level up this passive skill fully. It will increase the player’s fire rate by 15% and his critical hit damage by 20%.
- The Iron Bank
The player has to level up this passive skill to the maximum level. It will increase the player’s magazine size by 35%.
- Specialist Bear
The player must also obtain this passive skill to increase Moze’s Iron Bear’s weapon damage output by 60% if each weapon slot is filled with the same weapon.
- Some for the Road
This passive skill grants the player endless ammo for five seconds upon release from the Iron Bear.
- Click, Click…
This is another passive skill that boosts the damage output of the player’s gun as it empties its magazine. When ranked up to its maximum level, this skill will give the player an extra 60% of gun damage output.
- Forge
This is a passive skill that allows the player to replenish ammo for the weapon that is currently equipped constantly. This skill refills 5% of the player’s magazine per second.
Demolition Woman Skills
The Demolition Woman is not the main Skill Tree for this build. However, it has some skills that can help the player. The following are the skills that the player is recommended to get for this Skill Tree:
- Deadlines
This is a passive type of skill that will enable the player’s Iron Bear to use less fuel. In addition, eliminating an enemy generates Fuel with decreasing benefits. When leveled up to its max level, the Iron Bear mech will drain 40% less Fuel and return up to 6% of it.
- Grizzled
This passive skill will decrease the player’s Iron Bear mech’s cooldown with a decreasing effect after eliminating an enemy. If the player ranks it up to at least its second rank, this skill will decrease the cooldown by at least 2 seconds.
- Stainless Steel Bear
This passive skill increases the player’s armor and max Fuel. When ranked to its maximum, the skill will increase the player’s Iron Bear armor by 30% and total Fuel by 20%. This also increases Moze’s Iron Bear’s damage by 20%.
Shield of Retribution Skills
The Shield of Retribution Skill Tree isn’t a priority for this build, but some of its skills are beneficial. The following skills are recommended for this build:
- Security Bear
This is a passive type skill that will give the player’s Iron Bear a shield that can absorb damage. After absorbing enough damage, the shield deactivates and then reactivates after some time. This skill will give the Iron Bear a shield capacity of 20% of its maximum health. It also has a shield recharge delay of 5 seconds.
- Armored Infantry
When shields are active, this passive skill reduces the damage the player gets and increases the damage output of the player’s gun. At the fifth rank, the player gains an additional 13% damage reduction and 15% gun damage.
- Drowning in Brass
This passive skill lowers the player’s fire rate while increasing the damage output of their and their companion’s guns. When the player kills an adversary, the effects of this skill stack. Once leveled up to its highest rank, the player gains a 2.5% reduction in fire rate and a 20% increase in gun damage. This skill’s effects last for 15 seconds and can stack a maximum of three times.
- Experimental Munitions
This passive skill allows players to deal incendiary damage when landing critical hits. The additional incendiary damage is equivalent to 10% of the damage inflicted.
Build 4: Tank Build
This build aims to transform Moze into an almost invincible character. Building mostly within the Shield of Retribution skill tree gives the player the endurance to withstand massive damage from many sources. A number of the skills in this skill tree also boost her DPS, which allows the player to inflict damage even against the strongest enemies.
The recommended Action Skills for this Moze build are the Railgun, the second action skill from the Shield of Retribution skill tree, and the Vanquisher Rocket Pod, the second action skill from the Demolition Woman skill tree.
The player can use whatever kind of loadout they want for this build. However, for shields, it is recommended that the player use the Transformer absorb shield, the Super Soldier shield, and the Infernal Wish shield. As for grenades, the Cloning Maddening Tracker and the Hex are also advised for this Moze build.
Regarding Class Mods, Flare can help the player gain more damage while Iron Bear is in play. The Eternal Flame class mod is also great to have, as this will give Moze a chance to reset the Action Skill after igniting an enemy. The Mind Sweeper class mod will also greatly help.
This will give the player a chance to drop exploding grenades after landing a critical hit. The player can also get the Blast Master class mod. This permits the player to inflict greater splash damage the longer the player refuses to reload.
As for Artifacts, one of the recommendations is the Otto Idol. After defeating an enemy, this artifact will regain a percentage of the player’s maximum health. Another recommended artifact is the Toboggan. This increases the player’s slide speed, reduces damage, and increases amp damage. Another great artifact is the Victory Rush. When engaged after defeating a Badass, this will increase the player’s movement speed and damage output.
The following Anointments are recommended for this Moze build: the next two magazines have a 10% increased fire rate and 100% increased critical damage after exiting Iron Bear, 150% increased Railgun damage while Iron Bear is active, 150% increased Vanquisher Rocket Pod damage while Iron Bear is active, 100% increased weapon damage once the action skill ends, and 75% increased shield and health for 25 seconds after exiting Iron Bear.
Skill Trees
As previously mentioned, the main skill tree for this build is the Shield of Retribution. The second priority skill tree is the Demolition Woman. This time, we’re not putting any points into the Bottomless Mags skill tree. This means the player may not feel as strong as the other builds mentioned early on.
Shield of Retribution Skills
The following are the recommended skills in this skill tree for this build:
- Selfless Vengeance
This is a passive skill that allows the player and their allies to inflict extra incendiary damage with guns for a brief period after reloading. However, this also inflicts a small amount of damage on the player. When the player ranks it up to its fifth, the bonus incendiary damage is an extra 15% damage for 5 seconds. However, the player will take damage of 5%. This skill must be among the first few the player obtains for this Moze build.
- Armored Infantry
Once shields are engaged, this passive skill decreases damage and enhances the gun damage output. The fifth rank of this skill grants the player an extra 13% reduction in damage and 15% gun damage. This skill should be one of the first few skills the player gets for this Moze build.
- Experimental Munitions
When landing critical hits, this passive skill enables the player to deal flaming damage. The extra incendiary damage is equal to 10% of the total damage dealt. The player must get this skill next after getting the skills above.
- Security Bear
This is a passive skill that grants the player’s Iron Bear a shield that can absorb damage. The shield deactivates after taking enough damage and then activates after a while. This skill grants the Iron Bear a shield capacity of 20% of its maximum health. It also has a 5-second shield recharging delay. After getting the previous skills, the player must invest in this skill next.
- Full Can of Whoop-Ass
The ‘Full Can of Whoop-Ass’ is a passive skill that will speed up the recharging rate of the player and their allies’ shields. As it only has one level, it will only speed up the recharge of the shields for an extra 25%. After acquiring the preceding skills, the player must put points in this skill.
- Thin Red Line
This passive-type skill will take a few of the player’s health and, with the same amount, boost the player’s shield. Once it reaches its third maximum level, the skill will reduce health and increase the shield by 60%. This is one of the most crucial skills for this build. As a result, after obtaining previous skills, the player must invest points in this skill.
- Desperate Measures
The ‘Desperate Measures’ is a passive skill that boosts the damage output of the player’s gun as their health depletes. Once it is on its third level, it will raise the gun damage to an extra 50%. This works well with the ‘Thin Red Line’ skill.
- Hell on Rails
The ‘Hell on Rails’ is an augment skill that will convert the Railgun action skill damage to incendiary damage. This, however, speeds up the fuel drain by an extra 30%.
- Vladof Ingenuity
This passive skill grants shock resistance and increases the player’s maximum shield. When raised to the fifth level, the skill grants the player 47% more shock resistance and 30% more shield.
- Behind the Iron Curtain
This is another passive skill that boosts the recharge rate and decreases the recharge delay of the player’s shield. When ranked up to its maximum, it will boost the shield’s recharge rate by an extra 21% and decrease the recharge delay by -19%.
- Phalanx Doctrine
This is a passive type skill that will give the player a stack of Phalanx Doctrine after killing an enemy. Each of its stacks will boost the player’s damage output and maximum shield for 30 seconds. When ranked up to its fifth rank, the player will get an extra 10% gun damage and an extra 15% maximum shield.
- Force Feedback
‘Force Feedback’ is another passive skill that enables the player’s shield to start recharging when the player lands a critical hit.
- Tenacious Defense
Once the player’s shield is used up, this passive-type skill will automatically get some shields for 30 seconds. During that, the skill will also boost the damage output of the player’s gun. This skill will boost the gun damage by 30% and replenish 40% of the maximum shield.
Demolition Woman Skills
As mentioned above, getting the following skills from this skill tree can also help the player with this build:
- Deadlines
This is a passive skill that allows the player’s Iron Bear to consume a smaller amount of fuel. Furthermore, defeating an enemy earns Fuel with diminishing benefits. When fully leveled, the Iron Bear mech will consume 40% less fuel and restore up to 6% of it.
- Grizzled
This passive skill will reduce the player’s Iron Bear mech’s cooldown with diminishing effect after defeating an enemy. If the player levels it to its fifth rank, this skill will reduce the cooldown by 5 seconds.
- Stainless Steel Bear
This passive skill boosts the player’s armor and maximum Fuel. When maxed up, the skill increases the player’s Iron Bear armor by 30% and maximum Fuel by 20%. This also enhances the damage of Moze’s Iron Bear by 20%.
- Vanquisher Rocket Pod
This is the second Action Skill that the player can unlock for the Demolition Woman skill tree. With this, the player can utilize the Vanquisher Rocket Pod while using the Iron Bear mech.
- Auto Bear
This passive skill allows the Iron Bear to attack foes automatically after Moze ejects. The Iron Bear mech will assault adversaries for 15 seconds. Following that, the Iron Bear will charge at an enemy and explode.
- Active Tracking
This augment skill increases the reloading speed of the Vanquisher Rocket Pod and allows it to fire homing rockets. This will increase its reloading speed by 25%.
Build 5: Iron Cub Build
This final build is a hybrid that seeks to keep Iron Cub running nonstop to deal massive damage. For this Moze build, the player can use whichever weapons they prefer.
There are a few Class Mods that go well with this build. One of them is Flare, which has been mentioned multiple times already. Another recommended one is the Bear Trooper class mod. This Legendary rarity class mod will decrease the Iron Bear’s fuel consumption by 50% and boost its duration.
If the player wants to use Miniguns for the Iron Cub, the Heat Exchanger class mod would be great, too. With this Legendary class mod, the player’s Iron Bear and Iron Cub will get up to 80% extra Minigun damage, depending on the weapon’s heat level. This class mod is exclusive to the Director’s Cut DLC expansion.
Skill Trees
As this uses the Iron Cub action skill, we will mainly use the Bear Mother skill tree. Again, the player will only have access to this skill tree in the Designer’s Cut DLC expansion. Also, as this is, as mentioned, a hybrid build, we will use some skills from the other skill trees.
Bear Mother Skills
The following are the recommended skills from the Bear Mother skill tree:
- Big Surplus
This is a passive type skill that allows the player to inflict extra incendiary damage. When leveled up to its maximum, the skill will give the player 5% additional incendiary gun damage
- Really Big Guns
With this passive-type skill, Moze’s Iron Cub can deal more damage. Once reaching its fifth rank, this skill will give the Iron Cub an extra 20% of damage.
- Double Time
Double Time is a passive skill that will increase the movement speed of the player and the Iron Cub while the Action Skill is active. It is recommended to rank it to its maximum; it will boost the player and the Iron Cub’s movement speed by 12%.
- Harmonious Havoc
This is a passive type skill that will boost the player’s gun damage of the weapon, shield, and grenade with the same element as the player’s gun. The player can rank this up to at least its third tier to get at least 6% extra damage.
- Fired Up
This passive skill will boost the player’s fire rate for a brief period if the player or the Iron Cub inflicts a status effect on an enemy. The player will get an extra 5% of the fire rate for 12 seconds. The effect of this skill can stack up to five times.
- Nitrotrinadium Engines
This passive skill will give the player’s Iron Cub a boost in maximum Fuel and Action Skill cooldown rate. It is recommended to level it up to its third rank to get at least 15% extra fuel and 12% for the action skill cooldown rate.
- Never Going to Give You Up
This iconically-named skill is a passive skill that allows the Iron Cub to obtain Fuel. This will trigger if the player or the Iron Cub inflicts a status effect on an enemy. This skill has declining results. When leveled up to its fifth rank, the player will get 25% of restored Fuel.
- Efficiency Engine
This augment-type skill will boost Moze’s gun damage. The increase in gun damage depends on how long the Iron Cub is active. This skill will increase the gun damage by an additional 0.5% per second.
- Feature Creep
The ‘Feature Creep’ is another passive skill that boosts the damage output and the damage resistance of the Iron Cub. This skill will give the Iron Cub an extra 18% of damage and 45% of damage resistance.
- Superior Firepower
With this passive ability, the player or the Iron Cub will have raised status effect damage. This will trigger if the player or the Iron Cub deals a status effect on an enemy. The skill will boost the status effect damage by an additional 20% for 8 seconds. The effect of this skill can stack up to five times.
- Running on Fumes
This passive skill enables the Iron Cub not to consume fuel for 6 seconds. This will trigger if the player or Iron Cub ignites an enemy.
Bottomless Mags Skills
As for this skill tree, the following are the recommended skills to get:
- Cloud of Lead
The player must completely level up this passive skill. It increases the players’ and the Iron Bears’ incendiary damage by 11.25%. This also saves ammo.
- Dakka Bear
This is a passive type skill that will spawn a manned turret on the back of the Iron Bear.
- Stoke the Embers
The player must invest three points in this skill. It provides a 30% increase to the incendiary damage inflicted by Moze and Iron Bear.
- Redistribution
This skill can restore up to 2.5% of the player’s missing health and 5% of the player’s magazine. The effect of this skill lasts three seconds after the player makes a critical hit.
- Scrappy
When on the 5th rank of this passive skill, this will boost the player’s weapon damage with an additional 30%, weapon swap speed with an additional 48.7%, an additional 48.7% mode switch speed, and an additional 37.5% handling when the player moves.
- Rushin’ Offensive
This passive ability enables the player to shoot while sprinting. When sprinting, the player gains an additional 8% life steal.
- Specialist Bear
If all of Moze’s Iron Bear’s weapon slots are filled with the same weapon, this passive skill increases weapon damage output by 60%.
Demolition Woman Skills
The following skills are recommended from the Demolition Woman skill tree:
- Fire in the Skag Den
When on its fifth level, this passive skill adds 15% incendiary damage to the player’s splash damage.
- Deadlines
This is a passive skill that, on its max level, allows the player’s Iron Bear to consume 40% less fuel. Furthermore, defeating an enemy gives the player 6% Fuel with diminishing benefits.
- Means of Destruction
With its maximum rank, the player has a 10% chance to recover ammunition and a 6% chance to recover grenades if the player inflicts splash damage.
- Torgue Cross-Promotion
It is advised to obtain the fifth rank for this skill to gain an additional 15% chance of doubling the splash radius when inflicting splash damage.
- Stainless Steel Bear
This passive skill increases the player’s armor and maximum Fuel. Once maxed up, the skill boosts the player’s Iron Bear armor by 30% and maximum Fuel by 20%. This also increases the damage of Moze’s Iron Bear by 20%.
- Vampyr
It is advised that the player ranks up on this skill. With this, every time the player delivers damage to adversaries with thrown grenades, this will restore 20% of the player’s missing health per enemy.
- Short Fuse
This skill is also required for this build to have a 20% chance of producing an explosion focused on the target every time the player causes gun damage. If an explosion occurs, it will deal 75% of the gun damage.
Shield of Retribution Skills
Finally, there is only one recommendation for this skill tree:
- Security Bear
This is a passive skill that gives the player’s Iron Bear a damage-absorbing shield. After sustaining enough damage, the shield deactivates and then reactivates after a while. This skill provides the Iron Bear with a shield capacity equal to 20% of its maximum health. It also has a 5-second delay in recharging the shield.
Conclusion
The best Moze build ultimately boils down to personal playstyle and preference. As we’ve explored various possibilities in this guide, it’s crucial to remember that these builds serve as blueprints for your own unique Moze experience.
Whether you favor endless ammunition, explosive firepower, or crowd-controlling mayhem, the true power of Moze lies in her versatility. Your build should reflect your style of play, designed to suit the situations you encounter and the enjoyment you derive from the game.
So, as you embark on your journey through the Borderlands, experiment with different combinations, adjust your skills, and create the Moze build that makes you feel unstoppable in the wild, unpredictable world of Pandora. Your path to vault-hunting success is uniquely yours to forge, so embrace it, and may the explosions ever be in your favor!