Sova is an essential pick for any team on most maps in VALORANT. His skill set is just too powerful to set aside. The ability to see exactly where enemies are hiding through his Owl Drone and Recon Bolt is so powerful it’s almost like you’re wallhacking. He truly is a powerful addition to any team lineup.
We have previously featured Sova Recon Bolt Lineups for Attacking on Ascent on the PlayerAssist website which you can read about here: Valorant: The 5 Best Sova Recon Bolt Lineups on Ascent (Attacking)
In this article, we head over to VALORANT’s hot and humid desert ruins: Bind.
Sova Recon Bolt

Sova’s Recon Bolt is arguably one of the most valuable Signature Agent Abilities in all of VALORANT.
Recon Bolt is a cooldown-based Ability that refreshes every forty (40) seconds. Players can add up to two Bounces to the Recon Bolt Arrow which opens up a world of possibilities in terms of lineups. His Recon Bolt also features a charge meter so Sova players can alter the total distance the Arrow travels before it lands.
When used correctly, Sova’s Recon Bolt is the closest thing players can get to wallhacks without the repercussions associated with hacking. When placed at certain spots within Spike Sites, Recon Bolt can reveal most of, if not everything inside the Spike Site. This makes it a very powerful tool when Attacking or Defending bombsites.
Bind B-Site Difficult to Hold, But A is easy to Retake.

We will be focusing on Defending side on Bind because the unique map layout makes for a very difficult time for Defenders on B-site but makes retakes on A-site quite possible.
A quick look at Bind’s map layout will show that B-site is difficult to defend. It is very easy for Attackers to smoke off safe defensive sightlines. It is almost impossible for Defenders on B-site to safely hold angles from B-Hall and B-Elbow.
Defenders are forced to play within B-site, but there is only so much cover in-site that players can hide behind. High-flying Agents like Jett and Raze can easily take up so much space coming from both Hooka and B Garden. B-site Defenders are dead men walking.
This is where Sova’s Bind Defense lineups come in. These lineups can give your team early information right after the round starts. This is important because the earlier we figure out where most of the enemy team players are stacking, the faster we can coordinate and rotate as needed.
A-site is easier to retake since Defenders can come from four different angles at once. That’s pretty difficult to defend for Attackers playing post-plant.
Bind Defending – B-site Fountain/B-Long Early Information

Let’s start with B-site Fountain Recon Bolt. This Recon Bolt reveals most of the Fountain Area and all of B-Long. This is a common holding spot for Attackers since they naturally will want to challenge the B-site Garden Defender to take control of B-Long and advance to B-site.
Enemy footsteps are usually very easy to hear from Hooka. So coordinating with your teammate who’s playing Hooka can help your teammates from the other side of the map rotate accordingly.
- Look for this corner inside B Hall:

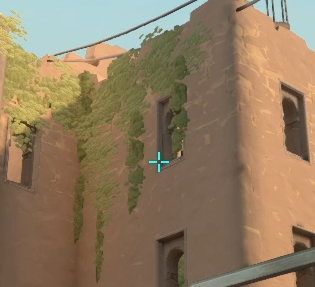
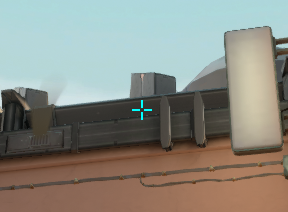
2. Stand on this corner and look towards B Garden:

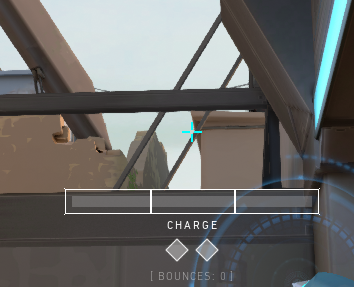
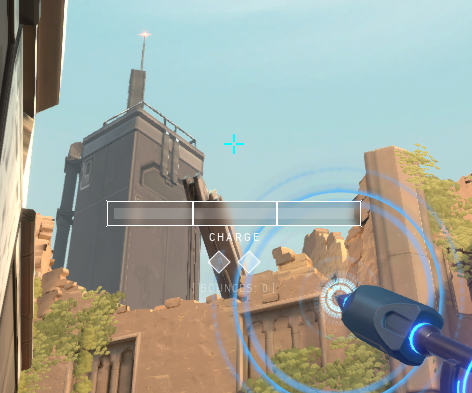
3. Place your crosshair just under this hanging plant like this:

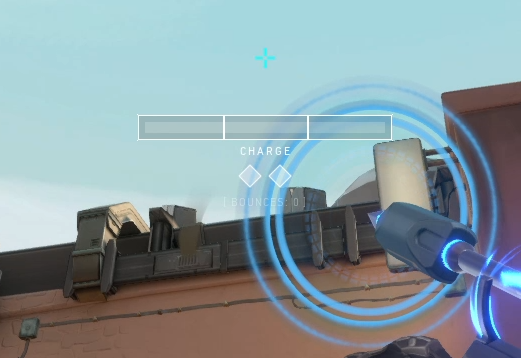
4. Do a Maximum Charge + One Bounce:

5. It should bounce off the wall and land here:

And reveal these areas:

Bind Defending – B-Short/Market Early Info

Bind B-Short is one of two entry points into Bind B-site. An early information Recon Bolt can help you and your team quickly determine the number of players in B-short. Your team will be able to rotate as needed, or you can even set up a pincer attack on the enemy if you’re feeling brave enough.
- Stand on the opposite corner of the B-Fountain Recon Bolt lineup:

2. Turn around and look for this steel wire here:

3. Place your crosshair at the intersection between the wire and the wall. Like this:
4. Do 2-bar charge + No Bounce:

The Recon Bolt should land here:

And reveal some of market and most of B-Short:

Bind Defending – A-Short Early Info

A-Short is another area in Bind where the early information you can gather from a Recon Bolt can be used to help your team rotate towards A or even push Hooka to gain an advantage.
This is also very useful since you, as Sova, can play from B-site and still be able to give your team information on A-short.
- Stand on this corner in B Hall:

2. Turn around and look for this window:

3. Place the right circle of the Owl Drone icon in this corner of the window:

4. Do a 3-bar Charge + No Bounce:

If done correctly, the Recon Bolt should land here on A-Short:

And reveal most of A-Short for your team:

Bind Defending – A-Site Default Plant/Lamps Retake

The area behind Tank on Bind A-site is one of the most common planting spots in Bind A-site. Attackers can make A-site effectively smaller by cutting off vision using agents with a wall or smoke ability like Sage, Phoenix, Viper, or Omen.
Since your teammates will most likely be walled off or smoked off from Default, this Recon Bolt will give your team information about where the enemies are even if you’re rotating from B-site.
- Stand on this same corner on B Hall:

2. Look for this crane:

3. Take the bottom of the left diamond of your Bounce Indicator and place it on this corner on the crane:
4. Do a 3-bar Charge + One Bounce:

The Recon Bolt should bounce off of the crane:

And land here:

It should reveal off of these areas here:


Bind Defending – A Showers/Baths Early Info

The last Recon Bolt on this list reveals outside Showers/Baths area and some of Attacker Spawn/A-short. This is a very valuable Recon Bolt to learn because Showers/Baths is an important area to control for Attackers. This last Recon Bolt is easy to line up and can help give you and your team the early Showers information you need.
- Stand in this corner of the Triple Boxes:

2. Turn around and look for this vent:
3. Place the bottom of the right Diamond Bounce Indicator on the tip of this vent:
4. Raise your crosshair until the “Charge” bar is parallel with this building here:

5. Do a 2-bar Charge + No Bounce:


The Recon Bolt should land here:

And reveal most of the areas outside Showers/Baths and some of outside A-short

Every Team Needs A Sova

That’s about it! These Recon Bolt lineups are mostly designed to give your team early enemy information in Bind. Whenever you find yourself on Defense in Bind, these lineups can help you play mostly from B-site and still be able to help your team at A-site.
That is a huge plus for your team because Sova can still use his Owl Drone to scout out enemies from B-site even if he decides to use his Recon Bolt for A-Short, for example.
Sova really is a very versatile and essential Agent for almost any map. Bind is just one of those maps.
Well, Sova is essential in every map anyway. (except Split maybe)