Sova’s Recon Bolt is one of the most valuable abilities in VALORANT with its ability to reveal enemy locations on almost any spot on the map, but let’s not forget about the ability that really made Sova a highlight-reel worthy Agent; Double Shock Bolt Lineups.
If you watch a ton of YouTube videos about VALORANT, you might have already seen AverageJonas line-up and land these Double Shock Bolts on unsuspecting enemies. You might even have fallen victim to one of these nasty plays yourself.
You know exactly how tilt-inducing getting hit by these arrows is, so you’ve come here to learn some Double Shock Bolts yourself just to stop your ego from bleeding out.
Kidding aside, here are some Double Shock Bolt Lineups on Ascent that you can learn to clear off common holding angles and hopefully score some quick kills for your team.
Shockingly Good
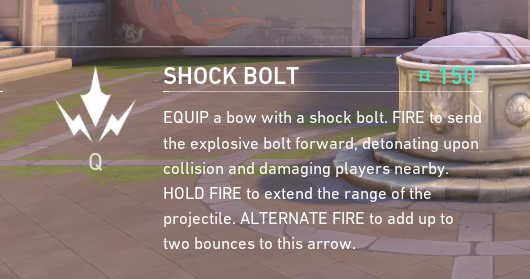
Sova’s second ability, Shock Bolt, is an arrow projectile that has the same charge and bounce properties as the Recon Bolt. The main difference between the two is that Shock Bolt explodes right after it lands, dealing good damage to a small area – while the Recon Bolt pings enemies in its LOS.
One caveat about Sova’s Shock Bolt is that it does not deal an exact amount of damage. Rather, Shock Bolt deals around 10-90 damage depending on how close the enemies are to the epicenter of the bolt. Shock Bolt costs 150 credits each and players can equip a max of two Shock Bolts.
When used on its own, Shock Bolt can be a pretty good way of dealing damage to enemies hiding in small cubbies or corners while staying relatively safe yourself since Sova can add bounces to these arrows. With enough practice, players can get a good sixth sense of exactly how much charge or how many bounces they need to land Shock Bolts exactly where they want.
Shock Your Enemies. Literally.

The Double Shock Bolt lineups we will be learning today will take place in Sova’s best map: Ascent. In Ascent, alleys and entryways to bombsites are relatively tight. This works in Sova’s favor since Shock Bolt’s area of effect is large enough to cover almost the whole width of these alleyways.
After learning some of these Double Shock Bolts on Ascent, you will be able to deter enemies from holding some of these common angles since they will want to avoid the risk of getting Double Shock Bolt’d right in the face.
These Shock Bolt Lineups are tested and proven. We get an average of two clean kills with either one of these Shock Bolt Lineups per game. Of course, you will have to understand the fact that players will be able to adapt after getting pawned by one of these Double Shock Bolt Lineups. This means that most of these lineups are one-offs and will only really be most effective the first time you use them in a match.
As the match goes on, players’ brains are stuffed with information and become more mentally tired. You might be able to land a second Double Shock Bolt. Enemy players might have already forgotten about the bitter memory they had on the same spot earlier in the round.
Ascent A-site – A Entrance Double Shock Bolt (Attacking)

The first Double Shock Bolt Lineup we will learn is great for clearing a common angle that Defenders love to hold on A-Main. This spot is a fairly common area for Defenders to hold when playing Ascent A-site. More often than not, an enemy Jett might be holding this angle with an Operator, hoping that they can score a quick pick and then dash out to safety.
One advantage of this first Double Shock Bolt is that it comes from an angle that enemy players will never suspect. Coupled with the fact that when scoped in with the Operator, players won’t be able to see these Shock Bolts coming since their screens will be partially blocked off. Players hit by a Double Shock Bolt from this spot will be… shocked.
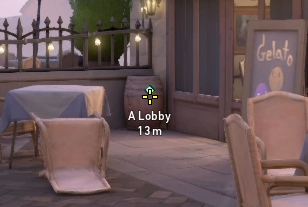
- In A Lobby, look for this barrel.

2. Stand on it while tucking yourself in the corner:

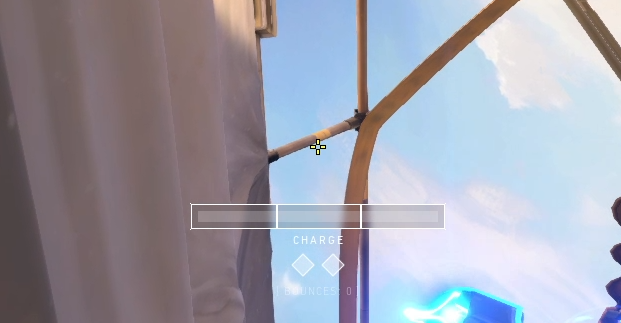
3. Look up towards the sky and look for this rift:
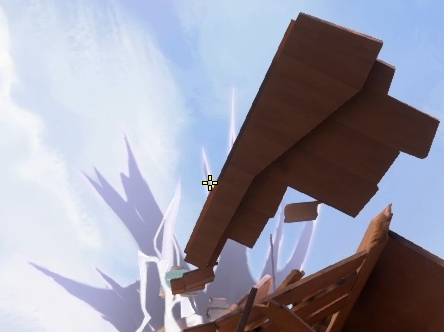
4. Place the right circle of your Owl Drone icon on the bottom part of this rift:


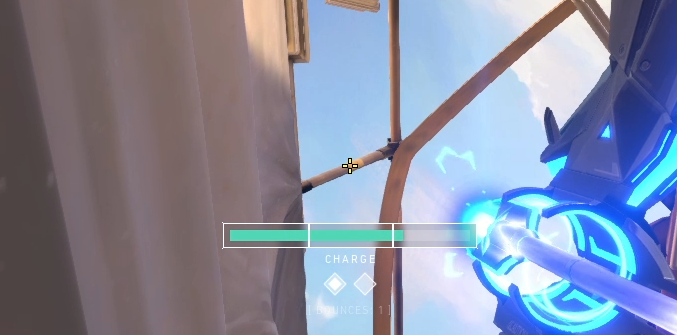
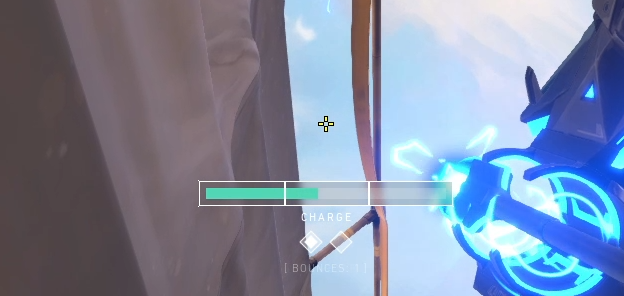
5. Now do a 3-bar Charge + No Bounce:

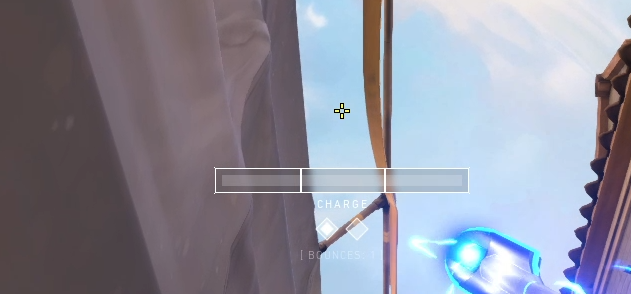
6. For the second Shock Bolt, take the tip of the Right Diamond Bounce indicator and place it on this corner here:


7. Do a 2-bar Charge + No Bounce:

8. When done correctly, both Shock Bolts should land here at almost the same time:

Ascent A-site – A-Short Cubby Double Shock Bolt (Attacking)
This Double Shock Bolt Lineup is great for clearing A-Short Tree. This spot in A-short is a good place to land Double Shock Bolts because this is a spot that Defenders need to hold to gain information on Ascent Middle.
This is important because Ascent Middle is arguably the most important space to take control of in Ascent. Gaining control of the Middle can usually dictate which site your and your team can take to have the best chance of winning the round.

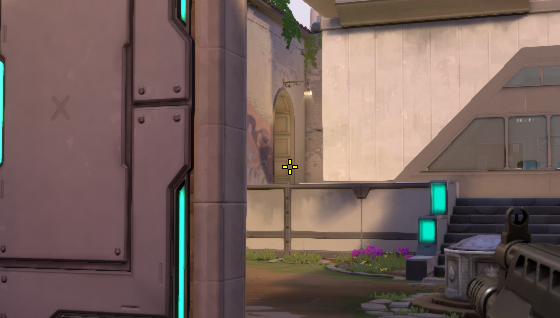
- Look for this crate in A Lobby

2. Stand on this corner:

3. Look up towards this tower:

4. Take the left tip of the Owl Drone Charge Indicator and place it on the tip of this Kingdom Logo:
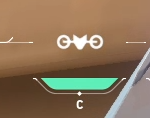
5. Do a 3-bar Charge + No Bounce:

6. For the follow-up Shock Bolt, simply lineup the same way as Step 4:
7. Then simply pull your mouse down in a straight line until the left Owl Drone Circle lines up with this beam:


8. Do a 2-bar Charge + No Bounce:

When done correctly, both Shock Bolts should land here:

Ascent A-site – A Main Double Shock Bolt (Defending)

Ascent A-Main rushes are difficult to Defend from A-site. This is because the wall between A-Main and A-site is thin enough for some Agent Flashes to penetrate through, which will force you and your teammate holding A-site to take a more Defensive position within A-site.
You can use this A-main Double Shock Bolt to hopefully pick off one or two players off the rushing enemy team to help slow down the impending onslaught.
- From A-Heaven, look for this corner on Ramps:

2. Stand in this corner and look up towards these tube frames:

3. Align the 3rd bar charge indicator along the left side of this tube just below this yellow tape:

4. Do a 3-bar charge + One Bounce:

5. For the follow-up Shock Bolt, simply pull your mouse down in a straight line and align the same third bar charge line on this corner:
6. Do a 2-bar Charge + One Bounce:

7. When done properly, the Shock Bolts should land here on A-Main:

Ascent B-site – Market Double Shock Bolt (Attacking)
This next Recon Bolt Lineup will clear the most common spot in Middle/Market. This spot is often held by players with an Operator. Because Middle control is so important in Ascent, Defending players will often want to peek Top middle to gain information on the attackers by using a scoped weapon.
- Stand on the same corner as the A-Short Double Shock Bolt Lineup:

2. Turn around and look towards the same Kingdom Logo:

3. Place the middle line of this mouse guide on this corner of the Kingdom Logo:


4. Do a 3-bar Charge + No Bounce:

5. For the follow-up Shock Bolt, place the left charge bar line on this corner:

6. Do a 2-bar Charge + One Bounce:

If done properly, the Shock Bolts should land here:

And hopefully, kill the player holding market:


Ascent A-site – Post-plant Generator Double Shock Bolt (Attacking)

The last Double Shock Bolt on our list is for post-plant where your team has planted the spike in front of Generator. This is a good way of defending the Spike from Defenders safely since you will be deep behind cover in A-Lobby.
- Look for this box in A-Lobby:

2. Stand next to it while keeping your crosshair in the middle of this edge here:

3. Turn to the left and look up towards the sky. Look for this pointy thing here:

4. Place the middle of both Charge indicators just a little towards the tip of this pointy thing:

5. Do a 2-bar Charge + No Bounce:

6. The follow-up Shock Bolt is done by placing your crosshair in the middle of the pointy thing:

7. Do a jumping 1-bar Charge + No Bounce:


When done properly, the Double Shock Bolt should land on Generator where the bomb is planted:


Shock Dart
These Shock Bolt Lineups are pretty effective for clearing important spots in-game. Just this last game we got queued up on Ascent. That was the perfect time to put these lineups to the ultimate test. It was a hard-fought 11-13 game, but we got some pretty nasty kills off of one of these lineups (A-Main). Ironically, the player that died was also a Jett, like we alluded to earlier in this article. The Double Shock Bolt kill gave us a free ticket to A-site, which guaranteed us the round win.
Double Shock Bolts are pretty fun to do overall. After lining up and shooting out both arrows, the short wait time before they land on their target is akin to a kid waiting for which color gumball he gets from the gumball machine. It is exciting, not to mention rewarding the moment you get a nice kill off of these Double Shock Darts.
We call them Shock Bolt because it’s the official game name, but Sova affectionately refers to his electrically charged arrows as Shock Darts. I digress.
Anyway, we hope you find these lineups viable and helpful! Try them out yourself and shock enemies with these lineups! Literally!