Lockdown Bind with these Killjoy Turret placements on Bind.
Killjoy mains will know what a hoot the German Sentinel is to play on Bind. With only two major lanes to worry about, Killjoy can easily lock down a bombsite on her own with help from her Nanoswarm, Alarm Bot, and her trusty Turret. With solid onsite defense from Killjoy, the rest of her team can simply focus on stacking the other bomb site on Bind.
Knowing the best spots to place your Turret will significantly increase your ability to slow down or deter incoming Attackers/Defenders on your bomb site.
Fortunately, we have listed some of the best Killjoy Turret spots on Bind that you can use when Defending or playing the Spike post-plant.
Weaker But Still A Kicker

VALORANT veterans will tell you just how broken Killjoy’s Turret was in the early days. Not only was Killjoy’s Turret tanky, but it also dealt decent damage with its burst fire. Who can forget about getting slowed to a crawl whenever the Turret landed a few shots on them?
A ton of players complained about Killjoy’s Turret and how broken. It overpowered it was, especially on Ascent, which led to a nerf back in patch 3.05 that significantly reduced the Turret’s bullet-tag slow from 72.5% to just 29.5%.
This change significantly reduced Killjoy’s control over key entry points on most bombsites in VALORANT and forced Killjoy mains to be more creative in their bombsite setups.
Still, Killjoy’s Turret is as close as teams will get to having another player on their team and gives Killjoy’s team the ability to hold an extra lane/sightline on any map passively.
Best Killjoy Turret Spots on Ascent
A-Showers Turret


A-Showers is a hotly contested area on Bind A-site. To gain full control of A-site, the Attacking team needs control of A-Showers as well, or they risk getting flanked by the Defending team through A-short.
When Defending A-site, this A-Showers Turret should slow down any Attacker coming out of A-Showers.
A-Truck Turret

This simple A-Truck Turret will easily spot and punish Attackers pushing through A-Short or hanging out at A-Cubby.
You should be playing at A-Heaven/Tower to trade the Turret. Otherwise, the enemy team will shoot it down, and you risk getting zero value from this Turret.
A-Double Box Turret

Some of the most annoying Turret placements sit very close to corners since the enemy team will be forced to turn hard to one side to aim and shoot down the Turret.
The A-Double Box Turret, as seen below, will slow incoming Attackers from A-Short. If you can position yourself in the U-Hall area, you can trade the Turret as soon as the enemy team tries to shoot it down.
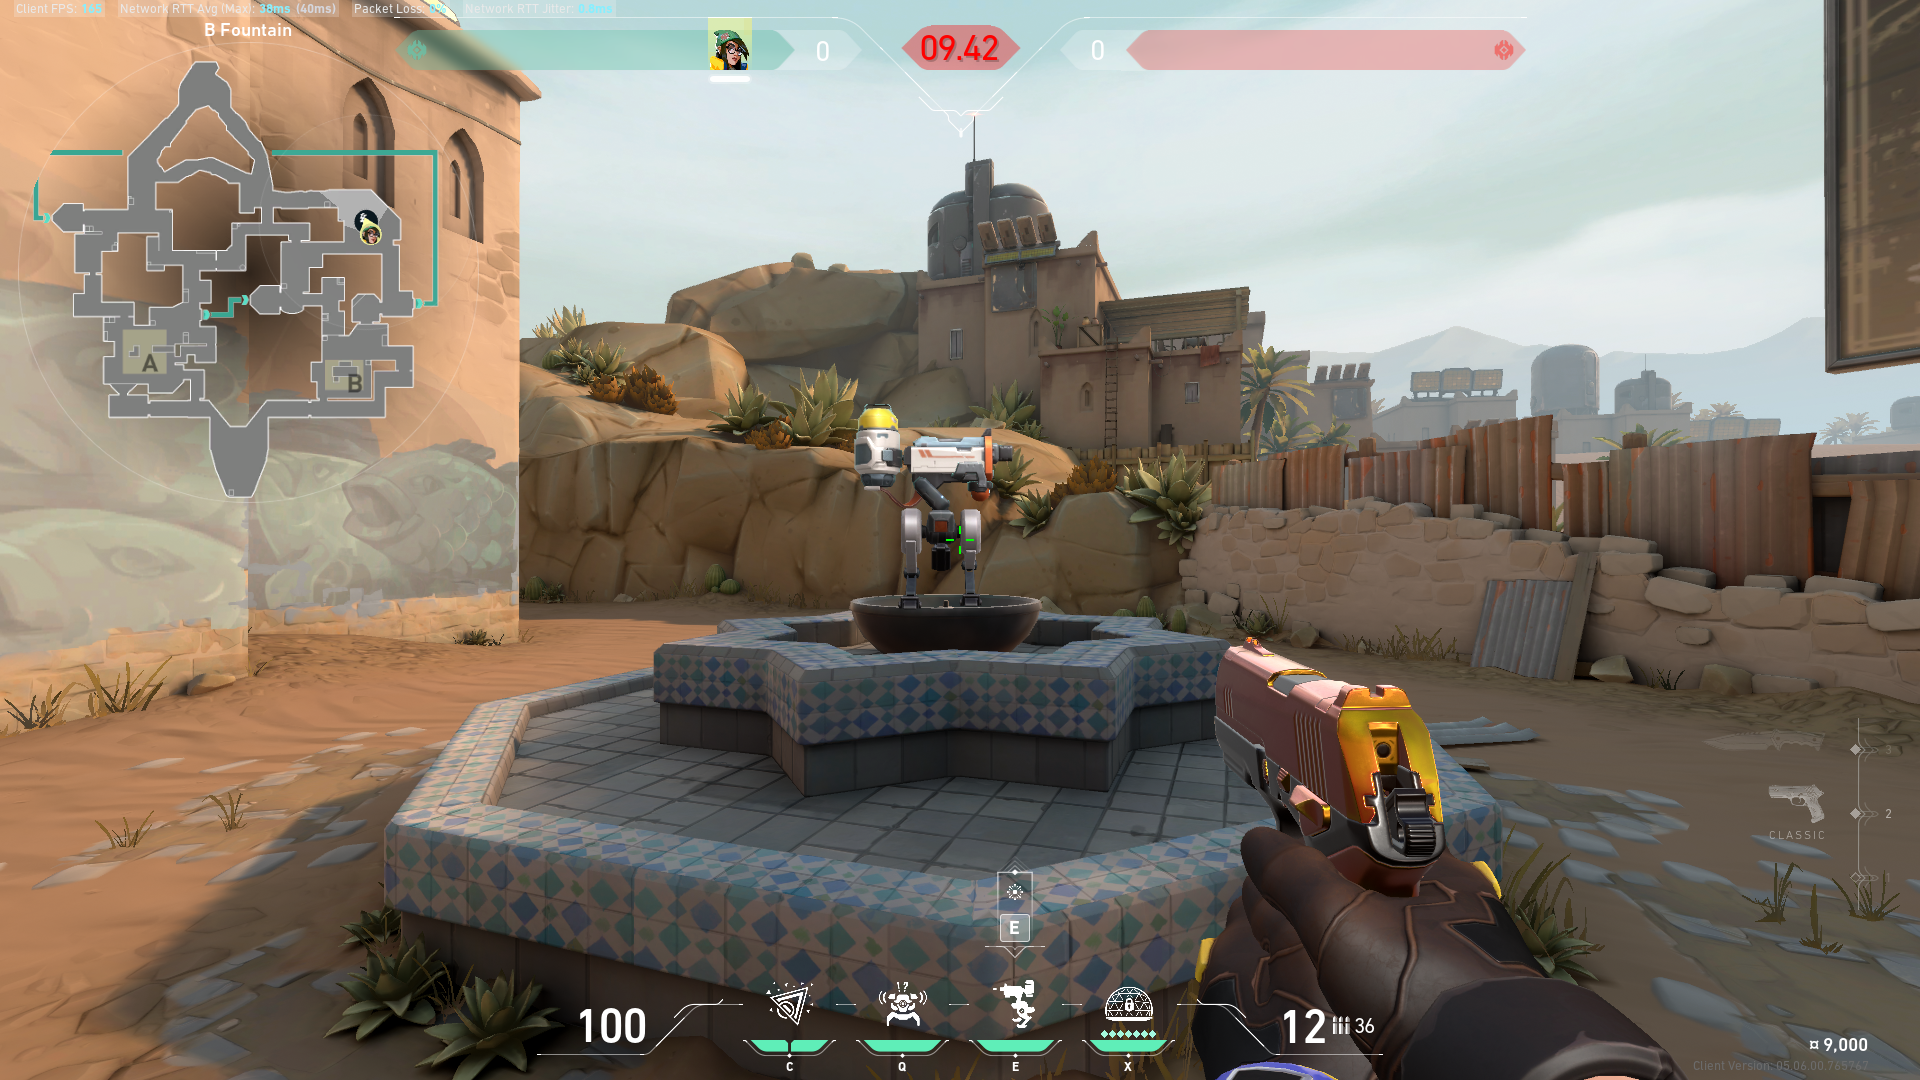
B-site Garden Turret


Like A-Showers, B-site Garden control is necessary to gain full control of B-site on Bind. With this in mind, you can expect Attackers from Hooka and B-Garden if the Attacking team decides to take control of B-site.
Placing the Turret on top of the utility room in B-site will help spot, tag, and slow Attacking swinging out from B-Garden. You can play from either B-Elbow or in the cubby next to the B-Garden entrance to trade out your Turret.
B-site Hooka Turret


As mentioned above, you can expect Attacking team members to split up between Hooka and B-Garden when taking control of the B-site.
This simple Turret for Hooka will be more challenging to take down because half of the Turret’s hitbox is hidden. This Turret will also spot Attackers at B-Long.
Best Killjoy Turret Spots on Bind (Anti-flank/Attacking)
A-Short Flank Turret

Pushing through A-Short can be very challenging as an Attacker, and most of the time, you and your teammates will find yourselves stuck at A-Short looking for that small opening to storm towards A-site.
This is enough time for the Defending team to flank you through Hooka.
B-Teleporter Flank Turret

This one is a more unorthodox spot for Killjoy’s Turret but works well to secure the Teleporter and Middle lanes from rotating Defenders.
B-Hooka Flank Turret

The most annoying Turret placements force the enemy team to hard-check corners. With this in mind, place Killjoy’s Turret in the far left corner of Hooka to serve as flank watch against rotating Defenders.
Auto Defense System
Killjoy will deliver the same solid onsite Defense regardless if you play her on A-site or B-site on Bind.
With some solid Turret placements, you can easily choke key lanes toward any bombsite on the map. A-Showers, A-Short, Hooka, B-Garden, you name it, an optimal Turret placement will make sure you spot enemies as soon as they land on the Turret’s cameras.
Visit the PlayerAssist website for more Gaming Guides, Gaming News, Game Codes, and other Gaming Content!