KAY/O was introduced to the VALORANT community via a short teaser trailer situated on the relatively new map Breeze, and it is about time we make a KAY/O Lineup Guide for KAY/O’s homecoming.

KAY/O’s ZERO/POINT EMP Knife can cover a considerably large area in maps like Haven, Split, or Ascent. However, on Breeze – VALORANT’S largest map ever – lining up KAY/O’s EMP could prove to be a challenge.
Breeze’s large bombsites did not deter us from creating ZERO/POINT lineups, though, as we were able to devise a few useful lineups that you can use on Breeze.
For Attackers, these lineups will focus on the more common holding angles within A-site and B-site, such as the B-Back site, Middle Nest, and the A-Pyramids. On the other hand, Defenders will be able to gain early information about the enemies’ location through some of the Defender-side lineups we will show you today.
Let’s get started!
Robot Initiator: KAY/O

KAY/O is a humanoid robot from the distant future. As some of the lore would suggest, KAY/O was built by humans to kill Radiants.
In the distant future, it seems that a divide between humans and Radiants has ensued, causing humans to fear Radiants, and at the same time, Radiants to despise humans. Of course, Radiants would have the upper hand in the ensuing war seeing as Radiants are super-powered humans like the X-Men.
This is probably the reason why they were forced to make a ruthless Radiant killing machine in KAY/O.
Everything about KAY/O is aimed towards the destruction of all Radiants. His skill set revolves around the disruption of any Radiant Ability. Figuring out how to render Radiant Abilities useless through KAY/O is an impressive feat for the human race, and most likely gave them the upper hand in the war since, through KAY/O’s voice lines, he would share how many times he has killed Reyna in his lifetime, and we all know how powerful Reyna can be.
More information about the lore surrounding KAY/O, the Radiants, and the human race will only be revealed as time goes by. Riot has done an amazing job of injecting tasteful storylines into the game. KAY/O’S lore is no exception.
ZERO/POINT
KAY/O’s Signature Ability is his third ability called ZERO/POINT.
When activated, KAY/O pulls out a small blade from his forearm and equips himself with a suppression blade that sticks to the first wall or objects it comes into contact with. KAY/O throws this knife with a precision that only a humanoid robot can achieve.
The blast resulting from ZERO/POINT affects Radiants and human technology alike, disabling every Agent Ability within a large spherical area.
ZERO/POINT is KAY/O’s Signature Ability which disables the abilities of all Agents hit by the EMP blast radius. As a bonus, ZERO/POINT pings you and your allies of the number of enemy players hit by the EMP blast. The pings give information about which Agents were hit by the EMP blast, along with how many were hit by the blade’s area of effect.
ZERO/POINT is a great tool for figuring out which players are playing which sites on most maps in VALORANT. A good ZERO/POINT lineup on Breeze, for example, can give you and your team a good idea of how many players are currently playing on which side of the two bomb sites.

The information given by ZERO/POINT is valuable in almost every map in VALORANT, which could all benefit from early information about which site the enemies have stacked. You and your team can attack or rotate accordingly using this valuable information given by ZERO/POINT.
ZERO/POINT’s projectile travels pretty quickly and has a consistent trajectory which makes lineups pretty straightforward. ZERO/POINT’s area of effect is quite large. The large area of effect makes this ability very forgiving in terms of where your knife must be thrown to effectively utilize its radius. It also has the bonus of tagging enemies even if they are behind walls since the EMP blast goes through walls and other types of in-game cover.
The ability does not cost any credits to equip. However, it has a slightly long cooldown time of 40 seconds.
Cool and Calm Breeze

Breeze is a breath of fresh air (figuratively and literally) for VALORANT players. However, like any new map that Riot has released, Breeze was received with a ton of dodged queues and hate.
Just like Icebox before it, Breeze has some of the longest sightlines in VALORANT. The longer sightlines make duels and gameplay within Breeze a very rewarding experience for players with amazing pinpoint accuracy. Most of the hate probably came from players who quickly realized how lacking their long-ranged aiming ability was when playing in a large map like Breeze.
Guns like the Operator and the Vandal are the stars of the show here. These guns offer the most value relative to the average duel distance in Breeze. The Vandal offers a one-shot headshot regardless of the range it’s fired from, while the Operator can kill anyone with one shot as well.
As time went on, though, more and more players have started to embrace and love Breeze. We know we used to hate it as well but we absolutely love it these days.
Breeze Attacking – A-site Right Pyramid/Cubby/Back-site ZERO/POINT

This A-site ZERO/POINT lineup tags and clear out the most common spots that Defenders love to peek from. These spots are the Right-Pyramid, Cubby, and the A-Backsite.
These spots are very common spots where defenders peek from because it gives them the superior angle advantage versus the Attackers. Most of the games we have played from Silver-Diamond lobbies featured Defenders that take these spots consistently on a round-to-round basis.
With that said, here is how you line up KAY/O’s ZERO/POINT Knife:
- Look for this corner at Attacker Spawn:

2. Hug the corner, turn around, and look up towards these beams on this red structure:

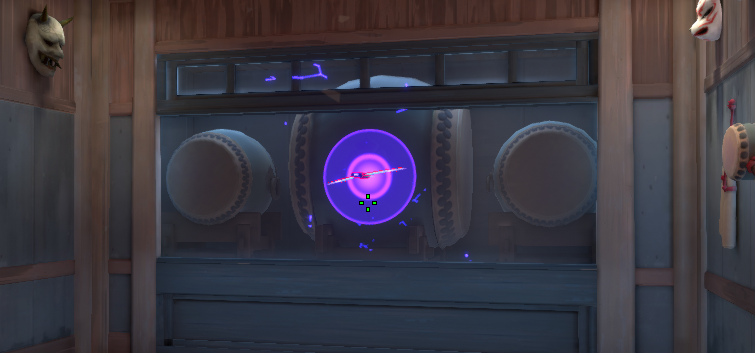
3. Place the tip of the ZERO/POINT logo on the tip of this vertical beam:

4. Left-click to throw ZERO/POINT:

When done correctly, the ZERO/POINT blade should land just behind the right-Pyramid on A-site:

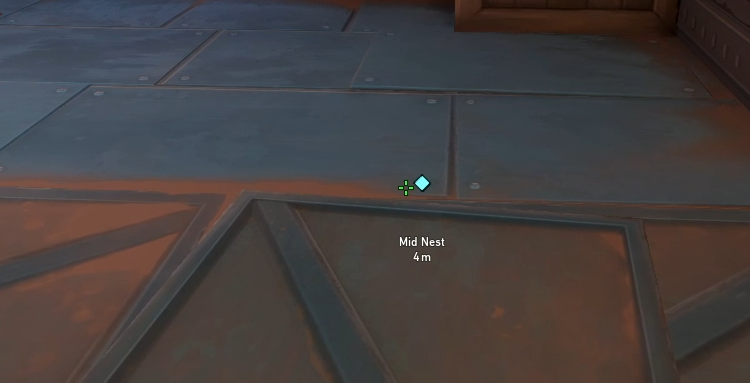
Breeze Attacking – Middle Nest/Tunnel ZERO/POINT

Like most of the map layouts in VALORANT, the middle area of any map is arguably the most important space to take control of. Gaining control of the middle area in maps like Ascent and Breeze can help your team cut off any rotation from the adjacent bomb site and overwhelm Defenders on the site that your team has chosen to attack.
- Look for this corner at Attacker Spawn:

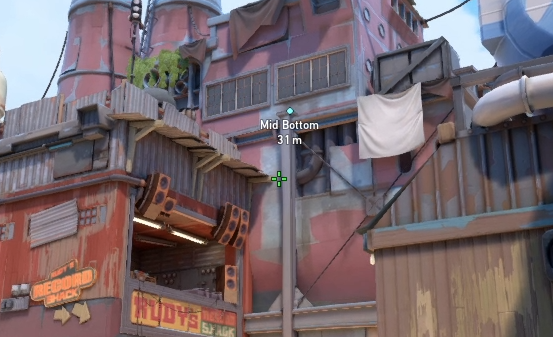
2. Hug the corner and look up towards this cannon:

3. Place the letter “E” indicator of the ZERO/POINT Icon on top of this cannon’s opening:

4. Left-click to throw ZERO/POINT:

When done correctly, ZERO/POINT should land just inside of Middle Nest:
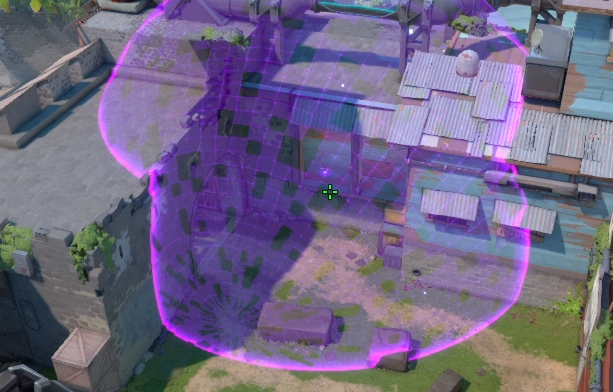
And cover the whole Middle Nest and some of Tunnel:
Breeze Attacking B-Site Backsite ZERO/POINT

B-site Backsite is by far more important to clear out versus Spawn and Tunnel. Spawn and Tunnel can easily be smoked or walled off by Omen’s Dark Cover or Viper’s Toxic Wall.
This next lineup can clear out B-Backsite so that you and your team can safely take B-site and play crossfire from B-Main and B-Backsite during post-plant.
- Look for this corner at Attacker Spawn:

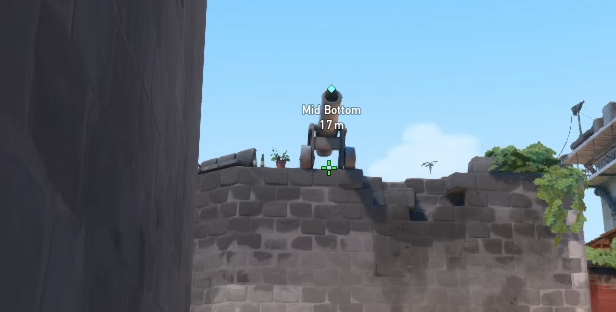
2. Hug the corner and look up towards this cannon:

3. Place the letter “C” of your first ability’s button indicator inside the cannon’s opening:

4. Left-click to throw ZERO/POINT:

When done correctly, ZERO/POINT should land around B-Backsite:

This ZERO/POINT lineup will reveal and disable any player hiding around the B-Backsite area:
Breeze Defending – B-Main/B-Elbow Early Information

The most common setup when attacking B-site on Breeze is a middle and B-Main split. A-site lurk is pretty rare because of how far the player has to travel to reach B-site.
This next lineup focuses on tagging as many players around B-Main and B-Elbow. Three or more players tagged within these areas will often indicate a B-site attempt by the Attackers.
- Look for this corner at B-Backsite:

2. Position yourself within this exact corner and hug the wall:

3. Turn around and look up. Search for the rightmost group of clouds:

4. Place the tip of the ZERO/POINT logo on the rightmost tip of this cloud:

5. Left-click to throw ZERO/POINT:

When done correctly, ZERO/POINT should land just on top of this small arch at B-Main:

And cover most of B-Main and B-Elbow:
Breeze Defending – Middle God ZERO/POINT

As mentioned before in the Breeze Middle Attacking Lineup, the middle area is a very important space for both Attackers and Defenders. As a defender, giving up middle control will give your team a more difficult time in either A or B sites because they will have to deal with an attack from multiple directions.
This lineup aims to stop or deter a middle control attempt by tagging multiple players around the middle area on Breeze.
- Look for this corner inside of Middle Nest:

2. Hug the corner and turn around:


3. Look for this rivet on the floorboards:

4. Place the rightmost diamond of your Ultimate Ability’s charge indicator in the middle of this rivet:


5. Left-click to throw ZERO/POINT:

When done correctly, ZERO/POINT should land just on top of the Middle tower:
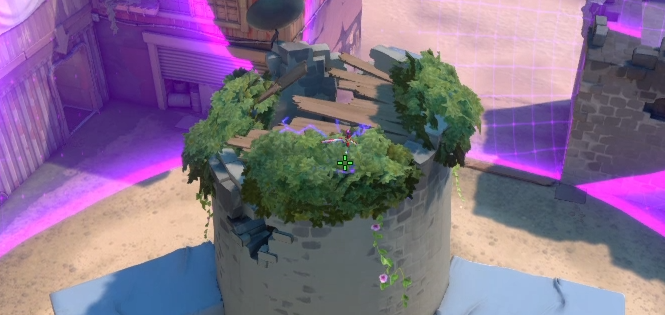
And cover most of the Middle Area:
Breeze Defending – A-site A-Cave/A-Shop ZERO/POINT
This last lineup for Breeze aims to slow down and tag players currently stacked within A-Cave and A-Shop. These spots are the most common waiting areas for Attackers. With KAY/O’s ZERO/POINT, your team can be informed about how many players were tagged by ZERO/POINT.
This information can be used to prompt your teammates from the opposite bomb site to fully rotate accordingly.
- Look for this corner in A-site Backsite:

2. Tuck yourself neatly in the corner and look for this spot inside A Cave:

3. Place your crosshair on the pinged spot:
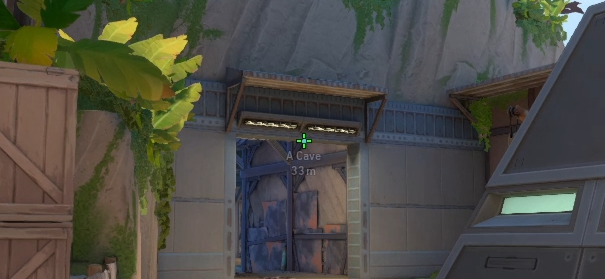
4. Left-click to throw ZERO/POINT:

When done correctly, ZERO/POINT should land inside of Cave:

And cover most of Cave and A-Shop:

Breezing Through

That’s about it! Most of these lineups are pretty easy to line up and land consistently. Breeze is admittedly not the best map for KAY/O, whose arsenal shines more on maps with tighter alleyways where his flashes and mollies can deal the most damage.
However, his Signature Ability can still be of great use for clearing out common angles and spots where enemies tend to hang out, which can give you and your team an easy ticket towards the bombsite of your choice.
Overall, KAY/O is a good pick for Breeze since his knife’s trajectory can freely fly through the map unimpeded. We hope that this guide can help you learn and use these lineups to provide value to your team. What are your favorite lineups for Breeze?