
Killjoy’s Lockdown is a powerful Ultimate Ability that stuns or detains any opponent caught inside its radius after a long windup.

However, the most ideal spots to place our German Prodigy’s ultimate ability can not 100% cover an entire area. There will always be a small spot around the outside of Lockdown’s radius enemies can use to weather the storm safely.
Today we take a quick look at the best spots for Killjoy to place her Ultimate Ability and the accompanying Nanoswarm Grenade we can complement it with to cover spots that would otherwise be left open. Let’s go!
Killjoy Ultimate: Lockdown

Lockdown is Killjoy’s Ultimate Ability. Killjoy places a Lockdown device that winds up for thirteen seconds upon placement. The ability covers a large spherical area, with the center where the Lockdown device is placed.

Any enemy players caught within the area of effect will be “detained” for eight seconds. The enemy team players will not be able to shoot when detained. They can, however, move very slowly.
Killjoy’s Ultimate requires seven Ultimate Points to equip. Killjoy’s Lockdown ability is a non-moveable target that the enemy team can destroy.
Ascent A-site Defending – A-Garden Lockdown Placement + Wines Nanoswarm

The leftmost corner in A-Garden gives Killjoy’s Ultimate Ability the slight elevation it needs to cover a wider area in A-site.
However, despite the small area boost that the elevation gives to Lockdown’s overall radius, A-Wines is a small area that Killjoy’s Lockdown will not be able to cover.
We can remedy this with a simple Nanoswarm lineup right after placing the Lockdown device.
- Place Lockdown in this corner at A-Garden:


2. Immediately run towards this corner by the Tree:

3. Look up towards the leaves on the Tree. Look for the small gap just above the large branch:

4. Left-click-throw your Nanoswarm Grenade while aiming for this spot:

5. The Nanoswarm Grenade should land at Wines:

Activate the Nanoswarm Grenade immediately once it settles at Wines.

Ascent A-site Attacking – A-Main Lockdown Placement + Rafters Nanoswarm


This small cubby at A-Main is the best spot to place Lockdown for Attacking. This spot in A-Main allows Lockdown to cover the most area on A-site.
However, Killjoy’s Ultimate will not cover a small spot behind the boxes at Rafters. A simple jump-throw Nanoswarm lineup will finish the job nicely.
- Place Lockdown on this corner in A-Main:


2. Run towards the double Radianite boxes in A-Lobby:

3. Place your back against the double Radianite Boxes and the wall:

4. Aim for the left side of this triangle. Jump + left-click-throw:

5. When done properly, the Nanoswarm Grenade should land on Rafters and cover this small area:

Ascent B-site Attacking – B-Main Lockdown Placement + Spawn Nanoswarm


For Attacking on B-site, placing Lockdown in the corner beside the large crate in B-Main will cover most of B-site. Lockdown will also be relatively safe from Defenders since they will have to push out into B-Main to destroy it.
A small spot at spawn is still open for Defenders to lurk around. We can easily remedy this by complementing Lockdown with a Nanoswarm Grenade.
- Place Lockdown in the corner by the wall and the large crate in B-Main:


2. For the Nanoswarm Grenade follow up, run backward until your back is against the B-Main entrance’s left corner:

3. Aim just a little bit to the right of this wire:
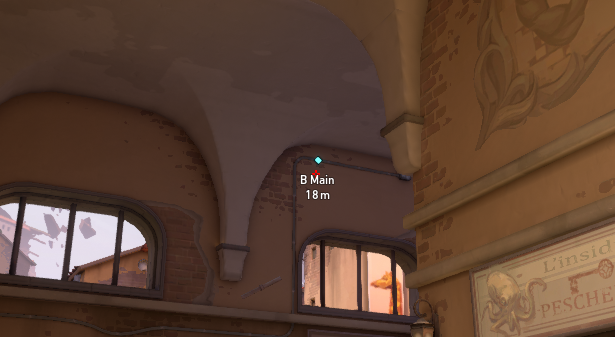
4. Run-throw the Nanoswarm Grenade through the window:

When done correctly, the Nanoswarm Grenade should land at Defender Spawn and cover the small area that Lockdown could not cover:

Partners in Crime
Killjoy’s Lockdown is a powerful crowd-control ability that can cover a whole bomb site on its own. Enemies will either try to clear out the bomb site or fall back to safer positions outside the bombsite to avoid getting “detained.”
However, there are instances where the Lockdown radius is not large enough to cover areas that enemies can use to weather out Lockdown’s windup.
In these situations, Killjoy’s Nanoswarm Grenade can be used to clear out these areas through simple lineups. Killjoy’s enemies can not run nor hide from her powerful one-two combo.


