Split is the most claustrophobic map in VALORANT. The tight corners, alleys, and entryways into sites compliment many Agent Abilities covering a significant area.
Killjoy’s Nanoswarm is one of the many Agent Abilities in VALORANT that can cover a large spherical area. She has two of these molly-type grenades, making this German Agent scarier on Defense.
Today we take a look at some Defender-side setups for Defense on Split.
Claustrophobic Split

Split features some of the tightest angles in any VALORANT map. The map also features elevation changes that could rival Icebox’s overall verticality. Split is also the first map ever to feature “Ascenders” or “Ropes” that allow players to move up to higher spaces inside the map. There are three sets of Ascenders in Split:
- Four Ropes inside Vents which allow players to move from B-Tower to A-Tower
- Two Ropes that allow players to ascend towards A-Lobby from Sewers
- Two Ropes that allow players to ascend towards B-Tower from B-site.
As for the map’s real-world location, the coordinates on the Split loading screen bring us to the Shinjuku District in beautiful Tokyo, Japan.
Shinjuku is known for its nightclubs, karaoke rooms, motels, and hotels located within alleyways of alleyways. Split takes inspiration from Shinjuku in terms of the on-foot navigational experience.
In the VALORANT Lore, Split is where Kingdom Headquarters and their Main Research Lab is located. When viewed from above, the map seems to be “Split” into a Business/Industrial side that features skyscrapers and buildings built by Kingdom Corp. In contrast, the other side features traditional Japanese buildings and structures. Posters can be seen around the map suggesting civil unrest is brewing between Kingdom Corporation and the locals.
German Efficiency Child Prodigy: Killjoy

Killjoy belongs to the Sentinel class of Agents. As such, her abilities allow her to lock down bombsites completely on her own. Allies can rely on the German Prodigy to stall or even stop an enemy team’s push on her own to buy her teammates enough time to rotate over to her bombsite.
Killjoy uses her superior knowledge and skill to employ robots and gadgets to fight on her behalf. Her skill set consists of nanobots, an alarm bot, and a sentry bot that she can set up to give her the best chance at holding down a bombsite. Her ultimate ability allows her to cover a large enough area to cover entire bombsites, giving Killjoy the ability to detain anyone caught in her ultimate.
In the VALORANT lore, Killjoy is known to have a father-daughter relationship with Brimstone. While both characters are not related, Brimstone sees it fit to act as a guide for Killjoy.
Killjoy is in-charge of almost all of the non-Sentinel VALORANT Agents’ tech. She oversees repairs and tech innovation for every Agent. Taking some of the Agents’ voice lines into context, Killjoy seems to be a natural-born tactician, using data she gathers from engagements as inspiration for her next inventions and strategies.
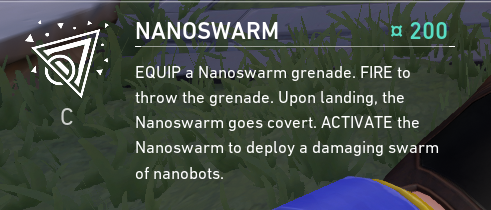
Killjoy Nanoswarm

Killjoy’s Nanoswarm is a molly-type ability that deals quick damage over time to a large radius. Killjoy’s Nanoswarm ability can be equipped at the beginning of each round for just 200 credits each and a maximum of two charges.
The thing that sets Killjoy’s Molly Ability apart from other molly-type abilities like Phoenix’s Hot Hands, Viper’s Snake Bite, and KAY/O’s FRAG/MENT is Killjoy’s ability to place the grenades before the start of the round and activate them as she wishes at any time within the same round. After placing the Nanoswarm Grenades, they will become completely invisible until enemy players stand next to them.
Among the other molly-type abilities present in VALORANT, Killjoy’s Nanoswarm Grenade is the only molly ability in VALORANT that does not activate upon landing. However, a slight caveat is that KJ’s Nanoswarm Grenades shells can be destroyed when damaged with guns or abilities. Killjoy’s Nanoswarm Grenades also emit a subtle buzzing noise when enemy players stand close enough to the Nanoswarm Grenades.
Split B-site Defending – B-Main Nanoswarm Setup

B-site is arguably Killjoy’s best site on Split. The narrow entryway from B-Main is a great chokepoint where Killjoy can use her Nanoswarm Grenade to full effect.
Attackers going through B-Main to get to B-site will most likely rush to the site to bypass as many angles as possible. With a B-site rush, Attackers can also take advantage of their sheer numbers to overwhelm the two or so Defenders holding B-site.
We can use the Attackers’ sense of urgency to our advantage. This Nanoswarm setup for B-site on Split will punish rushing Attackers making their way towards B-site from B-main. Our trusty Turret will be on-site to slow down incoming enemies of some added insurance.
First Nanoswarm Placement
- Look for this drainaige hole just in front of B-Main Entrance:

2. Left-click-throw the Nanoswarm Grenade so that it sits just on the bottom of the drain hole :

Second Nanoswarm Placement
- Look for this manhole cover that is close to the rightmost wall on-site:

2. Left-click-throw the Nanoswarm Grenade on this small notch on the manhole cover:


Alarm Bot Placement

There is no particular spot to place the Alarm Bot. Just make sure to cover most of the B-Main Entrance. Otherwise, enemies will be able to lurk towards the alley just behind B-site Pillar.
Turret Placement

A common mistake when placing Killjoy’s Turret is placing it directly in the enemies’ line of sight. The enemy team will shoot down your Turret, rendering it useless early in the round.
A better way of placing your Turret would be to put it in spots where enemies will not be able to shoot it down directly. Hiding your Turret from plain sight also invites the enemy team into the bomb site, giving them a false sense of security. When they find out where you or your Turret is, the enemy team will most likely be standing on top of your Nanoswarm Trap.
For Split B-site, place your Turret against this blue wall and along this strip of tiles:

Remember to rotate your bot so that it is facing B-Main.
Split A-site Defending – Lane/Hell Nanoswarm Setup

For A-site Defense, we can set up our Nanoswarms to cover the narrow entryway into A-site.
A-site’s entryway into the main bomb site is even narrower than the site entryway found in B-Main. You can do even more damage with Killjoy’s Nanoswarm here, as enemies caught by your Nanoswarm setup will have nowhere to run once they are caught inside your Nanoswarm Trap.
First Nanoswarm Placement
- Look for this corner at A-site Hell:

2. Left-click-throw your Nanoswarm Grenade into this corner:


Second Nanoswarm Placement
- Look for this T-shaped tile intersect just in the middle of the third tile from the right:

2. Left-click-throw the Nanoswarm Grenade:

Alarm Bot Placement

Place the Alarm Bot a little further back to not scare away Attackers from taking more space into the A-site.
Turret Placement
Once again, we will be placing our Turret away from the enemy team’s line of sight. This way, the Turret can continue to support us with its detection and slow capabilities. Unlike the previous patches, it only takes a few bullets before the Turret is ultimately destroyed, no thanks to the recent nerfs slapped on Killjoy’s trusty Turret.
For these Nanoswarm setups, Killjoy’s Turret will simply play a support/cleanup role thanks to the slow debuff applied to any enemies tagged by Killjoy’s Turret.
- Look for this wall at A-site’s backsite:

2. Place the Turret against the back wall and in this small corner:


This location should give it a direct line of sight over enemy players caught in the Nanoswarm trap, making it harder for them to fall back into safe cover.
When To Activate Killjoy’s Nanoswarm
Your Alarm Bot is your best friend. However, you still have to time the Nanoswarm activation to further sell the bait that is your Nanoswarm Grenade.
A good rule of thumb is to wait 1/2 or 1 second after the Alarm Bot is triggered. This way, the enemy player that triggered the Alarm Bot will not immediately fall back since nothing happened after the Alarm Bot was triggered.
Still, it will be up to you to decide when to activate the Nanoswarm Grenade. Remember, though, that we are basing the timing off of actual in-game experience.
We found out from a few Competitive games that we played that enemy team players caught by the Alarm Bot will most likely continue to push since falling back will expose them to your teammates.
Split Their Brains With Your Mind Games
Split is an excellent map to play Killjoy on. The narrow entryways and tight corners make the ideal map to maximize Killjoy’s Nanoswarm Grenades’ area.
Killjoy’s Nanoswarm traps are a nightmare to run up against as some of these Nanoswarm traps force the enemy team to play at a slower pace than what is ideal. They would be risking quite a lot by running straight into the site with Killjoy’s Nanoswarm traps waiting to catch its prey.
Overall, Killjoy and Split is an awesome combination that you should try playing for yourself.