Welcome to Viper’s pit.
Viper is a very versatile Agent that can play both the Attacking and Defending sides well. On tight and narrow maps like Pearl, you can take full advantage of Viper’s Toxic Screen, Snake Bite, Poison Cloud, and Viper’s Pit and make strong offensive or defensive plays on the map.
Since we have already covered the essential Attacking setups for Viper on Pearl, we now turn to the Defensive side of things and look at some valuable Defensive setups for Viper’s Toxic Screen and Poison Cloud you can use to secure bomb sites on Pearl.
Viper Toxic Screen and Poison Cloud Setups on Pearl
For the most part, you want to use Viper’s Toxic Screen to cover as much space as possible away from the bomb sites. This way, you and your team can control more space around A-Main and B-Main, making it more difficult for the Attacking team to take more space towards either bombsite.
Doing this also makes the Attacking team more susceptible to flank plays, as they will have no choice but to wait out your Toxic Screen.
On the other hand, Pearl gives Viper many opportunities for one-way smokes. Using these one-way smokes alongside Viper’s Toxic Screen should make site entry a scary proposition for the Attacking team when played perfectly.
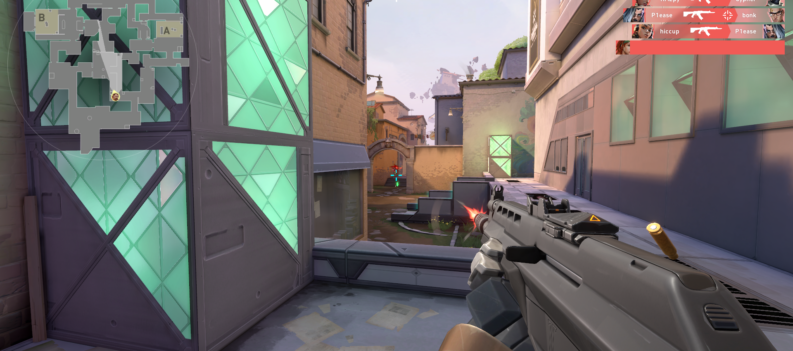
Pearl A-site Viper Toxic Screen and Poison Cloud Setup
For Pearl’s A-site, you can set up a neat little wall that simultaneously covers the A-Main and the A-site entrance. This way, you can get the jump on the Attacking team if they decide to push out your Toxic Screen at A-Main.
If things get too spicy, you can also use Toxic Screen as cover for when you are retreating into A-site.
Toxic Screen Setup
- Stand against this wall at A-site:

2. Use the Minimap as a guide. Make sure you cover these two corners:

When done properly, the Toxic Screen setup should look like this:

If the Attackers swing out from the Toxic Screen, they will receive an instant 30HP decay damage for 1.5 seconds. Alternatively, you can use this Toxic Screen as a cover when retreating.

A-Link One-way Smoke Setup
- While facing the double-box and with your back against the wall at A-Link, stand on top of this point between the tiles:


2. Aim for this corner on the bottom box:

3. Jumping right-click throw Viper’s Poison Cloud:

When done properly, Viper’s Poison Cloud should sit nicely on top of the double box:

And give you a nice one-way smoke at A-Link:

Pearl Middle Viper Toxic Screen and Poison Cloud Setup
Middle will always be the most critical area for maps that feature a middle lane, as it provides alternative lanes towards either bombsite on the map.
Since Pearl is a more traditional A-site-Middle-B-site map, you can expect the Attacking team to want to take control of Pearl Middle. As a Defender, you want to cut off as many lanes to the Attacking team as possible and funnel them towards a single entryway towards either bombsite on the map.
With that said, here is a quick Viper Toxic Screen setup covering both Top Mid and Mid Shops.
Toxic Screen Setups
- Stand in this corner at B-Link:

2. Use the minimap as a guide.

When done properly, Viper’s Toxic Screen should cover both Top Middle and Mid Shops:

Make sure you cover both of these corners: you can easily punish any Attacker that pushes out from your Toxic Screen with this setup.
Mid Doors One-way Smoke Setup
- Stand against the barrier at Mid Doors:

2. Aim along the middle of the darker spot on the wall:

3. Left-click-throw Viper’s Poison Cloud:

When done properly, Viper’s Poison Cloud canister should land on top of Mid Doors:

And give you a powerful one-way for Mid Doors:

Pearl B-site Viper Toxic Screen and Poison Cloud Setup
B-site is a long way out from B-Main, which makes a B-site attack very obvious. This should give the Defending team enough time to set up and call for rotations.
With this Viper Toxic Screen setup for B-Main, you can block off basically all the sightlines that the Attacking team might have on you towards B-site. You can also use the cover to push up deep into B-Main and catch daring Attackers off guard.
Toxic Screen Setup
- Stand in this corner at B-Tunnel:

2. Move your mouse around until Viper’s Toxic Screen covers both B-Link and B-Main. (Refer to the minimap to get accurate placement)

When done properly, Viper’s Toxic Screen should look like this:

You can push up B-Main if you wish to do so. Feel free to punish any daring Attacker that crosses your Toxic Screen:

B-Main One-way Smoke Setup
- Stand in this corner at B-Default:

2. Place the tip of the second line from the right of the toxin fuel gauge along this line on the wall:


3. Left-click-throw Viper’s Poison Cloud:

When done properly, Viper’s Poison Cloud should land on this gap at the B-Main pillar:

And give you a powerful one-way smoke for B-Main:

Viper Strike
Viper’s kit is pretty much unchanged from when she used to define the VALORANT meta alongside Astra. All that’s changed is the timing and communication required to use both Toxic Screen and Poison Cloud efficiently every round – which is easily resolved by talking and communicating to your teammates.
With that said, the setups above are guaranteed to give the Attacking team many problems, as your Toxic Screen and Poison Cloud setups will make them think twice before rushing into just about any bombsite on Pearl.
Visit the PlayerAssist website for more Gaming Guides, Gaming News, Game Codes, and other Gaming Content!