If you’re a PC gamer, Steam is likely your best friend. It is a great way to organize all your games, has amazing sales, manages DLC and mods, and offers a forum and active community for every game it features. Whether you’re new to Steam or are a returning player, you may not know how to appear invisible on Steam.

I’ll cover that and a few other neat tricks too. All will make your time on the gaming platform more productive! Steam is primarily a gaming platform but has a social element.
It isn’t as intrusive as Facebook or as annoying as Snapchat. Instead, the social side allows you to game with friends to form co-op groups, raids, or whatever you like.
As part of our Steam coverage, we have compiled this tip sheet of basic hints and tricks for using Steam. It is designed especially for newbies or returning users and offers some ideas of things you can do with Steam to make your life easier.
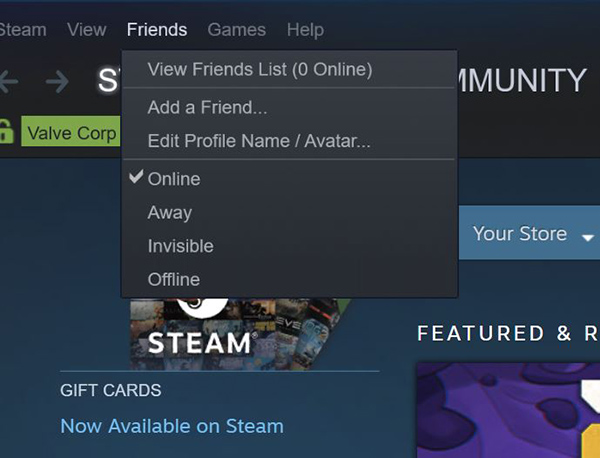
How to Appear Invisible on Steam
If you want to play in privacy for a while, you can. While friends who game are amazing, sometimes you want a little alone time to indulge in a secret guilty game or play alone for a while.
Read: How To Have YouTube Videos on Your Steam Profile
Usually, when logged into Steam, you show it as online to your Steam friends. You can change that if you want. The instructions for going offline may vary whether you’re using a Mac or PC.
- Open Steam and select Friends from the top menu.
- Select Offline from the drop-down.
Once Steam picks up the change, you should appear offline to everyone on your friend list. At very busy times, this can take a few minutes to update for some reason, but you will eventually appear invisible on Steam.
I Don’t See an Option to go Offline
Some users have stated they do not see an option to toggle their online/offline status. If you’re having difficulty changing your status, try these troubleshooting tips:
- Verify your internet connection – Turn your wifi off and back on to ensure a strong connection.
- Clear the cache – Whether you’re using the browser or app, try clearing the cache by going through your task manager.
- Log out and back in – Go to the profile option, click to access the dropdown, and click ‘Logout.’ Then log back in.
- Check your internet settings – Go to advanced settings in your browser and ensure that ‘Enable Enhanced Protected Mode’ is unchecked.
You can visit the Steam Support page for more help if you have more issues.
Add non-Steam Games to Your Library
You can use Steam to manage your other installed games, too, if you like. It won’t work for every game, but most AAA games will work. If another game portal is having a sale, but you still want Steam to manage everything, or you want to game with friends, you can.
- Open Steam and select Games from the top menu.
- Select “Add a non-Steam Game To My Library.”
- Select the game(s) from the list and check the box next to the ones you want to add to Steam.
If you have just bought a game but have yet to install it, you can add the code to Steam and use it through the platform.
- Open Steam and select Games from the top menu.
- Select “Activate A Product” on Steam.
- Select Next in the pop-up window and then agree to the T&Cs.
- Add the serial code in the next window. Allow Steam to recognize the code.
- Download the game through Steam as usual.
Backup your Save Games
I learned that even though Steam says it backs up your games, it doesn’t do it for all games. Some games either don’t allow Steam backups or just don’t work. So you may think your save games are safe, but they may not be. Fortunately, you can back up your save games too.
- Open Steam and go to your Library.
- Select the game you want to back up.
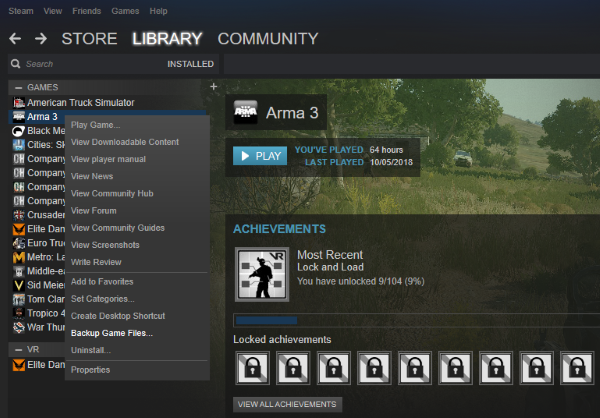
- Right-click and select Backup Game Files.
- Set the destination in the pop-up box.
You can use a different hard disk or even OneDrive if you’re a Windows user. In the event of disk failure or having to rebuild your PC, you don’t lose your game saves and can rebuild your Library quickly.
Move Steam to a Different Drive
You can if you have just invested in a new SSD and want to move your Steam installation to make the most of the extra speed. It isn’t as straightforward as possible, but it can be done. You can move just your games, but moving the entire package is tidier.
- Exit Steam and navigate to the Steam installation folder.
- Copy the SteamApps and User Data folder to your new drive.
- Uninstall Steam from the old drive.
- Install a fresh copy of Steam on your new drive.
- Copy the SteamApps and User Data folder into your new Steam installation folder.
- Start Steam and log in.
Your games should appear in your Library and be ready to play. Some may have to install dependencies first, but it should work fine. If a game gives you problems, right-click it, select Properties, click the Local Files tab, and select Verify the Integrity of Game Files.


