Killjoy’s Ultimate Ability, Lockdown, is a powerful crowd-control ability that can cover a large amount of space on virtually every bomb site in VALORANT.
Players always have the option to place Killjoy’s Lockdown anywhere they wish. However, the steep Ultimate Points requirement to use Killjoy’s Ultimate Ability means players must consider placing Lockdown to maximize its benefits.
With that in mind, we have compiled the most efficient and effective Killjoy Lockdown spots on maps such as Ascent, Bind, and Haven. Ready? Let’s go!
Killjoy Lockdown

Killjoy’s Ultimate Ability, Lockdown, is a powerful CC (crowd-control) ability that allows Killjoy to secure a large amount of space on any map.
Killjoy needs seven Ultimate Points to be able to cast Lockdown. Killing opponents will give one Ultimate Point per kill. Defusing the bomb also gives out one Ultimate Point. When enough Ultimate Points are collected, Killjoy can cast and deploy her Lockdown ability to cover a large area, in this case, entire bomb sites. Killjoy also has the option of securing Ultimate Orbs around the map.
When deployed, Killjoy’s Lockdown creates a large 32-meter dome-like area of effect. The Lockdown device will immediately start winding up 13 seconds after deploying it. Any enemy caught within the dome after the wind-up ends will be detained for 8 seconds.
While detained, enemy players cannot equip weapons or abilities, and their movement speed is reduced significantly.
However, keep in mind that Lockdown can be destroyed by enemy fire and utility.
1. Ascent A-site Lockdown (Defense/Retake)
Despite the nerfs slapped onto Killjoy in the recent patches, she remains a force to be reckoned with on Ascent. Killjoy can set up powerful Nanoswarm Traps and line up post-plant Nanoswarm Grenades to delay site entry and secure post-plants.
As for Killjoy’s Defense Lockdown for Ascent A-site, there is only one spot on Ascent A-site where Killjoy’s Ultimate can cover the entire bomb site and most of the space around A-Main.
This corner in A-Garden is the best spot to place Killjoy’s Lockdown:

Stand in the corner between the leftmost wall and the box.


As you can see, placing Killjoy’s Lockdown in the aforementioned corner at A-Garden guarantees full coverage of A-site.
Wine is pretty much the only spot not covered by this Lockdown placement. A simple post-plant Nanoswarm Lineup can easily clear this spot as well.
If you want to learn post-plant Molly + Lockdown combos for Killjoy on Ascent, we recommend reading our article on Killjoy Lockdown + Nanoswarm Combo Spots on Ascent.
2. Ascent A-site Lockdown (Attack/Post-plant)

When appropriately used, Killjoy’s Ultimate Ability guarantees a free round. Lockdown forces Defenders to clear out from the site or risk getting detained, which means Attackers can safely enter the site without much resistance.
The cubby at A-Main will be your best bet for the Attacking side if you want to cover as much space as possible on A-site. This spot is great for both site-entry Lockdown and post-plant Lockdown.

This Lockdown spot covers all of Ascent A-site except for the tall box at Rafters.

Again, you can use the post-plant lineups featured here to clear out the areas that Killjoy’s Lockdown does not cover.
3. Ascent B-site Lockdown (Defense/Post-plant)

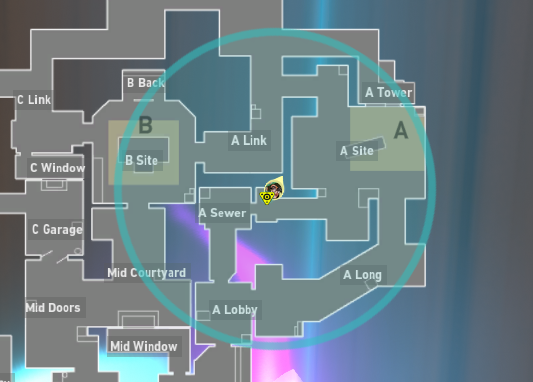
For Ascent B-site, a Lockdown placed in this corner behind Lane will cover the most space in B-site and a ton of other neighboring areas around B-site.
Attackers playing post-plant will take more advantageous angles versus the rotating Defenders since this Lockdown placement will force Defenders off of Market, Defender Spawn, and B-Main. B-Lobby, and Mid Link.
For Defenders, this Lockdown placement will force Attackers to wait out the Killjoy Ultimate (and risk getting flanked by your teammates) or give up B-site entirely and rotate to A-site instead.

4. Bind A-site Lockdown (Defense/Attack/Post-plant)

Killjoy’s Lockdown is a precious utility that can quickly turn the tides of battle in your team’s favor. However, Lockdown is a very scarce utility that must be used efficiently.
The corner inside U-Hall (as shown in the picture above) will be the most efficient spot for Killjoy’s Lockdown. This spot covers all of A-site and spans to A-Short and Showers.


One minor caveat for this placement is that Killjoy’s Ultimate will not cover a small spot inside A-Heaven. Fortunately, said spot is a not very good area to hold anyway as enemies will be exposed to A-Short if they weather out Lockdown from this spot in A-Heaven.

5. Bind B-site (Attack/Defense/Retake/Post-plant)

For B-site, this corner inside of B-Elbow is the best place to plant Killjoy’s Lockdown Ultimate Ability.
Both Attackers and Defenders can use this spot for various situations. It will not matter whether your team is playing Attack, Defense, Retake, or Post-plant; this spot inside B-Elbow will force enemies to fall back deep into Defender Spawn, Hooka, and A-Long.


6. Haven A-site Lockdown (Defense)


Haven A-site is notorious for being very difficult to retake as a Defender. Almost every entryway into Haven A-site is a chokepoint. The angles from where the enemies might be coming from are very predictable and easy to hold for Attackers playing post-plant. Because of this, A-site Defenders will have to do everything they can to prevent the Attackers from gaining full control of the A-site.
Killjoy’s utility is best used in Haven’s A-site, where she can set up her Nanoswarm mollies to stall the Attacker push. With a well-timed Killjoy Lockdown from A-Heaven, Killjoy might even force Attackers to abandon A-site altogether, as they will be forced back towards A-Long and out of A-Sewer.


7. Haven A-site Lockdown (Attacking/Retake)

For Attackers, gaining control of Haven A-site gives a very high chance of winning the round due to the reasons mentioned above (retake is difficult since entryways are chokepoints).
This cubby inside A-Sewer covers the entire A-site and most A-Heaven, which can easily be cleared with some Nanoswarm Grenades. Defenders will have to fall back deep within Defender Spawn to avoid getting detained by Killjoy’s Ultimate.
As you can see, a Lockdown placed on this spot in A-Sewers covers almost 3/4 of Haven’s B-site. Your team’s lurker might be able to make something happen with this opportunity.
8. Haven B-site Lockdown

Haven is the only triple-bombsite map in VALORANT. With teams consisting of just five players, keeping tabs on every bombsite will be difficult for a Defender. Fortunately, Sentinel Agents such as Killjoy can easily hold a bombsite or any adjacent area on her own with some help from her Nanoswarm, Alarm Bot, and Turret.
When you are not playing A-site as Killjoy on Haven, you should probably be playing at C-Garage. Your bots can hold C-Garage for you while you hold either B-site or C-site.
If the Attacking team goes for a B-site take, a retake Lockdown placed in this corner in C-Link will cover all of B-site and most of Mid-Courtyard and C-Garage.


9. Haven C-site Lockdown (Retake)

Whenever Killjoy is not playing A-site on Haven, she should be playing in C-Garage, where she can move back and forth between B-site and C-site with ease.
In retake situations, a Lockdown placed in the corner shown above will cover most areas within C-site, except for a small space at the Platform.

Attackers playing post-plant will be forced back deep in C-Long. Your team can easily smoke off the C-site entrance and defuse the bomb with ease.

10. Haven C-site Lockdown (Attacking/Post-plant)

The last Lockdown spot on this list is mainly for post-plant play. This particular Lockdown placement aims to buy your team just enough time to set the Spike off. Killjoy’s Ultimate lasts for 13 seconds, which, for Defenders playing retake, will feel like an eternity.
Defenders will be forced as far back as deep within Defender Spawn, A-Link, and C-Long, giving your team enough time to find the best crossfire positions on-site.
Killjoy can further delay the defuse and secure the Spike with her Turret, Nanoswarm Grenades, and Alarm Bot.


These Sites are Closed Until Further Notice
These Lockdown placement spots offer Ascent, Bind, and Haven’s bomb sites the best coverage. However, keep in mind that, while these might be the ideal places to plant Killjoy’s Lockdown Ultimate in theory, there will be situations where you can not place the Lockdown in the spots featured here.
With that said, successfully getting the Lockdown placed at even the least ideal spot is better than not using it. Remember, Lockdown costs 7 Ultimate Points to equip. Killjoy’s Ultimate will get more value the more you use it within a match. There is not much point in saving the ability in most cases.