Breaking ground is an essential ability in the eerily beautiful world of Hollow Knight, where an exciting journey awaits players. Team Cherry’s Metroidvania-style game encourages brave individuals to explore the depths of an underground kingdom rich with mysteries, challenges, and creatures.
Players must learn the technique of breaking ground as the title character, a little but determined knight, which entails utilizing their trusty nail as a weapon to open paths and reveal hidden mysteries. This guide will serve as a stepping stone, offering vital insights and methods for how to break ground and navigate Hollow Knight’s hauntingly beautiful universe. Get ready to embark on an unforgettable odyssey and embrace the thrill of exploration as you carve your path through the darkness, one swing at a time.
How to Break Ground in Hollow Knight
While exploring the vast kingdom of Hollownest, the Knight will sometimes find parts of the floor that rumble. This rumbling ground implies that the Knight can break it. However, the Knight cannot simply attack the floor to break the ground.
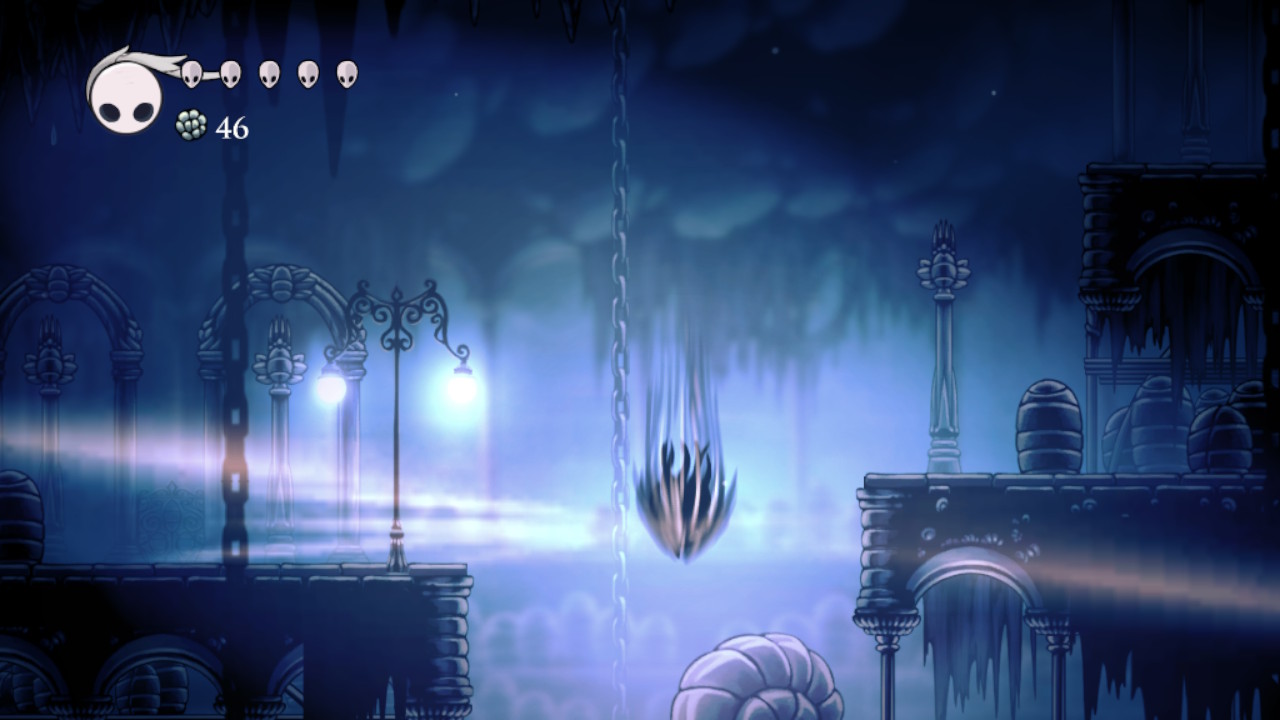
Breaking ground requires the Knight to learn a specific spell. This spell is the Desolate Dive Spell. Eventually, as the Knight explores more of the Hallownest, the Knight can upgrade this spell to the Descending Dark Spell.
Desolate Dive Spell
The Desolate Dive Spell enables the Knight to hit the ground with concentrated SOUL. This can then break the rumbling floors, like the one that leads out of Soul Sanctum to Crystal Peak, and damage opponents.
To cast the Desolate Dive Spell on each of the various platforms, the player can press the following buttons by default:
| Platform | Buttons |
|---|---|
| PC | PlayStation 4 |
| Hold the DOWN directional button, then press the CIRCLE or R1 button | Hold the DOWN directional button, then press the B or RB button |
| Xbox One | Hold the DOWN directional button, then press the A or R button |
| Nintendo Switch | Hold the DOWN directional button, then press the A or R button |
When the Knight casts the Desolate Dive Spell, they slam into the ground, resulting in a shockwave extending out and up. When it hits an enemy, the dive inflicts 15 damage, and the shockwave inflicts 20 damage.
During and after using Desolate Dive, the Knight is invulnerable for 0.4 seconds. As long as the Knight has enough SOUL, they can chain Desolate Dive spells to avoid damage from enemies. Desolate Dive cancels the invincible frames of the Spell if it is cast while the prior Spell’s invincibility frames are still active.
How to Get the Desolate Dive Spell
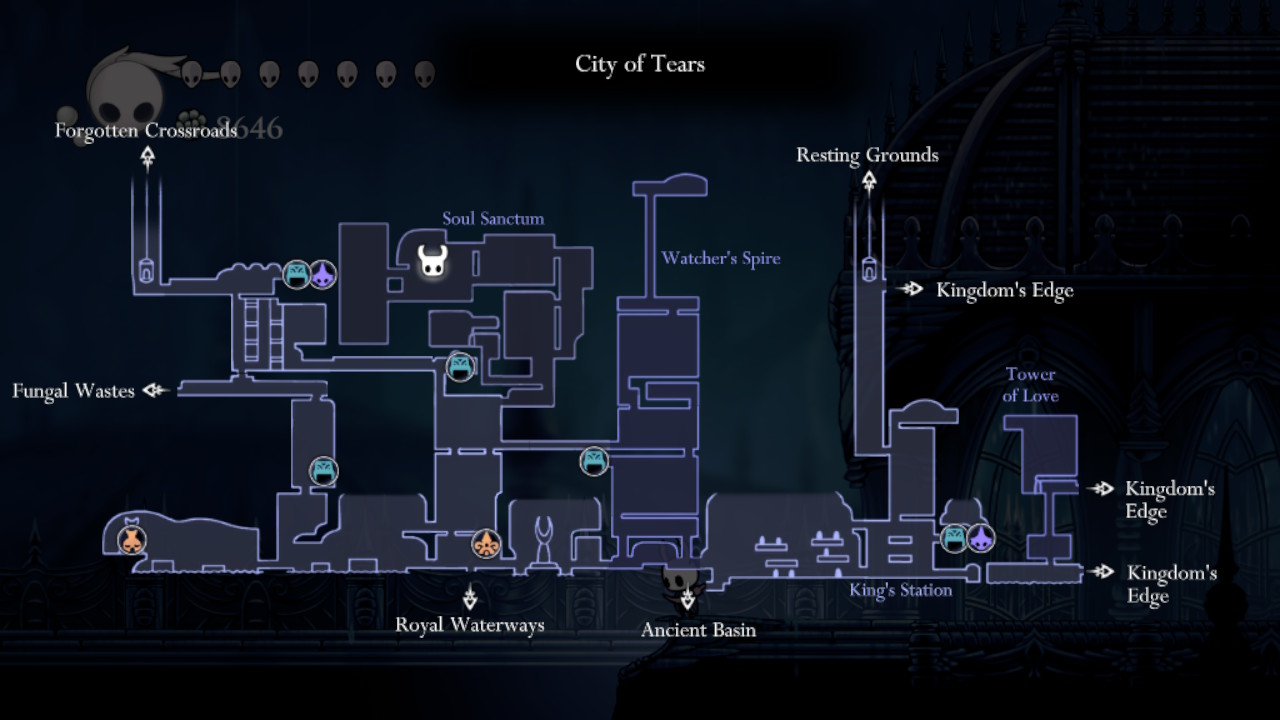
The Knight can learn the Desolate Dive Spell after defeating Soul Master. This enemy is one of the main bosses in the game. The Knight can find Soul Master at the top of Soul Sanctum in the City of Tears.
Requirements
To get to where the Knight can meet the Soul Master, the Knight must first acquire a particular ability. The ability required is the Mantis Claw ability. This ability enables the Knight to hold on to and leap off walls. In addition, the Knight can employ the Monarch Wings ability instead. The Knight can use this ability to perform a second jump while in the air.
Enemies
The Knight will face various foes on his route to the Soul Master. Winged Sentries, Lance Sentries, Heavy Sentries, Follies, Mistakes, and Soul Twisters are among the enemies. In addition, the Knight will face the Soul Warrior, a mini-boss in the Soul Sanctum.
Path to the Desolate Dive
These are what the Knight needs to do to find the Soul Master:
- Exit the City Storerooms Stag Station. Continue to the left until you reach the bottom of the room. Go to the left, then down to the next exit.
- Then, using small platforms, make your way to the bottom of the room. The Knight will encounter Winged Sentries and Lance Sentries on the way down. On the right, exit the room.
- Afterward, proceed to the right and exit the room at the far end. Jump across the gap to find a Bench. The Knight can heal and save the game by sitting on the Bench.
- Then, proceed to the left, descend the gap, and exit the room at the bottom. Proceed to the right, where the Knight will come across a Heavy Sentry. Exit the room through the far right door. Then, proceed to the right, up the small platforms, and exit at the top right corner of the room.
- The Knight has made his way into the Soul Sanctum. Head to the right and ascend the platform above using the Mantis Claw or Monarch Wings abilities. Ride the elevator on the left to the top, then take the path on the left and ride another elevator up.
- After that, at the top, travel to the right, where the Knight is confined in the room and fights the Soul Warrior, a mini-boss. To proceed, the Knight needs to slay the Soul Warrior. Exit the room on the right after the Knight has defeated the Soul Warrior.
- Next, use the little platforms to get to where the Knight will encounter a Soul Twister. At the top, turn right, fall down the gap, hit the lever to open a shortcut, and take the elevator on the right to return to the top.
- Then, proceed to the left and ascend the platform above, where the Knight will confront a Mistake. Exit the area on the left and proceed to the right, up the next platform above, where there is another Mistake.
- Following that, proceed to the left, jump across the gap, and exit the room at the end of the path.
- Finally, turn left, plummet down a short shaft, turn left again, and the Knight will meet the Soul Master!
Defeating Soul Master
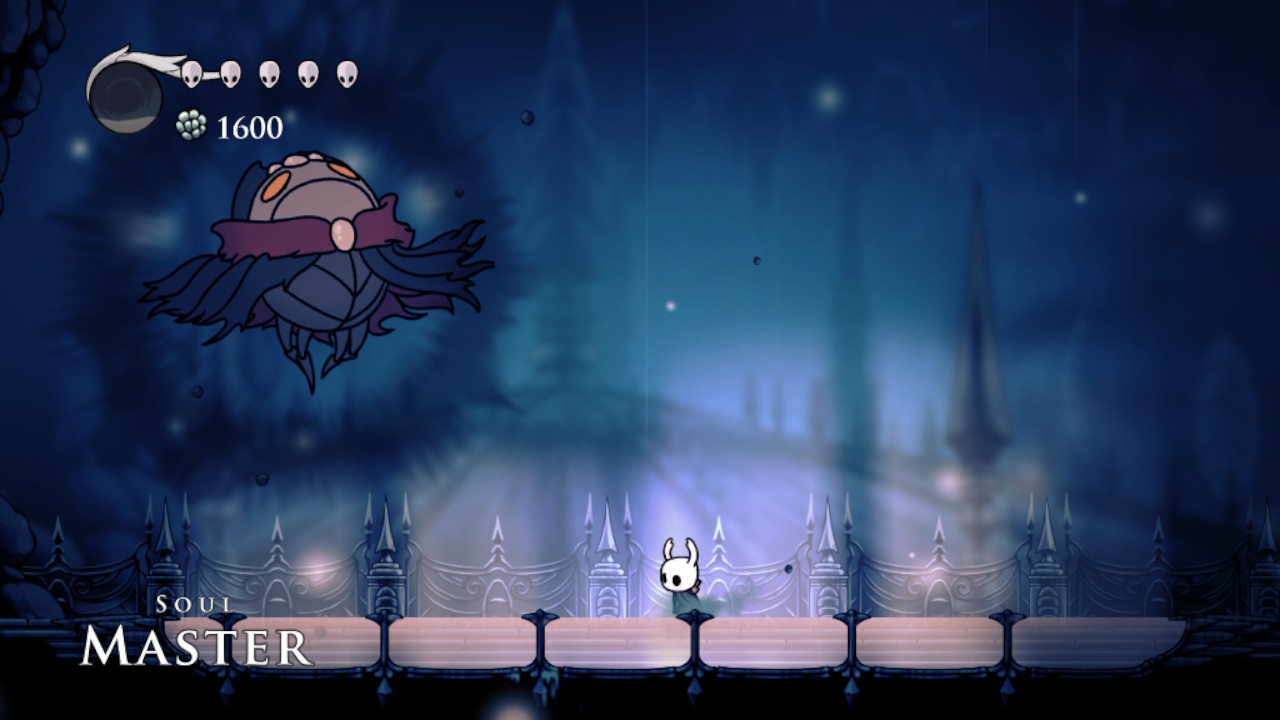
The battle between the Knight and the Soul Master has been split into two phases:
Phase 1
Soul Master will use the following moves in phase 1:
- Dash – Soul Master will dash across the arena. If the Knight makes contact during this, the Knight takes damage.
- Orb – This boss will release an orb of Soul from his head, following the Knight. The orb will only halt if it hits the Knight or a surface.
- Clock – Soul Master will hover through the room surrounded by four orbs. If Soul Master hovers to the arena’s left side, the orbs will circle him clockwise. If Soul Master is floating to the right, the orbs will circle him counterclockwise. Soul Master will vanish after floating across the room. However, the orbs will stay and float again to the opposite side of the room.
- Slam – This boss will come for the Knight and slam onto the ground. The impact will then cause a shockwave to ripple across each side of the room.
- Fake Out Slam – This attack starts in the same manner as the Slam attack. Midway through the slam, however, Soul Master will start over and perform the Slam attack on the Knight’s present position in the room. This attack will also trigger a shockwave to ripple around the arena.
Phase 1 Tips
Soul Master will teleport throughout the arena or no less than once before attacking.
To evade the Dash attack, the Knight can jump and then dash using the Mothwing Cloak ability.
Do not be fooled by the similarities in the initial attack motions of the Orb and Dash attacks. If the Knight is close to the Soul Master, the Orb attack will miss the Knight. If the Knight is far enough away from Soul Master, the Knight can jump or dash away to evade the Orb attack.
During the Clock attack, the Knight will have no trouble attacking Soul Master, but be wary of the orbs circling him.
Be aware of the teleport that may happen during the Slam attack. This means that Soul Master will execute the Fake Out Slam.
To deliver damage to Soul Master, hit him from beneath while he is summoning orbs for the Orb attack. Alternatively, the Knight can damage Soul Master during the Clock attack by moving at the same speed as him and attacking him from underneath.
There will be several healing opportunities, like when Soul Master is staggered. This will happen once Soul Master has taken a particular amount of damage. There is an additional opportunity to heal after the Clock attack. Keep the Knight in the center, where they will be free from being hit by any orbs.
Phase 2
Soul Master will appear vanquished if a certain amount of damage is inflicted on him. During this time, Soul Master will leave the Desolate Dive spell behind for the Knight to learn. But, as soon as the Knight tries to approach the spell, Soul Master reappears and slams the arena’s floor. Soul Master and the Knight will then fall to the area below and continue the battle there.
During the second phase, Soul Master will perform these attacks:
- Altered Slam – Instead of a shockwave, Soul Master will come for the Knight and slam onto the ground, unleashing a powerful blast. Soul Master is capable of performing this attack in quick succession.
- Fake Out Altered Slam – This attack resembles the standard one. However, instead of a shockwave, it is similar to the Altered Slam attack that will produce a massive blast.
- Altered Orb – Soul Master will hover and linger in one spot briefly before summoning orbs on various portions of the arena. These orbs will continue to pursue the Knight.
Phase 2 Tips
To evade Soul Master’s Altered Slam attack, the Knight can dash away out of the blast zone.
Like in the first phase, beware of the teleport that may happen in the middle of the Altered Slam attack. This also indicates that Soul Master will perform the Fake Out Altered Slam. The Knight can also dash out of the radius of the blast to flee from being struck by Soul Master’s Fake Out Altered Slam.
Read: Hollow Knight: How To Get Shopkeeper’s Key
Because Soul Master will remain stationary during the Altered Orb attack, now could be a good time to attack him. Just keep an eye out for those homing orbs.
As the Knight has fewer chances to heal during this phase, preparing and avoiding attacks is crucial. Despite alterations to Soul Master’s attacks, this phase will be simpler than the previous phase because anticipating his attacks is simpler. When Soul Master utilizes the Altered Orb attack, there are extra opportunities to attack. However, the Knight should not be greedy when attacking Soul Master, as the Knight must still be capable of handling the orbs focusing on the Knight.
The Knight may additionally equip Charms to aid him in the fight against Soul Master. These Charms are recommended to be equipped against Soul Master:
| Charm | Effect |
|---|---|
| Quick Focus Charm | Allows the Knight to heal faster. |
| Fragile Strength Charm or the Unbreakable Strength Charm | Increases the Knight’s Nail’s damage output by 50%. |
| Mark of Pride Charm and/or Longnail Charm | Extends the length of the Knight’s Nail. |
| Spell Twister Charm | Reduces the quantity of Soul needed to cast Spells. |
| Shaman Stone Charm | Increases the size and damage of Spells. |
| Soul Catcher Charm and/or Soul Eater Charm | Increases the quantity of Soul gained by the Knight when striking opponents. |
| Grubsong Charm | the Knight gets Soul every time they take damage. |
| Stalwart Shell Charm | Increases the invincibility time and reduces the recoil when the Knight takes damage. |
Descending Dark Spell
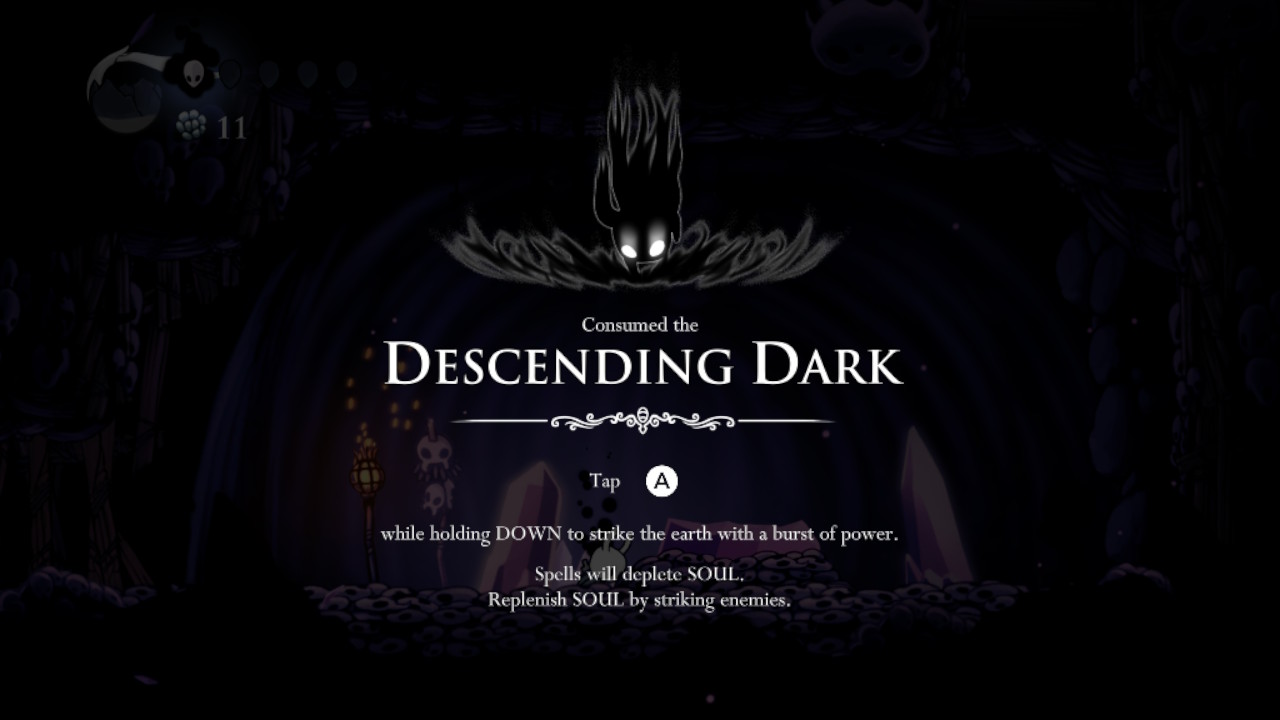
The Descending Dark Spell is the upgrade to the Desolate Dive spell. So, this also enables the Knight to strike the ground with concentrated SOUL and now with Shadow. This can also break floors and damage enemies.
Descending Dark Spell generates a shockwave that reaches higher than Desolate Dive and explodes twice. The dive delivers 15 damage, the left half of the first burst delivers 35 damage, the right half delivers 30 damage, and the second burst delivers 15 damage on both sides, for an overall total of 60 or 65 damage.
The Descending Dark Spell also makes the Knight invulnerable for 0.4 seconds and enables him to break specific parts of the ground.
How to Get the Descending Dark Spell
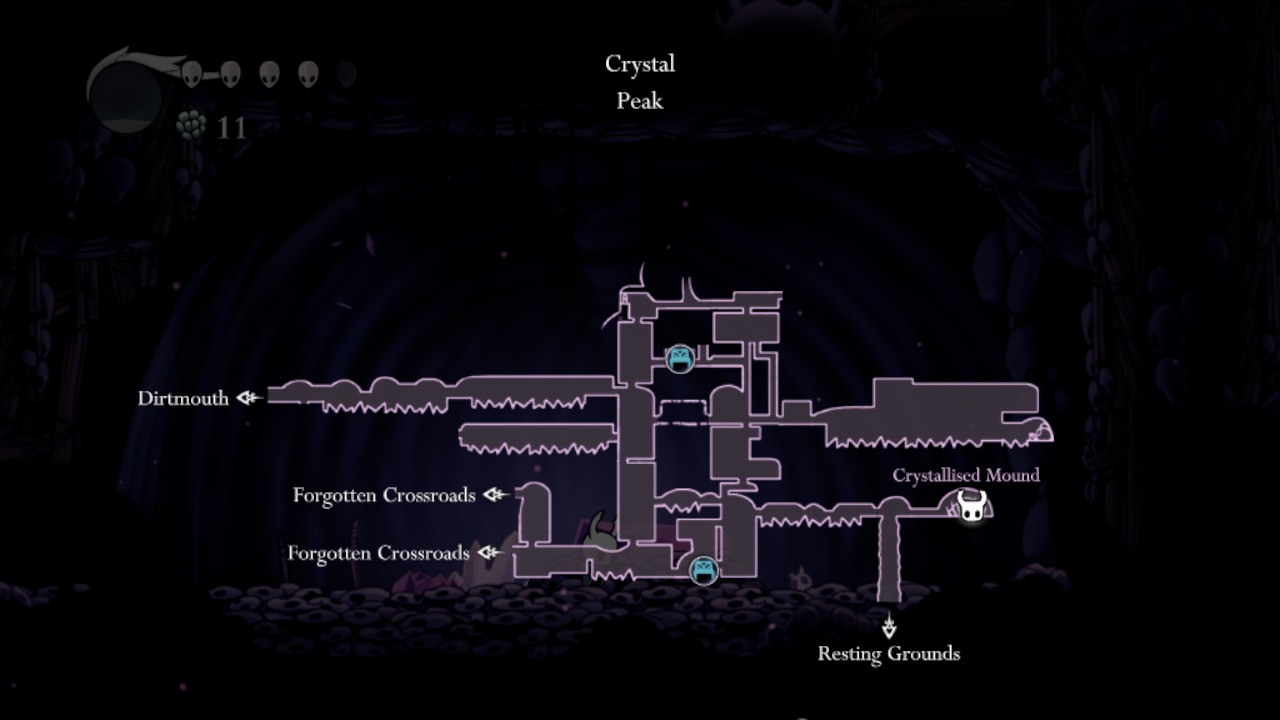
The Knight can get the Descending Dark Spell in the Crystalised Mound. This is in the bottom right of Crystal Peak. The spell is on the body of a snail shaman inside a crystal.
Requirements
The Knight must acquire a few specific abilities to reach the Descending Dark spell. The first required ability is the Mothwing Cloak ability. This ability allows the Knight to dash forward. The Mantis Claw ability is also required. This ability allows the Knight to hold on to walls and jump off them. The last ability required is the Crystal Heart ability. This enables the Knight to dash forward until it hits a surface continuously.
Also, the Knight must have the Lumafly Lantern to light up dark rooms. The Knight can purchase this from Sly up in Dirtmouth.
Enemies
On the way to the Descending Dark spell, the Knight will encounter a few enemies. Specifically, the Knight will encounter a bunch of Crystal Hunters, a Glimback, and a Shardmite.
Path to the Descending Dark
To learn the Descending Dark Spell, the Knight must do these:
- Start from the bench at the south of Crystal Peak. Head up using the revolving platforms and take the exit on the top right corner of the room.
- After that, jump across the gap on the right, where the Knight will find a Crystal Hunter. Jump up the slightly elevated platform, then the small one above on the left. Jump towards the platform on the right and take the exit.
- Then, the Knight will start using the Lumafly Lantern in this room. The Knight must traverse the room using small platforms without falling into the crystals below. On the way, the Knight will run into two Crystal Hunters, then a Glimback near the end. At the far right end of the room, take the exit.
- Next, the Knight is standing on a ledge. Hold the SUPERDASH button to charge, then, once full, let go of the button to use the Crystal Heart ability. The Knight will then dash continuously to the right and reach the entrance to the Crystallized Mound. Here, the Knight will also find a Soul Totem. Don’t utilize the Soul gained because it will be used inside the Crystallized Mound.
- After that, enter the Crystallized Mound. Head to the right, and part of the ground will rumble. This means that this part of the ground is breakable. Hold down the DOWN directional button while standing on top of the breakable ground and press the CAST or QUICK CAST button to use the Desolate Dive spell. The Knight will then strike the ground to break it and reach the Crystalised Mound.
- Then, head to the right and strike the wooden barrier several times to break it. The Knight will then traverse through another platforming segment. Jump towards the rotating platforms on the right, where the Knight will find two Crystal Hunters. On the last rotating platform, head up the wall above and climb up using the Mantis Claw ability. Head up the platform above on the right, where there is a Shardmite.
- Next, drop down the next shaft on the right while sliding down the wall on the left. Near the bottom, jump towards the rotating platform on the right. Continue jumping towards the rotating platforms on the right and up. On the way, the Knight will run into another Crystal Hunter. At the last rotating platform, jump towards the platform on the left, where there is a Baldur. Head up six rotating platforms, then jump towards the safe platform on the right.
- Then, jump on the rotating platform on the left again and quickly dash towards the wall above some crystal. From this wall, head up using the Mantis Claw ability.
- Next, go to the left, where the Knight will find a wooden barrier on the floor. Strike the wooden barrier on the floor. Drop down the newly-opened path, and the Knight will find the snail shaman’s body inside a crystal.
- Finally, attack the crystal several times to break it, and the Knight will get the Descending Dark spell!
Head to the left and destroy the wooden barriers to exit this area. After that, the Knight will be back to when the Knight first dropped down to the Crystallized Mound. Use the Crystal Heart ability to head to the left and exit the Crystallized Mound.
Conclusion
The Knight can break some specific ground parts with the Desolate Dive and Descending Dark spell in Hollow Knight. With that, the Knight can now explore more of the kingdom of Hallownest. Some of the breakable ground the Knight can find in the game leads to hidden areas on the map.
Also, remember that these spells not only open paths, but the Knight can also use them to damage enemies. This makes these spells very worth getting. Now that the Knight knows how to break ground, the Knight can go deeper into the Hallownest’s story and continue on his journey.
May your journey in Hollow Knight be one of awe, discovery, and progress, with your bravery echoing through the hollows and shadows of this beautiful world.