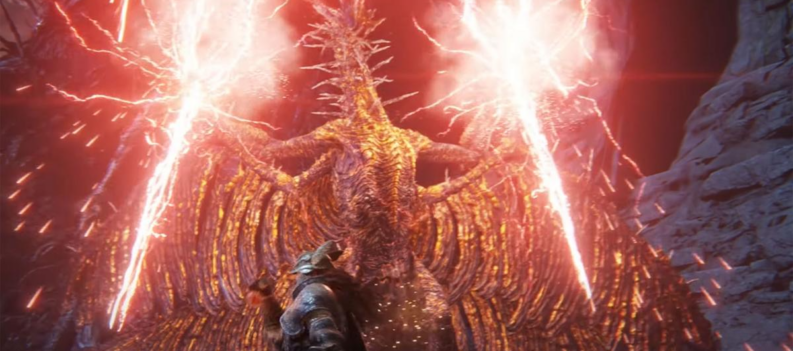
It would not be a FromSoftware game without dragons, and Elden Ring is no exception. Dragonlord Placidusax is one epic and intimidating dragon name. Once an Elden Lord, now the mighty dragon is an injured and broken version of his former glory.
Like most dragons, Dragonlord Placidusax uses a combination of melee and lightning attacks, with its second phase being the most debilitating. Fret not, however. We’ll be arming you with enough knowledge to take down this mammoth of a boss with relative ease.
Dragonlord Placidusax Overview

Dragonlord Placidusax is a tattered dragon that hovers high above Crumbling Farum Azula. This Legend is broken, but not without his menacing might. Even with just two of his four heads, he will quickly tear apart your HP bar if you slip.
Weaknesses: Dragonlord Placidusax is weak to every status effect (almost). No, we are not kidding. He is weak to Poison, Bleed, Scarlet Rot, and all other elemental damages. His only immunities are Sleep, Madness, and Deathblight.
Elden Ring Dragonlord Placidusax Location: Dragonlord Placidusax is located in the Crumbling Farum Azula. Getting to the boss is a bit tricky as he is optional and can be easily missed if you are not looking for him.
Go to the Great Bridge site of grace and take the adjacent elevator down to the church. Run past or take out the Beastmen. Leave the church and head forward towards a group of trees. If you go to the edge and look down, you will find a series of ledges to hop down to.
Follow the spiraling walkway all the way down toward the tornado that spins to your right. Beneath the tornado is a wide, flat area that looks like the side of a building. Jump onto this platform and find a basin that has no bones in it. There will be a ‘Lay down’ option which will take you to the Dragonlord Placidusax boss arena.
Here is the location of the spot on the map.

Is Dragonlord Placidusax a God?
No, though you would not think so when you fight him. Dragonlord Placidusax is a Legend, like the Fire Giant.
Is Dragonlord Placidusax Optional?
Yes, Dragonlord Placidusax is completely optional and does not need to be defeated to finish Elden Ring. However, defeating Draglord Placidusax is the only way to obtain his remembrance.
You will also need to fight Dragonlord Placidusax if you are trying to undo the Frenzied Flame Ending. Once you defeat the boss, you can use Miquella’s Needle to reverse the Frenzied Flame.
Pre-Fight Preparation

What level should you battle Dragonlord Placidusax?
Crumbling Farum Azula and Dragonlord Placidusax requires you to be at least level 120 to ‘comfortably’ fight the Dragonlord. However, more levels will mean more survivability. The same goes for your weapons and gear. Get them to the closest to the maximum as you can.
Can you summon spirit ashes in the battle against Dragonlord Placidusax?
Yes, you can most certainly summon spirit ashes for this battle. For both our melee and ranged build, we will be relying on our spirit summon to draw away Dragonlord Placidusax’s aggression. The case could be made for several ashes.
We will be going with Black Knife Tiche for our spirit summon. Her Black Blade is enchanted with Destined Death, which lowers the dragonlord’s health by 10% as well as applies percentage-based damage over time. This, along with her natural evasiveness will make sure we get our own damage in.
You will need to have completed Snow Witch Ranni’s quest to get you access to the Ringleader’s Evergoal. Beat Alecto and obtain Black Knife after defeating him.
Talismans and Gear
Since Dragonlord Placidusax primarily deals Lightning and Fire damage, the Boltdrake and Flamedrake Talismans will keep us from dying too quickly against the boss. For the melee build, you should obtain Lord of Blood’s Exultation, which boosts damage when blood loss occurs around you. For the other talisman, go with Winged Sword Insignia.
Ranged users, on the other hand, will be taking advantage of the Primal Glinstone Blade for less FP consumption by spells. For the second talisman, go with Graven-Mass Talisman for harder-hitting sorceries.
Melee users should get Rivers of Blood and White Mask
Rivers of Blood is an odd katana that scales with E in Strength, D for Dexterity, and D for Arcane. This makes the weapon flexible in many builds. With Rivers of Blood, you can go pure Dexterity or pure Arcane to maximize its potential.
We would recommend more Arcane over more Dexterity, or a 2:1 ratio. Also, since Dragonlord Placidusax is weak to Pierce damage, Rivers of Blood will be maximizing damage with each hit.
The weapon art, Corpse Piler, is a multi-hit skill that rapidly damages foes. This will work beautifully with the Winged Sword Insignia. To find this weapon, you will need to travel to the Church of Repose in the Mountaintops of the Giants. Here, you will need to defeat Bloody Finger Okina, an NPC invader, for the katana.
The White Mask is an armor headpiece that increases the Bleed damage by 10%. This stacks multiplicatively with the Lord of Blood’s Exultation’s damage boost. To find the White Mask, you will need to defeat another NPC invader called Nameless White Mask. Head northwest of the Palace Approach Ledge Road Site of Grace in Mohgwyn’s Dynasty Mausoleum to find this invader.
Ranged users should get Lusat’s Glintstone Staff and Meteorite of Astel
For ranged builds, we recommend dumping points into Intelligence until you’re about 75 in that stat. This will maximize the damage output by Lusat’s Glintstone as it benefits from high Intelligence.
To find this weapon, you will need to have progressed enough in Millicent’s quest line. There is a minor puzzle to solve as well as a boss to defeat within Selia, Town of Sorcery. Once the boss is defeated you can open the chest in the arena that has Lusat’s Glintstone Staff in it.
For the spell, you can’t go wrong with Meteorite of Astel. This epic sorcery summons a salvo of meteor before you. Because of how large Dragonlord Placidusax is, each meteor will make contact with him. Being gravity sorcery, it will also have the added benefit of staggering the daylights out of Dragonlord Placidusax. You can supplement your kit with other sorceries such as Shard Spiral if you need more flexibility. Shard Spiral also hits Dragonlord Placidusax for big damage
To obtain this Meteorite of Astel, you will need to defeat Astel, Stars of Darkness. This boss is in the Yelough Anix Tunnel on the Consecrated Snowfields.
Flask of Wonderous Physick combinations
We will be taking advantage of the Physick flask for the battle of Dragonlord Placidusax. Though it is for one-time use, this item will be crucial to your survival. Melee users will be using the combination of Crimsonburst Crystal Tear and Opaline Hardtear, which will allow them to heal over time and boost your damage negation for 3 whole minutes.
Ranged users will be using the combination of Cerulean Hidden Tear and Magic Shrouding Cracked Tear in your Physick, enabling unlimited FP usage for 15 seconds as well as a boost in sorceries for 3 minutes.
Now that we have your gear covered, let’s dive into the fighting strategy.
Fight Strategy

We will be taking two different strategies in the battle with Dragonlord Placidusax. There are many melee attacks, fire breaths, and phase-triggered attacks that you will need to watch out for. We will be breaking down each of his moves, as well as the phase changes Dragonlord Placidusax will go through.
Phase 1
Summon your spirit ash and get into position
Both our melee and ranged users will be summoning Black Knife Tiche as this battle starts. As Black Knife Tiche begins her advance, you will want to get in position behind Dragonlord Placidusax if you are melee. The best position for melee will be behind the dragon on at his tail and start using your weapon are/melee attacks against the boss. Ranged users will lock on and begin circle-strafing Dragonlord Placidusax.
Ancient Dragon’s Lightning Strikes
The battle begins as Dragonlord Placidusax roars, summoning delayed lightning bolts across the arena. The lightning will shine on the ground in red before the lightning bolt crashes down. These are AoE lightning bolts that are delayed in landing. You should be able to maneuver around them by watching the ground for the red lightning.
You will want to wait before engaging Dragonlord Placidusax as a magic-user. You do not want to get zapped while trying to channel Meteorite of Astel and waste your Physick. Instead, you will want to wait out the roar that summons the lightning. Once the dragon stops and aggros Black Knife Tiche, go ahead and pop your Flask of Wonderous Physick. Then, cast Meteorite of Astel till you are out of FP or need to reposition.
Lunging Lightning Claw attacks
Dragonlord Placidusax has several variations of a claw attack in which the dragon’s hand becomes enchanted with red lightning before attacking. This is your signal that a swipe attack is coming and you should prepare to roll.
The first claw attack is a swipe where Dragonlord Placidusax lunges forward before falling partially on his side. You will want to roll into this attack and follow up by attacking the dragon’s torso. The dragon will go left to right or vice versa, depending on the hand in use. All the same, just roll through the attack to avoid it.
There are also claw slam and claw scrape attacks. The slam causes his red lightning claws to come down directly in front of his chest, resulting in an AoE of lightning damage. As a melee user, make sure that you are keeping to his sides to avoid the attack. The second scrape attack is similar, except Dragonlord Placidusax will drag his claws toward him. You will want to dodge backward as this move has the least range of his claw attacks.
Get behind the boss during his Double Claw Slam
This claw attack has Dragonlord Placidusax raising both his arms, enchanting them with red lightning before bringing them crashing down. The AoE on this attack is quite large and will require you to sprint to his sides or roll at the last second to avoid it. This attack will likely follow his lunging claw swipe move.
Watch for Boulder Toss Combo
This move can follow any of Dragonlord Placidusax’s claw swipe moves. The move starts with the standard claw swipe and raking motion. However, in the end, the dragonlord will drive his claws into the ground before sending boulders flying at the player.
You will want to move backward out of the range of the swipe before rolling through the rocks to continue engaging the boss.
Avoid the Fire Breath by keeping to the dragon’s side
Dragonlord Placidusax has a few fire breath attacks that need to be noted. The first version is a fire breath that causes the dragonlord to reposition himself. He will leap backward while breathing out a gout of fire before him as he lands. This attack will only connect if you are trying to hunt down. Just wait for the fire to dissipate before engaging again.
As a ranged user, you can start charging your Meteorite of Astel at the boss as the animation has some recovery.
Melee should watch out for the Rearwards Fire Breath
This attack will only come out if you are lingering too long at Dragonlord Placidusax’s rear legs. You will see the dragonlord turn one of his heads around to look at you before he billows fire at the player. Watch the heads carefully as a melee user and if you see the boss looking at you immediately start running toward the end of his tail. Once the fire leaves, rush back to continue your onslaught.
Crawling Claw Fire Breath Combo
This attack is similar to his red lightning claw swipes but with a delayed fire breath that follows up the attack. You will need to run to the boss’ side to avoid being hit by the attack. Ranged users can keep out of range of the fire and cast Meteorite of Astel or one of your supplementary spells.
Watch out for the Wing Slam if you are on the boss’ left side
This attack only comes out if you are on Dragonlord Placidusax’s left side. The boss will raise his left-wing up before crashing it down on the player, following it up with a flick that pushes his wing out and upward. You will want to twice to avoid the initial impact and follow-up attack. Melee users can roll through the attack toward Dragonlord Placidusax to continue their attacks.
Bite attack leaves Dragonlord Placidusax’s head vulnerable
This attack does not trigger often, but is still a move to watch out for if you are standing near Dragonlord Placidusax’s front end. The boss will look over at the player and bite each of his two heads, one snap after another. You can punish this attack but run in for a melee jump attack as the second head finishes biting. Remember, dragons take double damage when struck in the head.
Melee users should be careful of Tail attacks
Mostly a problem for melee users, Dragonlord Placidusax has moves where he uses his tail offensively. The first is a reposition tail attack where the boss will curl up his tail before sending it crashing down. The Dragonlord will turn to face the player as he spins with his tail. You can avoid the attack by rolling through the tail as it comes down.
Dragonlord Placidusax also has a sweeping version of the attack where the tail comes at the player horizontally instead of vertically. Dodging through the attack will work for this variation as well.
Sprint away from the boss during Bolt of Placidusax
Dragonlord Placidusax will raise his left hand and summon an enormous spear of red lightning. He will slam the spear into the ground before him, dealing massive damage in a large area. The lightning spear will remain staked in the ground, emanating electrical energy. Finally, the boss will raise his right hand and detonates the lightning spear in a massive explosion.
Though this attack deals heavy damage, you can avoid it by sprinting away from the boss. You can wait at a distance while Dragonlord Placidusax finishes the animation. Melee users can use this break to heal or alternatively ranged users can use Meteorite of Astel while the boss is motionless. Just make sure you are out of range before committing.
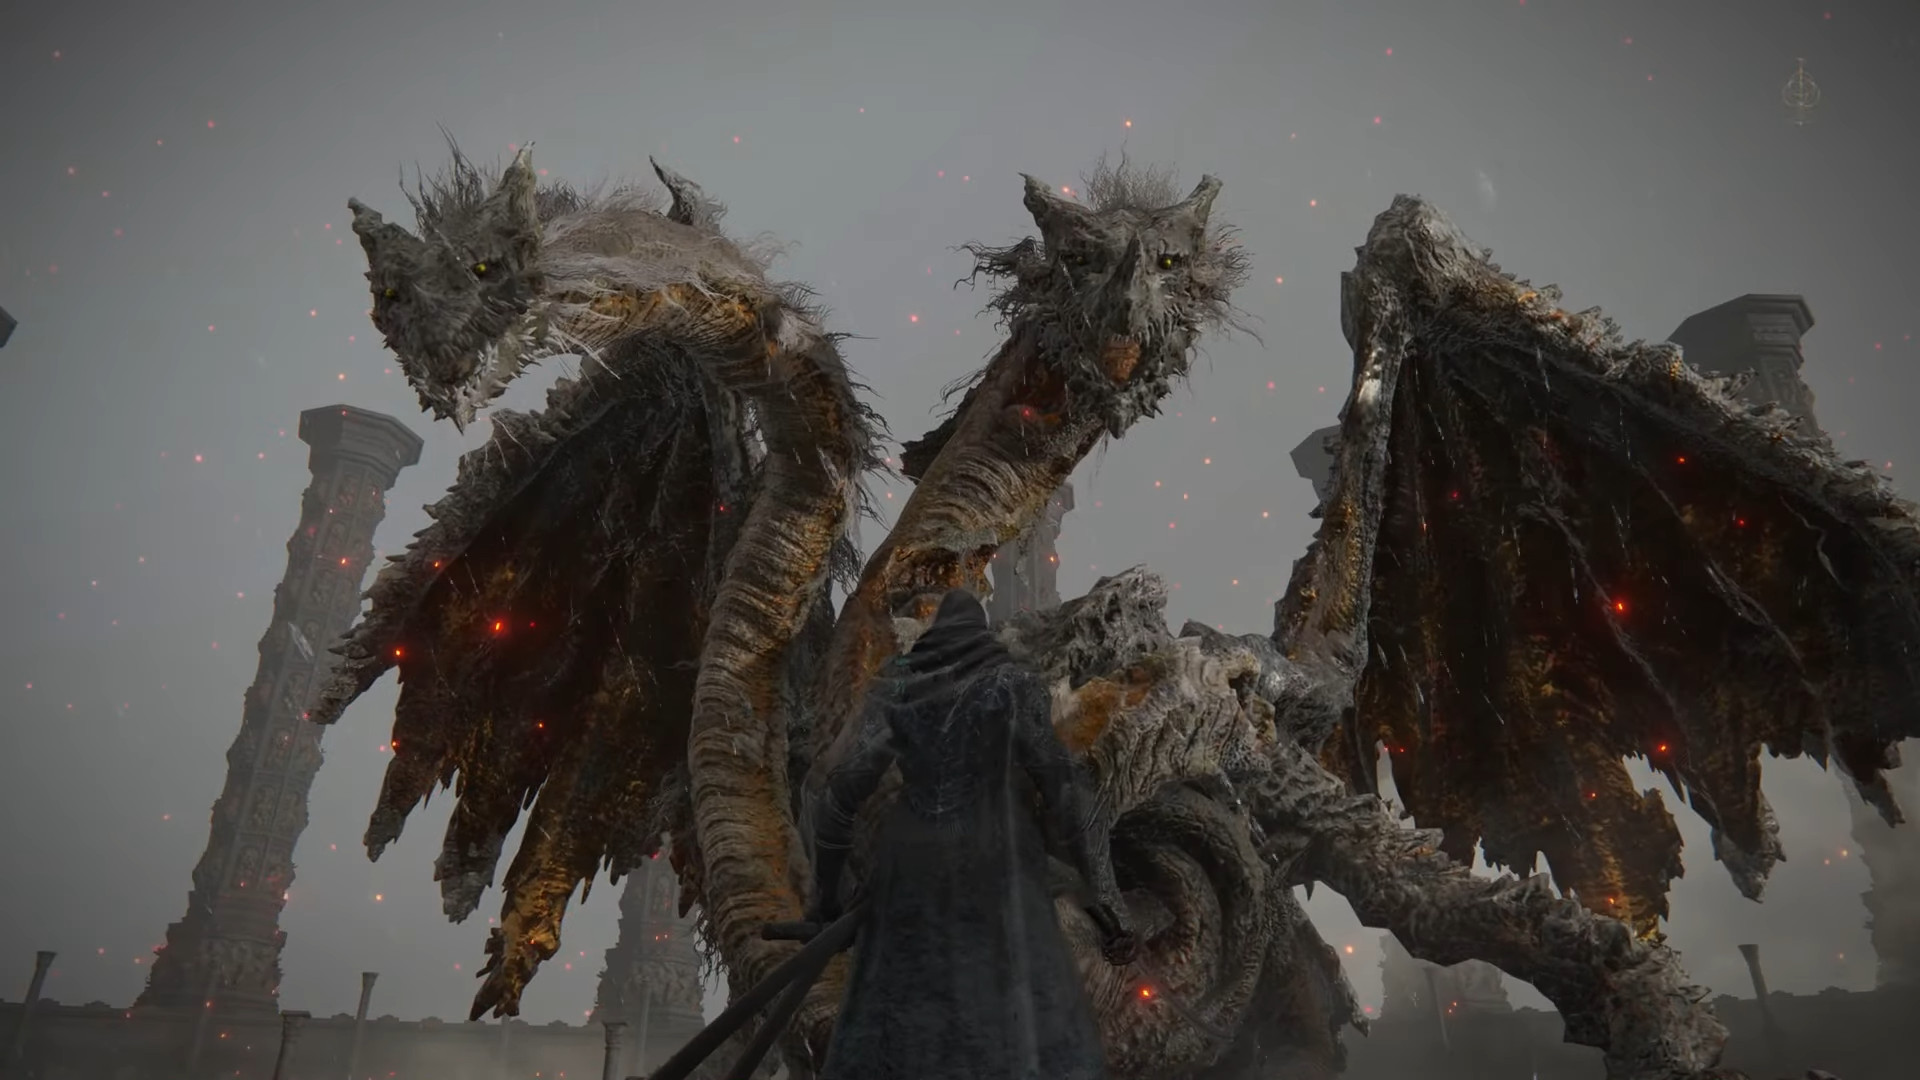
Phase 2
Stationary and Traveling Thundercloud
The next phase of Dragonlord Placidusax’s boss fight triggers once you get his health down to about 50%. The phase change will always trigger his Thundercloud Form attack. The boss will dissolve into mist and disappear. After a delay, Dragonlord Placidusax will manifest as a stationary Thundercloud before swooping out of the cloud and swiping at the player with red lightning claws.
Alternatively, Dragonlord Placidusax can become a moving Thundercloud that travels through the air before the boss emerges with a red lightning claw swipe. The only difference between the two is that the Stationary Thundercloud will leave Dragonlord Placidusax facing toward you. While the Traveling Thundercloud positions him facing away.
To avoid this attack, you will want to reposition your camera toward wherever the Thundercloud spawns. Watch the cloud and roll into the claw swipe to avoid damage. You can begin your charge back at the boss as he recovers from the move.
Keep locking on to the boss during his Teleportation
Phase 2 has a new attack where Dragonlord Placidusax will dissolve into mist before reappearing and attempting to claw swipe you. If you see him disappear, stay locked on. The indicator will telegraph the path he is taking. Turn your camera in the direction he is flying in and be ready to roll through the attack as it will already be in mid-animation.
Phase 3
Placidusax’s Ruin
Once you get Dragonlord Placidusax down to about 25% HP, the boss will perform a dual laser attack that can one-shot you from across the arena. This attack comes out in multiple stages.
The final stage will have the boss turn toward the player and begin to breathe out gouts of golden fire. These flame breaths become long-range, golden lasers that sweep across the arena. If you did not reposition yourself earlier in the attack, dodging these can be very tricky. The lasers come out diagonally from each head, with the right head starting to sweep to its right and the left head sweeping to its left.
If you are out of position for this attack, try to get as far away from the boss as possible. If you have enough distance between you and the boss, then you will only have to worry about the right head’s laser as it has the longest range. This attack is devastating and can one-shot even the most durable of builds.
How to cheese Dragonlord Placidusax?
It would not be an Elden Ring without a little bit of cheese to get you through those difficult battles. Here is how to beat the boss without much effort.
Get the Serpent Bow and Bloodbone Arrows
This bow we will be using has a unique passive that adds Poison build-up to all your arrows. You will want to max out this weapon before engaging with Dragonlord Placidusax. Additionally, we will be adding Bloodbone Arrows to the mix to take advantage of the boss’s weaknesses.
The bow itself is located in the Abandoned Cave, just prepared to deal with a lot of Scarlet Rot and the Servants of Rot (the centipede enemies).
Enter the arena but do not engage the boss
Once you enter the boss arena, take but a few steps forward, but not so much that you aggro Dragonlord Placidusax. Instead, aim your bow at the dragon’s wing and begin pelting it with arrows. The boss will flinch but not engage you if you are far enough back. The Poison build-up will deal 2500 damage for each bout of poison. As mentioned, you can use the Bloodbone Arrows to afflict Bleed and speed this up.
There you have it! Now let us see the fruits of your labor.
Rewards
Here is the breakdown of rewards that you get for taking down Dragonlord Placidusasx.
- 280,000 Runes
- Remembrance of the Dragonlord: Consumable item that, when given to Enia at the Roundtable Hold will give you one of two items. You can receive the Dragon King’s Cragblade or Placidusax’s Ruin.
The weapon is your standard Thrusting sword with the amazing weapon art that turns you into Dragonlord Placidusax’s Thundercloud. Placidusax’s Ruin is an incantation that gives you a powerful, laser-sweeping attack that deals massive damage.