Even though they share the same title, the recently released Lords of the Fallen will occur 1,000 years after the original. Hexworks and CI Games’ soulslike role-playing game takes the player on an adventure across a huge, linked world, exploring the Axiom and the Umbral parallel worlds.

The key to triumph lies in strategic character development and skill selection in a world teeming with challenges and adversaries. This guide will discuss the most OP build-in Lords of the Fallen. This will allow the player to dominate battles and conquer even the most daunting foes easily.
From optimizing attributes to selecting the most potent abilities and equipment, this guide aims to pave the path to an unstoppable character build, ensuring you stand as an indomitable force in the world of Lords of the Fallen.
The Most OP Build
The following are the recommended class, weapons, shields, ranged weapons, armor, pendants, and rings to get to have the most overpowered (OP) build in Lords of the Fallen:
Class
Of all the possible classes the player can try in the game, one stands out as the most overpowered. This is the Dark Crusader class. However, the player does not have this class right at the start of the game if they have the standard edition. After completing ‘The Paladin’s Request’ quest, the player will unlock this class later. Or, as an alternative, the player can purchase the deluxe edition of the game to have it available at the beginning of the game.
The following are the Dark Crusader class’ starting stats: a Strength stat of 12, Agility stat of 8, Endurance stat of 14, Vitality stat of 14, Radiance stat of 11, and Inferno stat of 8. As you can see, the Dark Crusader class specializes in melee combat and has excellent physical defense, health, and stamina. It can also cast Radiant spells.
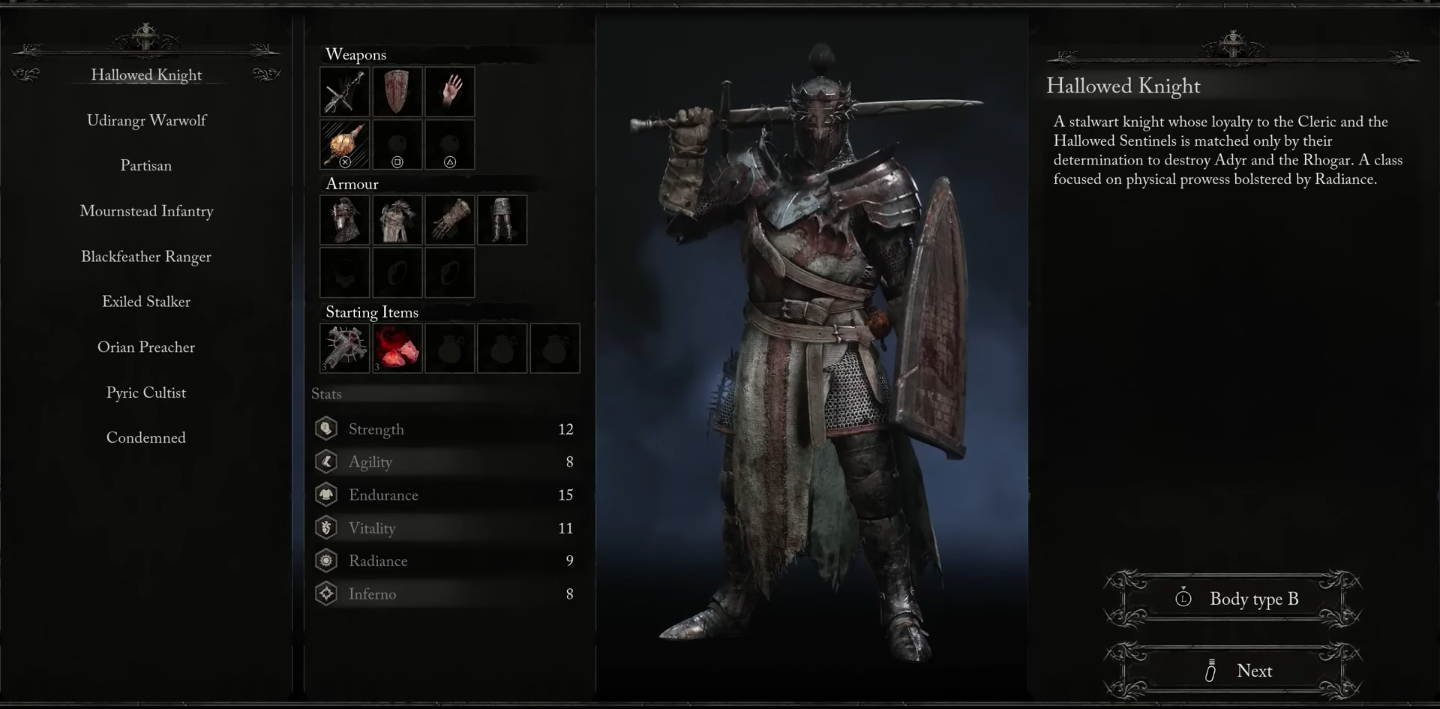
If the player does not have the Dark Crusader class yet but still wants a very OP build, the player can also use the Hallowed Knight class. The player does not need to unlock this class, so it is available right at the beginning of the game.
The following are the Hallowed Knight class’ starting stats: a Strength stat of 12, an Agility stat of 8, an Endurance stat of 15, a Vitality stat of 11, a Radiance stat of 9, and an Inferno stat of 8. This class has great Endurance and Vitality stats, which makes it an excellent choice for novices of the game. With its great Endurance stat, the player may spend their stamina bar very well.
With it, the player can unleash a combination of light attacks while being able to dodge when needed. This class is also slow, so the increased endurance for evading will come in handy. The Hallowed Knight class also has a good Strength stat. This means it can deal considerable damage when using strength-based weapons.
Stat Scaling
For an OP build, the player must begin boosting their Strength, Endurance, and Vitality stats as the player starts progressing in the game. This will allow the player to remain powerful and protected while fighting enemies. Also, this allows the player to use heavy armor and weapons without being slowed down. It is advised to disregard the Agility stat entirely because the player will not require the weapons it is required for.
Also, don’t overlook magic. The player can use this as a backup offensive option. With this, the player may use a few spells when needed. It is recommended to only choose one of either the Radiance or Inferno stats. These allow players to use at least a few basic spells on enemies.
Weapons
For a strength-based OP build, it is recommended to use two-handed weapons or a strong weapon in one arm and a shield in the other. The following are the recommended weapons for the most OP build in Lords of the Fallen:
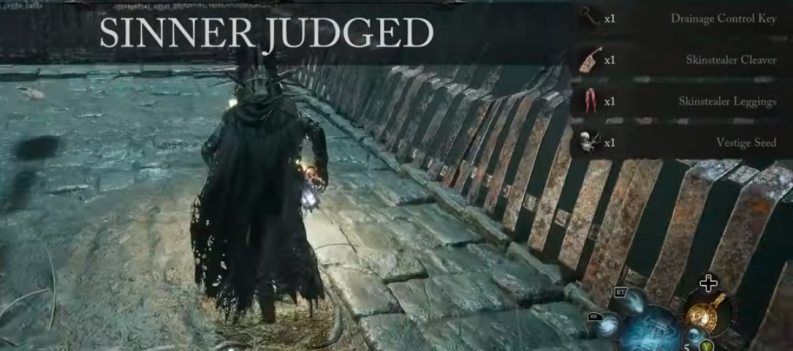
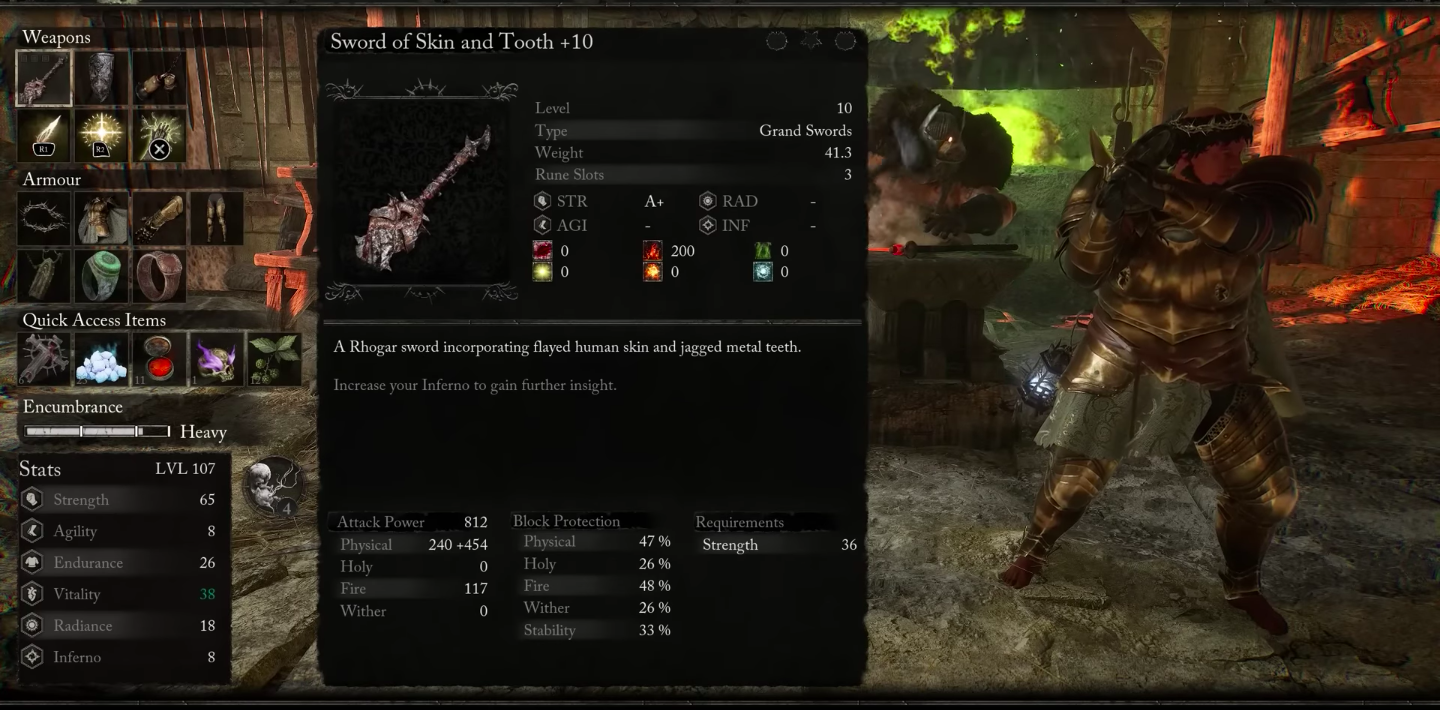
1. Sword of Skin and Tooth
This is arguably the best weapon to have the most OP build in Lords of the Fallen. This weapon can inflict physical and fire damage and have a burn effect on enemies. The Sword of Skin in Tooth is a Grand Sword, which means it is a two-handed weapon weighing 41.3.
Because it is a two-handed weapon, the player cannot use a shield while using this sword. However, it is still recommended to equip one, as the player will still be able to use the Rune effects of the shield. Because of that, it is advised to equip the lightest shield possible.
The following are this weapon’s stats: an Attack Power of 146 divided between Physical, with 100, and Fire, with 46. Additionally, the following are its block protection capabilities: Physical protection at 47%, Holy protection at 26%, Fire protection at 48%, Wither protection at 26%, and Stability at 33%.
This powerful weapon can deal 200 damage when inflicting the Burn effect.
To equip the Sword of Skin and Tooth, the player must have a Strength stat of at least 36.
How to Get
The player will be able to get the Sword of Skin and Tooth in Lower Calrath. To find the Sword of Skin and Tooth in this area, the player must do the following:
- First, the player must activate the Vestige of Lydia the Numb Witch in Lower Calrath.
- Next, the player must drop down the platform in front of the Vestige of Lydia the Numb Witch. Head slightly forward and head for the opening on the left.
- After that, the player must follow the wooden platform to the left and drop from the edge to the floor below. Head to the right, where the player will find a flight of stairs that leads down and a ladder. The player must head down the flight of stairs.
- Following that, the player must head to the right to come across another opening with a ledge. Drop down the ledge to reach an alley.
- Then, from this alley, follow the path on the right, then follow the next street on the left. At the end of this path, the player will find an arch with a broken brick wall.
- Next, the player must use the Umbral Lamp and shine it on the brick wall. After doing so, the player will find a hidden path. Head inside and go up a flight of stairs.
- After that, on top, follow the path, and the player will find a chest.
- Finally, approach the chest and open it to obtain the Sword of Skin and Teeth! Not only that, but the player will also get two pieces of Fire Salts, two pieces of Holy Salts, and two pieces of Water Salts.
2. Bloodlust
Another recommended weapon for an OP build is the Bloodlust. This is a Short Sword with a Rhogar-infused blade. This will allow the player to restore health after killing an enemy. The Bloodlust sword weighs 8.3.
The following are the stats of the Bloodlust sword: An Attack Power stat of 74, which is divided between Physical, with 37, and Fire, with 37. Also, this short sword has the following block protection capabilities: Physical protection of 27%, Holy protection of 11%, Fire protection of 33%, a Wither protection of 11%, and Stability of 18%.
This weapon can deal 60 damage when inflicting the Bleed effect and 60 when inflicting the Burn effect.
To equip the Bloodlust sword, the player must have an Agility stat of at least 13 and an Inferno stat of at least 13.
How to Get
The player can obtain the Bloodlust short sword in Fitzroy’s Gorge. This is the area before Lower Calrath. To find this short sword, the player must perform the following:
- First, from the Vestige of the Pale Butcher in Shuja Hamlet, the player must follow the path right before it. While following this path, the player will find a wooden opening.
- Following that, the player must enter the opening and follow the wooden path straight ahead. While trailing this wooden path, the player will eventually reach the woods and a ledge with a ladder.
- Next, the player must drop down the ledge and follow the path on the left with the lit torches. While following this path, the player must pass through a wooden opening with more lit torches inside. Keep following the narrow path inside, and the player will find a gate.
- After that, the player must use the Umbral Lamp and shine it on the gate. With that, pass through the gate and continue on the path to reach an open area. The player must continue on this path and pass through a shallow pond.
- Then, once the player reaches the point on the path where the path is divided into two, the player must take the path on the left. The player must continue taking this path until the player finds more lit torches on the path.
- Afterward, the player will reach a wooden structure with an opening. Proceed through the opening; the player will encounter and face Crimson Rector Percival. The player must now defeat this secondary boss.
- Following that, once the player has defeated Crimson Rector Percival, the player must continue heading straight ahead on the path from the entrance. Near the end, the player will find an opening to a tunnel on the left and a chest on the right. The player must head towards the chest.
- Finally, approach the chest and open it. The player has now obtained the Bloodlust sword!
3. The Iron Wayfarer’s Hammer
The Iron Wayfarer’s Hammer is another recommended weapon for an overpowered build. This is a Grand Hammer-type weapon with excellent physical damage. Additionally, this weapon can deal Holy, Fire, and Wither damage to foes. This hammer also weighs 35.2. The only disadvantage of this weapon is that the player can only find it near the end of the game.
The following are the stats of The Iron Wayfarer’s Hammer: an Attack Power total of 187, divided between 109 Physical Damage, 26 Holy Damage, 26 Fire Damage, and 26 Fire Damage. In addition, this hammer also has block protection capabilities. The following are The Iron Wayfarer’s Hammer’s block protection stats: Physical protection of 51%, Holy protection of 33%, Fire protection of 33%, Wither protection of 28%, and Stability of 33%.
Before the player can use The Iron Wayfarer’s Hammer, the player must first have a Strength stat of at least 31.
How to Get
The player will be able to acquire The Iron Wayfarer’s Hammer from The Iron Wayfarer himself. The player can find this boss in Upper Calrath near the gates of Bramis Castle. To find The Iron Wayfarer and The Iron Wayfarer’s Hammer, the player must do the following:
- The player must first warp to the Vestige of Ethryg. When the player arrives, he or she must take the path straight before the Vestige of Ethryg. The player must descend a flight of stairs and go straight down the hallway on this path. At the end of the path, the player must climb another set of stairs and follow them to the top.
- After that, the player must proceed to the top of the stairs and take the path on the left. The player is going to arrive at Skyrest Bridge from here. Continue up a spiral flight of stairs, following this path. The player must then proceed to the next entryway on the right. This is where the player battled Pieta, She of Blessed Renewal.
- Following that, the player must proceed towards the entryway through which the player first entered the area. The player must proceed down this path and up another flight of stairs. Continue forward until you reach another ramp with stairs. In this area, the player will face a slew of enemies. After entering this area, the player must proceed to the doorway on the left. This doorway would have been closed if the player had previously visited the area.
- The player will then find a spiral set of stairs inside this room. After that, the player must proceed up this flight of stairs. After climbing the stairs, the player must proceed up the ramp with many planks of wood. In addition, turn right and follow the path through a doorway. The player must enter the entryway and descend the stairs. The player will come across an Umbral Flowerbed and a closed door nearby. The player must then proceed to the wooden stairs on the left. The player will come across a ledge with a wooden ladder just ahead of the end of the wooden set of stairs. The player must descend the wooden ladder.
- Next, the player must enter the doorway directly in front of the ladder at the bottom. The player must then exit this room via the doorway on the right. The player will then arrive in an open area to face more enemies. Now, the player must take the road on the left. The player must continue forward through this path to go through a slightly narrow path. Proceed to the next entryway on the right. An enemy is going to shoot fire at the player outside this opening.
- Then, once inside, the player must head for the next path on the left. Near the end of this path, where the player will encounter enemies, the player must take the path on the right. However, the player must soulflay to cross this path. It is recommended that the player plant a Vestige Seedling in this location so that you have a checkpoint in this region. After that, the player must pass through the arch on the left, where the player will encounter many more enemies. Here, the player must go towards the path on the left, which will head down. At the end of the path, pass through another doorway on the left that leads to an open area.
- In this open area, the player must defeat The Lightreaper to continue. After successfully doing that, the player must follow the walls of the open area on the left from the doorway used to enter this area to find another opening. Follow this path until the player reaches a closed gate. Andreas of Ebb will enter the alley and fight the player before the player reaches the gate. To proceed, the player must now eliminate him.
- After defeating Andreas of Ebb, the player must soulflay to cross the gate. After passing through, the player must take the path on the left. The player will encounter numerous enemies while on this path. Close to the end of the path, the player must proceed to the open area on the left, which is teeming with enemies.
- The player will come across a stone bridge with a large barricaded door at the opposite end on the right of the open area. The player must then proceed to this location to face The Iron Wayfarer. To proceed, the player has to eliminate this mini-boss.
- Finally, the player will get The Iron Wayfarer’s Hammer after defeating The Iron Wayfarer!
4. Faithful Bludgeon
One of the most recommended weapons for a Strength-based build is the Faithful Bludgeon. Because of that, this could be perfect for an OP build. Part of the Rhogar faction, the Faithful Bludgeon is a large and potent melee weapon. This weapon is a Grand Hammer-type weapon with a weight of 34.4.
The following are the stats of the Faithful Bludgeon weapon: an Attack Power of 168, all of which are its Physical damage output. Also, the following are its block protection stats: 47% Physical Protection, 26% Holy Protection, 48% Fire Protection, 26% Wither Protection, and 33% Stability.
To use the Faithful Bludgeon, the player must have a Strength stat of at least 28.
How to Get
The player can find the Faithful Bludgeon weapon on a platform in the Sanctuary of Baptism. To get this weapon, the player must do the following:
- First, from the Vestige of Chabui, the player must head towards the large opening on the right that leads outside. Head down the stairs, then follow the wooden path on the right. Here, the player will find a wooden ladder. The player must then head down this ladder, where the player will land on a platform with another ladder that leads down. Head down this next ladder, then take the path on the left.
- Then, head towards the narrow, wooden plank on the right and jump towards the hanging and spinning wooden platform. From here, jump towards the next wooden platform on the left and slightly follow the path on the right.
- After that, the player will immediately find another set of wood planks on the right. The player must head towards it and jump ahead of the wooden and spinning platform. From here, jump towards the ramping wooden platform on the left.
- Following that, the player must follow this wooden path until reaching a ladder. Head up the ladder and continue following the wooden path. Through this, the player will eventually head inside a wooden structure. The player must keep following this path until the player finds a wooden lift on the left. Here, the player must stand on the lift to make it start moving up.
- Afterward, once the lift is up, the player must exit and continue on the path to find a large flight of winding stairs. The player must head down the stairs and continue heading for the path. Near the end of this path, the player will find a ramp on the right that leads to a hallway.
- Next, at the end of the path, the player must face to the right to find an opening with a platform down below. The player must find a way to reach that platform. To do that, the player must use the Umbral Lamp and shine it on the opening floor to find a hidden path. Keep on shining the lamp on the path and follow it. Once the player is directly above the platform, the player must turn off the Umbral Lamp and drop down on the platform.
- Lastly, the player can approach the item on the grind and interact with it. Finally, the player has now acquired the Faithful Bludgeon Grand Hammer!
Shields
The player can use shields to deflect incoming attacks and lessen the harm they will receive. Equipping shields can also help make the player tankier for most OP builds. This is especially useful if the player is only using a one-handed weapon. The following are the recommended shields for the most OP build in Lords of the Fallen:
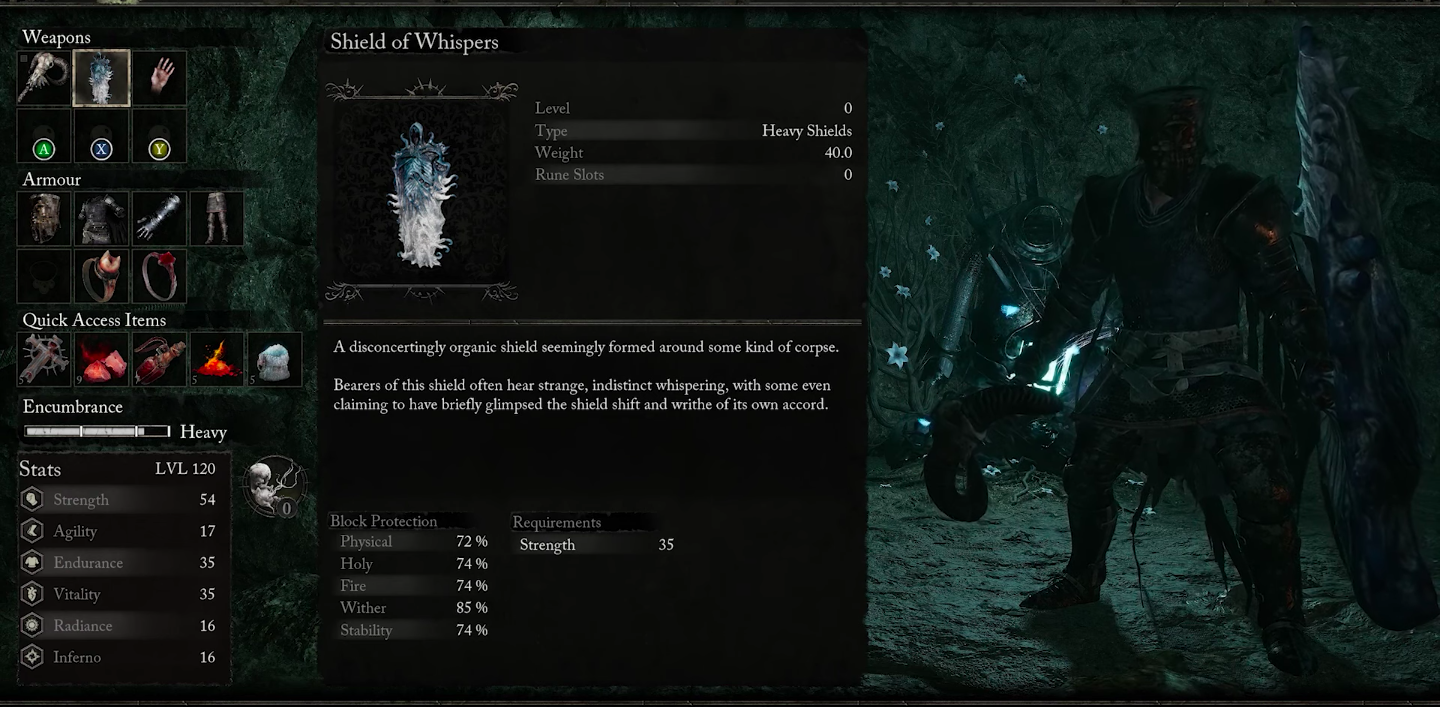
1. Shield of Whispers
Shield of Whispers is a heavy, organic shield that appears to have been built around a corpse. Its superiority in fending off physical, holy, fire, and wither damage makes it a very strong and versatile option. The Shield of Whispers is classified as a Heavy Shield with a weight of 40.0.
Also, the player must first have a Strength stat of at least 35 to use it. It requires one of the highest Strength stat requirements and is incredibly heavy, but the work to grind and wield it is worth waiting for.
The following are the block protection stats of the Shield of Whispers: a Physical protection stat of 72%, a Holy protection stat of 74%, a Fire protection stat of 74%, a Wither protection stat of a whopping 85%, and a Stability stat of 74%.
This shield provides very high protection at the expense of being very heavy. With enough upgrades, the Wither protection stat of the Shield of Whispers can reach 95%. This makes it very helpful against withering damage, which may prove challenging.
How to Get
The player will be able to find the Shield of Whispers down below the Sunless Skein Mines. To find this heavy shield, the player must do the following:
- First, head to the right from the Vestige of Hooded Antuli in the Sunless Skein and drop down the train tracks. From here, the player must follow the train tracks inside the mine.
- Next, while following the train tracks, the player will reach an open area and enter another narrow path. Eventually, the player will reach a locked gate. The player must then head for the opening on the right and follow its path.
- The player will find an Umbral gate while on this path. To pass this gate, the player must use the Umbral Lamp, shine it on it, and pass through. The player must then continue on the path to discover another Umbral Gate. Again, the player must shine the Umbral Lamp on the gate to pass through it.
- After that, once the player is through, the player must drop down a pit to land on a poisoned area. To avoid being poisoned while navigating the area, the player can switch to Umbral. Upon dropping into the murky waters, the player must then head towards the path on the left. Near the end of the path, the player must take the path on the right. At the end of this path, the player must head for the next path on the right.
- Lastly, while on this path, the player must take the next turn on the right to find something glowing on the corner. The player must then approach this glowing item and interact with it. Finally, the player has now obtained the Shield of Whispers!
2. Lucent Sword Shield
Another great shield that can help the player attain the most overpowered build is the Lucent Sword Shield. This shield is ideal for a strength-based build. The Order of the Lucent Sword owns this shield, which excels at defending from physical attacks while offering moderate defense from holy and fire damage.
The Lucent Sword Shield is a Medium type shield weighing 8.3. It is a medium shield with a good balance of light and heavy shields. The Lucent Sword Shield is undoubtedly considered one of the most formidable shields in the game that the player can use even against the most difficult bosses.
The following are the block protection stats of the Lucent Sword Shield: a Physical damage resistance of 61%, a Holy damage resistance of 41%, a Fire damage resistance of 41%, a Wither damage resistance of 36%, and a Stability stat of 45%. The Lucent Sword Shield boasts a few of the most powerful defensive stats for shields in Lords of the Fallen.
To use the Lucent Sword Shield, the player must first have a Strength stat of at least 12.
How to Get
The player will be able to find the Lucent Sword Shield in The Empyrean. Before this, the player must first have the Empyrean Church Key. The player can get this key item inside a chest in the same area. To get the Lucent Sword Shield, the player must perform the following:
- First, starting from the Vestige of Iorelo the Cursed Knight in The Empyrean, the player must head to the right to find a large door. The player can open this door using the Empyrean Church Key. Once this huge door is open, the player must head inside, where the player will find three pairs of Abiding Defenders.
- After that, inside, the player must go straight and head up a large set of stairs. Continue forward to find another flight of stairs with a huge statue in between. The player must then continue forward and head up three more stairs. Near the end of the path, the player will find another doorway.
- Then, the player must enter the doorway to arrive inside a church. Here, the player must follow the path forward from the door and past the church benches. After the church benches, the player must head to the left, where the player will find two more Abiding Defenders. In this part of the area, the player will find an altar with a dead body on the floor and something glowing just next to the altar.
- Lastly, after defeating the Abiding Defenders, the player must approach the glowing item next to the altar and interact with it. Finally, the player has now acquired the Lucent Sword Shield!
3. Heavy Memento
Heavy Memento is a dual-quality heavy shield made from a damaged stone statue. This shield is skilled at preventing fire damage while also providing strong stability. It also provides sufficient defense against physical and wither damage. The disadvantage of this shield is its extremely heavy weight. The Heavy Memento shield weighs 50, easily the heaviest shield in Lords of the Fallen.
The following are the block protection stats of the Heavy Memento shield: a Physical Defense stat of 80%, a Holy defense stat of 70%, a Fire defense stat of 90%, a Wither defense stat of 75%, and a Stability stat of 78%.
To wield the Heavy Memento shield, the player must first have a Strength stat of at least 40.
How to Get
The player can purchase the Heavy Memento shield from Molhu at Skyrest Bridge. However, before Molhu will add it to his wares, the player must first obtain the Remembrance of the Sundered Monarch.
Also, the player will have to use Umbral Scourings as currency instead of Vigor to buy the Heavy Memento from Molhu. The player must exchange 20 Umbral Scourings to purchase the Heavy Memento shield.
Remembrance of the Sundered Monarch
After defeating the Sundered Monarch, the player can obtain the Remembrance of the Sundered Monarch himself. The player will find this Colossal Boss in Bramis Castle. To find The Sundered Monarch and get the Remembrance of the Sundered Monarch, the player must perform the following:
- First, from where the player encountered Damarose the Marked, the player has to go up the wooden ramp on the right. The player must now take the path on the left. On this path, the player will discover the Map of Bramis Castle Barbican on the floor. The player will come across a small flight of stairs and a door at the end of this corridor. On the inside, the player will discover an Umbral Flowerbed, where they can plant a seed.
- Next, the player must proceed to the door ahead and open it. After passing through, the player will arrive at the inner part of Bramis Castle. The player must then head down the stairs ahead and follow the path where there are a bunch of enemies. Near the end of the path, the player must head for the next path on the right. Here, the player must follow this path through an opening on a wall and up a ramp.
- Then, on top, the player must take the path on the left, where there are more enemies. While on this path, the player will find a structure on the left with an open fire. The player must then enter this structure. To do that, the player must cross to the Umbral Realm. Upon doing that, the fire will disappear, enabling the player to enter the structure safely.
- Following that, proceed on the path inside up a ramp where there is an enemy. The player must continue on this path to arrive at a room with a wooden floor and some boxes and crates. Here, the player must then follow the path on the right. Eventually, the player will reach an area with a concrete floor. Here, the player must take the next path on the right.
- Afterward, at the end of this path, the player will find a gap with lava below. Here, the player must soulflay the other side to connect the paths. Continue on the path where the player will face more enemies and take the next path on the right to enter another ruined structure. Inside, the player will again face more enemies. The player must cross the opening on the other side. To do that, the player must be in the Umbral Realm.
- Next, the player must follow this path with holes in the middle. At the end of this path, the player must drop down the next path on the right. Here, the player must drop down another ledge ahead with more enemies. From here, the player must follow the narrow wooden path ahead. While on this path, the player will encounter more enemies. At the end of this path, the player will pass through an opening to a room with an enemy. The player will find a small lift in the middle of this room. The player must stand on it to make it start moving down.
- Then, once the lift stops at the bottom, the player must head for the doorway to exit the room. Here, the player can find an Umbral Flowerbed where the player can plant a seed. From here, follow the path on the right, then head down a flight of stairs. Because of this, the player will now start going to the left. While following this path, the player must take the next path on the left, where there are four flights of stairs: one short, one slightly taller, one the tallest of the three, and another slightly shorter than the last. On top of the third flight of stairs, the player will face a few enemies.
- After that, the player must head to the right to find another flight of stairs. On top, an enemy is waiting for the player. The player must then take the path on the left with a few enemies and another short set of stairs. Head up these stairs to pass through an arch and enter a structure with an Umbral Flowerbed.
- Following that, the player must cross to the Umbral Realm to continue. Once doing so, the player can pass through the previously closed doorway ahead. Here, the player must head up a set of stairs where there is an enemy. On top, the player must head to the path on the left and follow this path around and up towards an opening. From here, take the path on the right and follow this path up another tall flight of stairs.
- Next, on top, the player must continue on the path to reach an open area where the player will encounter a sorcerer. The player must defeat this enemy to access the next Vestige. After doing so, continue on the path to find and activate the Vestige of the Bloody Pilgrim. Once that is done, the player must head back towards the previous flight of stairs to find the unobstructed path in front of it.
- Then, the player must head for this newly-opened path and take the next path on the left. From here, head for the next set of stairs on the immediate left and follow this path to pass through an arch. The player must then head slightly forward and take the next path on the right up another flight of stairs. An enemy is waiting for the player on top of the stairs. Once on top, the player must enter the arch on the structure’s left ahead.
- After that, inside, follow the path to head up another flight of stairs on the right and enter the arch on the left to arrive in a room with an Umbral Flowerbed. The player can plant a seed in this area. Once that is done, continue on the path on the left, where the player will find the Map of Bramis Castle near a ledge.
- Following that, the player must drop down the ledge at the end to land on a winding set of stairs. Head up the stairs and destroy the boxes at the top to enter a large room. Here, the player must follow the path on the right to find a door on the right wall. Approach the door and interact with it to open it and head inside. Here, the player will find a ladder on the right that they can drop to create a shortcut to and from the previous seed.
- Afterward, exit the previous door and head to the opposite side of the room to find an opening. The player must pass through this doorway and take the path on the right. At the end of this path, head towards the path on the right to find a sorcerer. The player must defeat this sorcerer to continue.
- Next, after defeating the sorcerer and the other enemies in the area, the player will find a lever near where the sorcerer is found. Approach the lever and interact with it to move the stairs in the hall’s center. After doing so, the player must return to the previous path to return to the opposite side of the room. Here, the player must head up the stairs directly in front of the doorway.
- Then, once up a level, the player must head for the next doorway on the left. Here, the player must then follow the path on the left. At the end of the path, the player will find an enemy and a path to the left. Head to the left and cross to the other side of the room. In the middle of this structure, the player will encounter an enemy. Once on the other side, the player must approach the large shelves on the right to find something glowing in the corner. Approach this and interact with it to obtain the Royal Key.
- After that, the player must head back to the opposite side of the room and follow the path on the right. At the end of the path, the player must pass through the doorway on the right and continue up the flight of stairs on the left. At the top, the player must approach the door to the left. Interact with the door to open it using the previously obtained Royal Key.
- Following that, the player must pass through the doorway and follow the path on the left and up several small stairs. At the end of the path, take the path on the left, where the player will find another set of stairs. The player must then head up this flight of stairs. After going up a level, the player must take the path on the right, where the player will encounter enemies. While on this path, the player will find an opening on the left. Pass through the opening and head down the flight of wooden stairs.
- Next, at the bottom of the wooden stairs, the player must now follow the path on the right. At the end of this path, the player must drop down the ledge and use the broken scaffolding to break the fall. After landing, the player must continue on the path where they will encounter several enemies. At the end of the path, the player must break the wooden obstructions and enter the doorway ahead.
- After that, inside, the player must head slightly forward and then take the path on the right. Head down the ramp, and the player will reach a large room, the king’s bedroom. The player can open a shortcut to and from a previous room on the path using a flight of stairs next to the ramp. Head towards the large doorway on the left to get to a balcony that overlooks the previous hall.
- Following that, the player must cross to the Umbral Realm to continue. Here, the player will find a platform below on the left shaped like a hand. Drop down this platform and soulflay the target just ahead of it to drop down another platform. The player must then jump towards this new platform and follow the path on the right to reach another platform shaped like a hand. From here, the player must then follow the path of the crystal to find a path with an opening.
- Afterward, the player must continue taking on this path. This will lead the player to a winding, narrow path that leads down. While taking on this path, the player will find two paths. To continue, the player must follow the path on the left (the player can follow the path on the right to reach an Umbral Flowerbed). Eventually, the player will head outside and reach an open area with a large flight of stairs. The player must head up the high stairs to find a sorcerer. The player must now eliminate this sorcerer to continue.
- Next, after defeating this enemy, the path up the stairs is cleared. The player must now continue heading up the large flight of stairs. Finally, the player will now face The Sundered Monarch at the top!
- The player must soulflay the Stigma once this colossal boss is defeated. Through this, the player will get two Umbral Scourings and, finally, the Remembrance of the Sundered Monarch!
Molhu
The player can go to the chamber at the side of the Main Hall in Skyrest Bridge to find Molhu. To locate Molhu, the player must do the following:
- First, from the Skyrest Bridge’s Main Hall, the player must head left and upstairs. These stairs lead into a room. The lamp will begin to glow brighter and make a sound once the player gets to the top of the stairs. This means there is something significant in the Umbral Realm.
- Next, the player can use the Umbral Lamp to search the area for Molhu. Upon finding Molhu, the player must cross to the Umbral Realm while holding out the lamp to interact with Molhu.
4. Ravager Greatshield
The Ravager Greatshield is a heavy shield that the formidable Ravagers favored. This well-rounded shield protects against physical, holy, fire, and wither damage. As a result, it is a reliable choice for various combat situations. As mentioned, the Ravager Greatshield is a heavy shield weighing 35.0. After upgrading to the highest level, every stat of the Ravager Greatshield rises to well over 80. This then makes it a great option for high-level hordes and bosses.
The following are the block protection stats of the Ravager Greatshield: a Physical damage resistance stat of 71%, a Holy damage resistance stat of 80%, a Fire damage resistance stat of 71%, a Wither damage resistance stat of 71%, and a Stability stat of 73%.
How to Get
To get the Ravager Greatshield, the player must purchase it from Exacter Dunmire. For this item, the player must buy it for 1,125 Vigor. However, before the player can buy the Ravager Greatshield, they must first take on the questline from Exacter Dunmire and reach a certain point to unlock the heavy shield in question in their inventory.
To take on the Exacter Dunmire questline and get the Ravager Greatshield, the player must execute the following:
First, once the player reaches Skyrest Bridge, the player will come across Exacter Dunmire and other NPCs in front of the Vestige of Ethryg. Talk to Exacter Dunmire to learn more about the player’s responsibilities as Orius’ chosen.
Then, when going back to Skyrest Bridge, the player can locate Exacter Dunmire on the balcony on one side of the Main Hall. As the player converses with him, he will assign the player a new task: find and return to him some items that can serve as evidence of the Hallowed Sentinels’ heretical deviations and malpractices. He will explain that this is to direct them toward the light of Orius. Finally, he will ask the player not to tell Pieta or the captain of the Fidelis about this because they are already conflicted.
The following are the items that the player needs to find and give to Exacter Dunmire until the player can unlock the Ravager Greatshield in his inventory:
A. Bloody Aspergillum
The player will be able to find the Bloody Aspergillum in the Pilgrim’s Perch area. This quest item is on a large statue in the arena where the player will face the Scourged Sister of Delyth. To find the Bloody Aspergillum, the player must do the following:
- First, starting from the Vestige of Chabui in the Pilgrim’s Perch area, the player must head to the left and up a small set of stairs to find a wooden ladder. Climb up the wooden ladder and, on top, climb up the next wooden ladder on the right.
- Next, on top, the player must head straight through the narrow path. Near the end of the path, the player will find a very narrow wooden bridge on the right. Carefully cross this wooden bridge; on the other side, the player must follow the path on the left.
- Afterward, at the end of the path, the player will find a hole in the ground with a wooden ladder. The player must climb or slide down the wooden ladder and then, at the bottom, follow the path on the right. At the end of the path, the player will find another hole in the ground with a wooden ladder. Climb or slide down this next wooden ladder.
- Following that, the player must pass through the arch directly in front of the ladder. The player will face the Scourged Sister Delyth boss and two minions here.
- The player will also find a large statue surrounded by candles slightly on the right. Approach the large statue, and the player will find something glowing on the base of the statue. The player must then approach the glowing item and interact with it. Because the boss will not leave the center of the arena, the player can cautiously pick this item after eliminating two minions. Finally, the player has now obtained the Bloody Aspergillum!
B. Book of Sin
The player can find the Book of Sin in the Pilgrim’s Perch area. The player will locate this quest item in the lower scaffolding on an Umbral Belly. To acquire the Book of Sin, the player must do the following:
- First, starting from the Vestige of Blind Agatha in the Pilgrim’s Perch area, the player must follow the path on the right. While on this path, the player will pass through wooden platforms with some falls nearby. At the end of this path, the player must continue on the narrow path on the left.
- After that, the player must take the next path on the right and up a small wooden stairs. Once that is done, the player will reach a large wooden platform outside. Head towards the edge of the wooden platform and jump towards the hanging wooden platform across a gap. From here, the player must jump towards the next wooden platform, where the player will face an enemy.
- Next, the player must keep following the wooden path, where the player will encounter another enemy. At the end of the path, the player will find a wooden ladder on the left. Climb or slide down the wooden ladder; at the bottom, the player must follow the path on the right. While on this path, the player must cross the gap using the narrow wood plank and head up a small set of stairs.
- Then, at the end of the path, the player will find a wooden ladder that leads down. Climb or slide down the wooden ladder; at the bottom, the player will find a bony path leading down to the right. The player must now cross to the Umbral Realm to continue.
- Following that, the player must take the path all the way down before taking the path on the left at the end. Here, the player will face a few enemies and find an Umbral Belly. Soulflay the Umbral Belly, and it will drop something glowing.
- Lastly, the player must approach the glowing item and interact with it. Finally, the player has obtained the Book of Sin!
C. Hallowed Sentinel Scripture
Just like the previous quest item, the player will also be able to find the Hallowed Sentinel Scripture in the Pilgrim’s Perch area. This quest item is inside one of the cages near a Stigma. The player must perform the following to obtain the Hallowed Sentinel Scripture:
- First, starting from the Vestige of Blind Agatha in the Pilgrim’s Perch area, the player must follow the path on the right. The player will then eventually reach a wooden path and some waterfalls. Here, the player must cross to the Umbral Realm to continue.
- Then, once that is done, the player will find no water below the wooden platform in the Umbral Realm. Drop down from the wooden platform and, at the bottom, follow the path on the right. Here, the player will head up a flight of stairs. Continue following this path until the player finds an opening on the right.
- Afterward, the player must pass through the opening and follow this path. Here, the player will encounter a few enemies. Eventually, the player will reach a room with a few lit candles. From here, the player must head up the flight of stairs on the right and follow the path on top. While on this path, the player will again face more enemies.
- Ultimately, the player will head outside and must slightly take the next path on the right. The player will then find a wooden ladder that leads down to the left. Climb or slide down the wooden ladder.
- After that, at the bottom, the player must head for the path directly in front of the wooden ladder. In doing so, the player will find a small set of wooden stairs. Head up the stairs and continue on the wooden platform to find a cage at the end. The player will find something glowing inside the cage.
- Lastly, the player must approach the glowing item inside the cage and interact with it. Finally, the player has now acquired the Hallowed Sentinel Scripture!
D. Vanguard Barros’ Rosary
The player will be able to find the Vanguard Barros’ Rosary in the Forsaken Fen area. This quest item is near a dead body inside of a hut in the said area. To find the Vanguard Barros’ Rosary, the player must execute the following:
- First, starting from the Vestige of Valade in the Forsaken Fen area, the player must follow the path on the right. While on this path, the player will pass through a doorway that leads outside. The player must continue on this path through the wooden platforms.
- Then, eventually, the player will find a large trunk that the player can traverse on the left. Head up towards the large trunk and, midway through, drop down to the floor below. From here, the player must approach the large bonfire and follow the wooden path on its left side. This wooden path will lead the player around the back of the large bonfire and through an arch. The player must keep following the wooden path until the player passes through another arch.
- After that, the player must head straight from the arch and take the next path on the right. From here, take the next path on the left, where the player will find an enemy. The player must destroy the obstruction on an opening and head inside where another enemy exists.
- Next, from here, the player must take the next path on the right to reach a large open area. Continue traversing through the path while sticking to the walls on the left. Eventually, the player will find an Umbral Entity blocking an opening. The player must soulflay the Umbral Entity to open up the path.
- The player must continue through the newly revealed path and take the next path on the right. Here, head straight and head up a small wooden ramp to find an enemy. From here, the player must head towards the wooden path on the right, where there are enemies. Follow the wooden path around and down a ramp.
- Afterward, once at the bottom of the ramp, the player must pass through the doorway ahead. Once inside, the player will find a dead body in the corner. If the player is in the Umbral Realm, the player must cross back to the Axiom to find the dead body. Near the body, the player will also find something glowing.
- Lastly, the player must approach the glowing item and interact with it. Finally, the player has now acquired the Vanguard Barros’ Rosary!
E. Ravager Gregory’s Rosary
As for this quest item, the player can find Ravager Gregery’s Rosary in the Lower Carath area. This quest item is on an impaled corpse in the mentioned area. The player must do the following to find and get the Ravager Gregory’s Rosary:
- First, starting from the Vestige of Lydia the Numb Witch in the Lower Calrath area, the player must follow the wooden path on the right. Drop down the platform below at the end of the platform.
- After that, the player must move slightly forward before descending the stairs. The player should proceed to the right, where they will find an opening. The player must then proceed through the opening to reach an alley below. Follow the path to the right from here. The player must continue in this direction, where they will encounter a few enemies and get through an arch.
- Next, the player must destroy the obstacle on the path just after the arch and proceed to the next path on the right. After descending the stairs, the player will arrive in an open area filled with burning objects and structures. The player must continue straight until they reach another flight of stairs on the left. Ascend this flight of stairs and, at the top, take the wooden path on the left. Break down the wooden crates and barrels in the path and climb another small flight of stairs. The player must continue on this path, where they will encounter another enemy and ascend a wooden ramp on the left.
- Following that, the player must ascend to the wooden roof on the right before descending the wooden ramp on the right again. The player must then drop down to the street below at the ramp’s edge. Follow the path on the right from here, where the player will eventually encounter a couple more enemies. The player will come across a burning structure while on this path. The player must circumnavigate this structure by taking the path on the right and then the left. The player must ascend a large wooden ramp behind the burning structure.
- Then, the player must proceed to the path on the right after reaching the top of the wooden ramp. As the player ascends the stairs, they encounter another enemy on the top. This enemy is using a greatsword and buffs himself with fire. When on top, the player must enter a building by passing through the arch ahead.
- Afterward, inside, the player will find closed doors on the left. The player must now use the Umbral Lamp and shine it on the doors to reveal a path. To pass through, the player can cross to the Umbral Realm. Alternatively, the player can pass through the doorway while shining the Umbral Lamp. On the other side, head down the wooden flight of stairs and follow the path on the right. At the end of the path, take the next path on the left and through a doorway.
- After that, inside, the player must head up the wooden planks on the right. At the top, continue straight on the wooden platform with the burning walls on the right. After the burning walls, the player will find an open space on the right. Be wary of a second Raw Mangler attacking the player from the right.
- Lastly, in the open space, the player will find a dead body impaled by multiple wooden stakes. The player will also find something glowing on the lower part of the dead body. The player must approach the impaled dead body and the glowing item and then interact with it. Finally, the player will obtain the Ravager Gregory’s Rosary!
Once the player has obtained all the items mentioned above, they must give them all to Exacter Dunmire. For this, the player will still find Exacter Dunmire inside the study on the side of the Skyrest Bridge area. Once done, the player will unlock the Ravager Greatshield in Exacter Dunmire’s wares! Again, to purchase it from Exacter Dunmire, the player must pay him 1,125 Vigor.
Related: How To Get To Bramis Castle in Lords of the Fallen
Ranged Weapons
Ranged Weapons can help the player deal damage to enemies from a safe distance. Lords of the Fallen has a few ranged weapons that can help the player build a character that is as OP as possible. The following are the recommended ranged weapons for this:
1. Multi-Shot Crossbow
Multi-Shot Crossbow is a ranged weapon with a high damage output that scales with the player’s Strength stat. However, this ranged weapon is very heavy. The Multi-Shot Crossbow is the heaviest of all the ranged weapons in the game. The Multi-Shot Crossbow weighs 11.3. Also, the player must have a strength stat of at least 22 points to use this ranged weapon.
The following are the stats of the Multi-Shot Crossbow’s attack power: a Physical damage stat of 92, a Holy damage stat of 30, a Fire damage stat of 30, and a Wither damage stat of 30. Also, the following are this ranged weapon’s block protection stats: a Physical resistance stat of 29%, a Holy resistance stat of 12%, a Fire resistance stat of 12%, a Wither resistance stat of 7%, and a Stability stat of 8%.
How to Get
The player can find the Multi-Shot Crossbow in the Abbey of the Hallowed Sisters area. Here, the player will obtain this ranged weapon inside a chest on a balcony. To find the Multi-Shot Crossbow, the player must execute the following:
- First, the player must start from the Vestige of Rosamund in the Abbey of the Hallowed Sisters. The player must then head backward towards the arch leading inside a structure. Inside, the player must now follow the path on the right, which will lead up a flight of stairs.
- Afterward, on top of the stairs, the player must pass through the slanted arch ahead. Inside, the player must now cross to the Umbral Realm to continue. Once done, the player must soulflay the target to open a path ahead.
- Then, the player must pass through the newly revealed path and follow the path inside. At the end of the path, the player will find an opening on the right that will lead outside. Pass through this opening and continue on the path to head up another flight of stairs. At the top, the player must head to the left to head up a winding set of stairs.
- After reaching the top, the player must head to the right to head up another flight of stairs. On top of these stairs, head towards the path on the left, then take the path on the right to head up another set of stairs. At the end of the path, the player must head for the next opening on the left to go down a flight of stairs. Once through, head towards the path on the right to go down another set of stairs.
- After that, at the bottom, the player must head to the left and enter a shade. Here, head to the right and head up the flight of stairs. Once reaching the next level, the player must continue forward and exit the structure through the arch. The player must head up another set of stairs ahead, then another on the left.
- Next, on top of the stairs, the player must head to the right and then to the left to go up a winding set of stairs. On top, keep following the path to head up another small set of stairs, then another one on the left, then to the left up another set of stairs, then on the right up some stairs. Here, the player must head to the right to pass through an arch and continue towards the opposite side of the area to go up a small set of stairs. Continue on this path, and the player will eventually find another set of stairs on the left.
- Afterwards, the player must continue on the path and take the path on the right to go up another set of stairs. On top, go to the left and back to follow a corridor. Here, the player will encounter a few enemies.
- Lastly, halfway through the corridor, the player will find a path on the left leading to a balcony. The player must head towards this balcony to find a chest. Approach the chest and interact with it. Finally, the player has now obtained the Multi-Shot Crossbow!
2. Udirangr Shaman Bow
The Udirangr Shaman Bow deals medium damage and scales with Strength and Agility. This Bow-type ranged weapon helps by setting enemies on fire while remaining agile in battle. The stats of the Udirangr Shaman Bow are not the most impressive.
However, this ranged weapon is still good enough and easy to obtain in the early game. Even though the player will be able to find better-ranged weapons later in the game, the Udirangr Shaman Bow remains one of the best-ranged weapons available.
The following are the attack power stats of the Udirangr Shaman Bow: a Physical damage stat of 78, a Holy damage stat of 36, a Fire damage stat of 29, and a Wither stat of 29. Also, the Udirangr Shaman Bow has an Ignite stat of 100. As for its block protection capabilities, the following are this bow’s stats: a Physical defense of 29%, a Holy defense stat of 12%, a Fire defense stat of 12%, a Wither defense stat of 7%, and a Stability of 8%.
Before the player can use the Udirangr Shaman Bow, the player must first have a Strength stat of at least 13 and an Agility stat of at least 13.
How to Get
The player will be able to find the Udirangr Shaman Bow in the Fief of the Chill Curse area. To find this bow, the player must perform the following:
- First, the player must start from the Vestige of Svornil in the Fief of the Chill Curse area. From here, the player must face backward toward the opening just ahead. This opening has an iron gate halfway up. Once through, the player must keep following this snowy path.
- Then, eventually, the path will lead a player down a wooden platform. Just ahead of the ledge above on the right, the player will find a dead body hanging upside down by its feet. On it, the player will find something glowing.
- The player must then utilize a ranged weapon or a spell to hit the glowing item. Then, after doing so, the glowing item will drop below the ledge.
- Next, the player must drop down from the ledge. Doing so will result in the player landing in a body of water.
- Lastly, approach the glowing item and interact with it. Finally, the player has now acquired the Udirangr Shaman Bow!
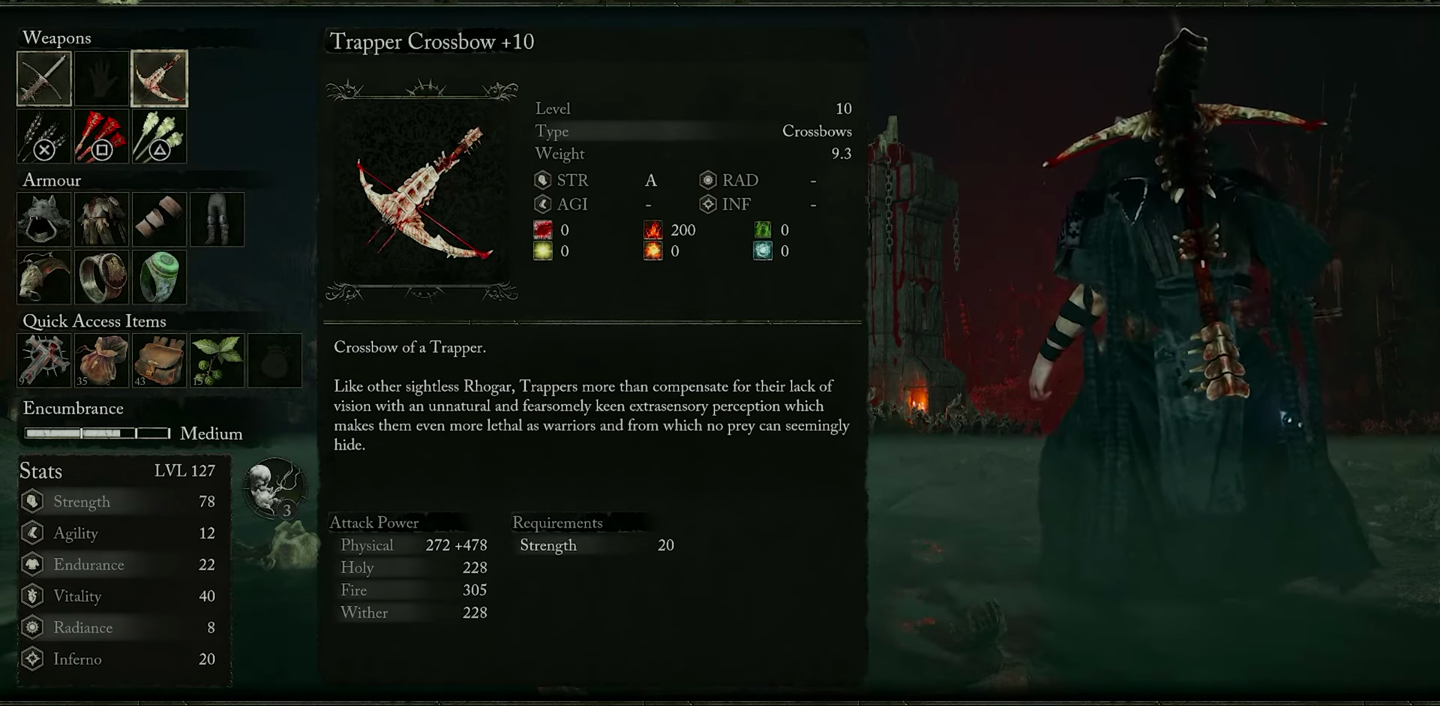
3. Trapper Crossbow
The Trapper Crossbow is, well, a crossbow-type ranged weapon that has a high damage output. Also, aside from dealing high damage, the player can use the Trapper Crossbow to set enemies on fire. The Trapper Crossbow has a Fire stat of 200 and a weight of 9.3.
The following are the attack power stats of the Trapper Crossbow: a Physical attack power of 160, Holy attack power of 46, a Fire attack power of 62, and a Wither attack power of 46. The following are the block protection stats of the Trapper Crossbow: a Physical Defense stat of 23%, a Holy defense stat of 5%, a Fire defense stat of 30%, a Wither defense stat of 5%, and a Stability of 8%.
Before the player can wield the Trapper Crossbow, the player must have a Strength stat of at least 20 points.
How to Get
The player will be able to get the Trapper Crossbow as an item drop from an enemy called a Trapper. These enemies are Serpentine Natives of Rhogar, skilled in deploying explosive traps. Trappers remain in the shadows to attack, delighting in the sensation of causing their victims pain and slavery. The Trapper Crossbow has a drop rate of 4.25% from these enemies.
To find Trappers, the player can head to Fitzroy’s Gorge, Lower Calrath, Upper Calrath B, Sunless Skein, and Bramis Castle.
Alternatively, the player can purchase the Trapper Crossbow from Thehk-Ihir. The player can buy this ranged weapon for 800 Vigor. This NPC is situated on the scaffolding in Skyrest Bridge. To find Thehk-Ihir, the player must do the following:
- First, the player must start from the Vestige of Ethryg in Skyrest Bridge. Here, the player must follow the path on the right. At the end of this path, pass through the opening and head down the flight of stairs on the right.
- Afterward, the player must continue heading down this path through an arch and another flight of stairs. At the bottom, continue on the path and exit through the large arch to reach some wooden scaffolding.
- Following that, the player will find a wooden ladder just ahead. Climb up the wooden ladder and continue on the path.
- Lastly, while on this path, the player will find an NPC and his wares on the right. Finally, the player has now found Thehk-Ihir!
It is important to note that the layer can find Thehk-Ihir in different locations near Vestiges. The location described above is the initial area where the player can find Thehk-Ihir. Each time the player finds Thehk-Ihir in a different location, this merchant will have an expanded inventory.
The followings are the other areas and the order where the player will find Thehk-Ihir: near the Vestige of Olleren in Forsaken Fen Lookout, near the Vestige of the Pale Butcher in Shuja Hamlet, again in Vestige of Ethryg in Skyrest Bridge, near the Vestige of Loash in Fief of the Chill Curse, near the Vestige of Dieter in Path of Devotion, near the Vestige of Brother Jeremiah in Manse of the Hallowed Brothers, then near the Vestige of Rosamund in the Abbey of Hallowed Sisters. The player will then cease finding Thehk-Ihir anywhere in the game after the player opens the church gate to The Empyrean. From here on out, the player can only access Thehk-Ihir’s inventory in another player’s world.
Armor

Players can choose whichever they want when creating the most OP, Strength-based build. It is more important to prioritize weight for the player’s weapon, ranged weapon, and shield. However, if the player’s weight capacity still allows, it is advised to use heavy armor. This is because, with an overpowered Strength build, the player will have to execute melee attacks most of the time.
This means the player would have to get close to enemies and be vulnerable to attacks. With heavy armor, the player is supposed to receive the least damage possible to survive for longer. For this, the recommended armor set is the Paladin’s Armor Set.
It is important to remember that even though the Paladin’s Armor Set is great, the player should not be confined to it. Upon reaching the latter parts of the game, the player can upgrade to different armor pieces based on the player’s defense needs and weight availability.
Paladin’s Armor Set
The Paladin’s Armor Set is a heavy armor type set. Paladins, renowned for their ability to fight and charge on powerful warhorses, wore this armor set with remarkable elemental and physical defenses. This armor set consists of four pieces: the Paladin Helm for the head, the Paladin Armour for the torso, the Paladin Gauntlets for the arms, and the Paladin Leggings for the legs. The Paladin Armor Set has a total weight of 61.6.
The following are the damage mitigation stats of the Paladin’s Armor Set: a total Physical Defense stat of 411, a total Holy Defense stat of 222, a total Fire Defense stat of 228, and a total Wither defense stat of 365. In addition, the following are the resistance stats of the whole of the Paladin’s Armor Set: a Smite resistance stat of 126, a Bleed resistance stat of 146, a Burn resistance stat of 146, an Ignite resistance stat of 126, a Frostbite resistance stat of 237, and a Poison resistance stat of 224.
Paladin Helm
The Paladin Helm is a heavy head type of armor with a weight of 9.3.
The following are the damage mitigation stats of the Paladin Helm: a Physical Defense stat of 64, a Holy defense stat of 33, a Fire defense stat of 34, and a Wither defense stat of 54.
Also, the following are the resistances and their stats for the Paladin Helm: a Smite resistance stat of 24, a Bleed resistance stat of 28, a Burn resistance stat of 28, an Ignite resistance stat of 24, a Frostbite resistance stat of 45, and a Poison resistance stat of 43.
Paladin Armour
The Paladin Armour is a Heavy Torso type armor with a weight of 25.8.
These are the damage mitigation stats of the Paladin Armour: a Physical damage reduction stat of 146, a Holy damage reduction stat of 106, a Fire damage reduction stat of 109, and a Wither damage reduction stat of 172.
Additionally, here are the resistance stats of the Paladin Armour: a Smite resistance stat of 57, a Bleed resistance stat of 66, a Burn resistance stat of 66, an Ignite resistance stat of 57, a Frostbite resistance stat of 107, and a Poison resistance stat of 101.
Paladin Gauntlets
The Paladin Gauntlets are a Heavy Arm type of armor with a weight of 8.5.
For the Paladin Gauntlets, the following are its damage mitigation stats: a Physical damage resistance of 65, a Holy damage resistance stat of 27, a Fire damage resistance stat of 28, and a Wither damage resistance stat of 45.
In addition, as for its resistance stats, they are the following for the Paladin Gauntlets: a Smite resistance of 15, a Bleed resistance of 17, a Burn resistance stat of 17, an Ignite resistance stat of 15, a Frostbite resistance stat of 28, and a Poison resistance stat of 26.
Paladin Leggings
The Paladin Leggings are heavy legs type armor weighing 18 pounds.
The following are the damage mitigation stats of the Paladin Leggings: a Physical Defense stat of 136, a Holy defense stat of 56, a Fire defense stat of 57, and a Wither defense stat of 92.
Also, the following are the resistance stats of the Paladin Leggings: a Smite resistance stat of 30, a Bleed resistance stat of 35, a Burn resistance stat of 35, an Ignite resistance stat of 30, a Frostbite resistance stat of 57, and a Poison resistance stat of 54.
How to Get
Fortunately, the Paladin’s Armor Set is the starting armor of the Dark Crusader class in the game. This is great, as this is the most recommended class to get the most OP build in Lords of the Fallen. If this is not the class the player chose, they would have to get the Paladin’s Armor Set elsewhere.
Even though there are four pieces in the Paladin’s Armor Set, the player can find each piece of this armor set in the same location. The player will be able to obtain all the pieces of the Paladin Armor Set from a corpse in the Abandoned Redcopse area.
Before the player can get the Paladin Armor Set, the player must first face and defeat the Paladin’s Burden boss. This is part of the game’s ‘Paladin’s Request’ questline. After soulflaying the final stigma in the Path of Devotion area, the player can find this optional secondary boss. After defeating the Paladin’s Burden boss, the player must obtain the Umbral-Tinged Flayed Skin that this boss drops.
After obtaining the Umbral-Tinged Flayed Skin, the player can now try to acquire the Paladin Armor Set. To get the Paladin Armor Set, the player must do the following:
- First, the player must start from the Vestige of Ranik in the Defiled Sepulchre area. From here, the player must follow the path on the left. While on this path, the player will eventually reach an open area. Continue heading straight and follow the path on the opposite side.
- Next, the player will reach a divided path while on this path. Here, the player must take the path on the right. Keep following this path until the player reaches where they found and obtained the Flayed Skin item.
- After that, the player must cross to the Umbral Realm to continue. Once that is done, the player will find a large door up ahead. Approach the door, interact with it, and, on the prompt, select ‘Use Umbral-Tinged Fayed Skin’ to open it. After doing so, the door will disappear for the player to access the next area.
- Following that, the player must continue down the path, which is made up of very large bones. After crossing it, the player will find a corpse with something glowing.
- Lastly, approach the glowing item and interact with it. Finally, the player has the Paladin Helm, Paladin Armour, Paladin Gauntlets, and Paladin Leggings! Not only that, but the player will also obtain the Paladin Isaac’s Sword.
Pendant
Pendants can greatly help the player have the most OP build by giving the player different special effects. The player only has one pendant slot to use. For this, the Warrior’s Claw pendant is recommended.
Warrior’s Claw
When equipped, the Warrior’s Claw pendant boosts the player’s physical and physical damage by 10%. With an overpowered strength build, equipping the Warrior’s Claw pendant will help the player deal with even more physical damage while being able to withstand slightly more physical damage.
How to Get
The player will be able to find the Warrior’s Claw pendant in the Pilgrim’s Perch area. However, before the player can try to get the Warrior’s Claw pendant, the player must first get the Pilgrim’s Perch Key. The player needs this key to reach the Bellroom and find the Vestige of Blind Agatha.
To get this item, the player must purchase it from Stomund, Captain of the Fidelis. The player can find Stomund near the Vestige of Ethryg in Skyrest Bridge. To buy the Pilgrim’s Perch Key, the player must exchange 9,500 Vigor to Stomund, Captain of the Fidelis.
Once the player has the Pilgrim’s Perch Key, the player can now attempt to get the Warrior’s Claw pendant. To find this pendant, the player must execute the following:
- First, the player must start from the Vestige of Blind Agatha in the Pilgrim’s Perch area. From here, the player must follow the path on the right. While on this path, the player will reach a wooden platform and find a pond and some waterfalls.
- Then, near the end of the wooden path, the player must follow the path on the left, where the player must immediately turn to the right. Here, the player must head up a small wooden stairs and arrive at a wooden platform.
- After that, the player must head toward the platform’s edge and jump toward the hanging wooden platform. From here, the player must jump towards the next wooden platform ahead.
- Following that, the player must continue on the wooden path. At the end of the path, the player will find a ladder that leads down to the left. Climb or slide down the ladder, and once at the bottom, the player must cross to the Umbral Realm to continue. On the right, when facing the recently used ladder, the player will find another ladder on a ledge that leads down. Climb or slide down the ladder and continue in front of the ladder. Eventually, the player will find another ladder on the right pillar leading up. The player must now climb up the ladder, follow the wooden platform around the pillar, and head up another ladder.
- Afterward, the player must slightly cross the thin path on the right. After crossing, the player will reach another wooden platform. Head to the right and climb or slide down the ladder. After reaching the bottom, the player must continue to follow the wooden path forward and up a small set of stairs. The player must climb or slide down another wooden ladder on the ledge at the end of the wooden path.
- Next, at the bottom, the player must cross the thin path on the left when facing the ladder. Once the player is across, the player must soulflay the target above on the right. Afterward, head back and cross the thin path again to reach the open area. Here, the player must head towards the opposite side of the wide platform. The player must now soulflay the target above on the left.
- Then, from here, the player must head back to the opposite side of the area, where the player will find a path that leads down to the left. Follow the path down and around; at the end, the player must take the path on the left. Head towards the edge of the platform, then look down below. Here, the player must soulflay the target below on the right.
- After that, the player must head up and around using the previous ramp. At the large wooden platform on top, the player will find the large door ahead glowing. Approach the door and soulflay the target on it to reveal a new path.
- Following that, the player must now enter the newly revealed, narrow path. At the end of the path, climb or slide down the wooden ladder on the edge. At the bottom, the player will find an Umbral Flowerbed. From here, the player must continue following the path on the right. At the end of the path, the player must climb or slide down the wooden ladder on the edge.
- Afterward, at the bottom, the player will immediately find a wooden ladder that leads down to the right. Climb or slide down this wooden ladder, then follow the path directly in front of it. While on this path, the player will find a doorway that leads outside. Once outside, follow the path on the right. Here, the player will reach a balcony where they will face two Pilgrims, two Marksmen, a Thorned Penitent, a Pureblade, and a Crimson Rector, and they are all protected by an Umbral Parasite. The player must defeat all the enemies to continue.
- Lastly, after defeating all the enemies, the player can head towards the rightmost part of the platform. Here, the player will find something glowing near a corpse. Approach the glowing item and interact with it. Finally, the player has obtained the Warrior’s Claw pendant!
Rings
The player can use Rings in Lords of the Fallen to give the player passive bonuses. The following are the recommended Rings to have the most OP build in Lords of the Fallen:
1. Mineowner’s Ring
An ancient, tarnished ring called the Mineowner’s Ring raises the player’s maximum stamina and the rate at which the player’s stamina regenerates. As this is the most OP build, the player’s character focuses mostly on strength. With this ring, the player will have a much-needed boost in stamina and regeneration speed.
According to in-game lore, wealthy nobles and businessmen who co-owned the Sunless Skein mine, a venture infamous for its callous and brutal operation, wore this ring.
How to Get
The player can find the Mineowner’s Ring in the Abandoned Redcopse area. To find this ring, the player must perform the following:
- First, the player must start from the Vestige of Marco the Axe in the Abandoned Redcopse area. From here, the player must face the paths on the left when facing the Vestige. Here, the player will find two paths and must take the path on the left.
- Following that, while on this path, the player will eventually find a corpse hanging by its feet near a door on the right. On the hanging corpse, the player will find something glowing. The player must now shoot the glowing item using a ranged or throwable weapon.
- Next, after doing so, the glowing item will fall to the ground. Lastly, approach the glowing item on the ground and interact with it. Finally, the player has now acquired the Mineowner’s Ring!
2. Melchior’s Ring
The Melchior’s Ring boosts the player’s physical damage output by 3.5% to 5%. This ring also features an image of a boar’s head. According to in-game lore, It symbolizes Melchior’s last-ditch effort to keep his brother safe in Mournstead.
This plan eventually led to a difficult journey that involved a sacrifice. Although Melchior knew that his desperate scheme would endanger his brother, he convinced himself it was essential. This is because Drustan was alone, and nobody would take care of him anyway. For a while, this helped Melchior feel less ashamed.
How to Get
The player will be able to find the Melchior’s Ring in Bramis Castle. However, the player will only find this ring if the player has completed Drustan’s questline. Otherwise, the player cannot find the Melchior’s Ring anywhere in the game.
To start this quest, the player must find and interact with Drustan. The player will be able to meet Drustan right next to a lit brazier inside a cave in Fitzroy’s Gorge. The nearest Vestige to Drustan’s location is the Vestige of Betrayed Eliard.
Once that questline is completed, the Melchior’s Ring will become available in the game. As mentioned, the player can pick up the Melchior’s Ring in Bramis Castle. To acquire this ring, the player must execute the following:
- First, the player must start from where the player fought and defeated The Iron Wayfarer. The nearest Vestige to this location is the Vestige of the Forgotten Guardian. After that, the player must proceed to the barricaded door and interact with it. Select ‘Unlock the gate’ from the prompt. The obstruction will vanish from the large door, and the player can open it.
- Next, after opening the large door, the player must continue across the stone bridge. Upon crossing, the player will be confronted with several enemies and boxes. The player should take the first path on the left. This path is a spiral staircase with large steps. On top, the player will come across a Proselyte.
- After clearing that, the player must proceed through an arch with broken floors. If the player attempts to move towards the platform on the opposite side of the room, the wooden flooring near that platform will collapse, causing the player to fall. To proceed, the player must utilize the Umbral Rift and descend below. A few Umbral enemies are here, such as Womb of Despairs and Remnants. The player has to Soulflay a platform above the arch entrance and another on the opposite side of the room.
- Then, after doing so, the player can try to cross again. To do so, the player has to go through the right gate. As a result, the player will return to the previous open space at the bottom of the stairs. To get to the other side of the room, return up the large stairs and leap across the new platforms.
- Following that, the player must now take the path on the right. On this path, the player will encounter an Emergence Effigy close to an arch. If the player wishes to plant a Vestige Seedling, an Umbral Flowerbed can be found nearby. The player will also notice a set of stairs on the right before the Effigy. This path can be followed to create a shortcut to and from the area after pushing the ladder.
- Afterward, the player must proceed through the arch. The player will be able to exit through this path. Here, the player will come across a couple of enemies. The player will come to another set of stairs with large steps on the right at the end of the path. On top, the player will enter the structure again and battle several more enemies.
- Next, after entering this structure, the player will arrive in a large room with fire on the opposite side. In this room, the player must confront and eliminate Damarose the Marked.
- Then, after defeating Damarose the Marked, the player must proceed up the wooden ramp on the right. Here, the player has to take the left path. The player will find the Map of Bramis Castle Barbican on the floor along this path. At the end of this corridor, the player will find a small set of stairs and a door. The player will find an Umbral Flowerbed inside, where they may plant a seed.
- After that, the player then has to go to the head door and open it. The player will now end up at the inner sanctum of Bramis Castle after passing through. Here, the player must proceed down the stairs ahead and follow the path filled with enemies. Close to the end of the path, the player must turn right and take the next path. The player must now follow this path through a wall opening and up a ramp.
- Following that, the player must then take the path to the left, in which there are additional enemies. While on this path, the player will come across a structure on the left that has an opening and is on fire. The player must now enter this structure. To do so, the player must enter the Umbral Realm. The fire will then go out, allowing the player to get inside the structure safely.
- Next, keep going on the path inside up a ramp where there is an enemy. The player must continue down this path until reaching a room with wooden flooring and a few boxes and crates. Here, the player must then take the path on the right. The player will eventually reach an area with a concrete floor. The player must now take the next right path.
- After that, the player will come across a gap with lava below at the end of this path. To connect the paths, the player has to soulflay the target on the other side. Once that is done, cross the newly-revealed platform and continue on the path. The player will reach inside a structure with more wooden boxes and crates. Here, the player will find a Stigma and have to defeat a couple of enemies. On the opening on the left, the player will find something glowing on the floor.
- Finally, the player must approach and interact with the glowing item. Finally, the player has now obtained the Melchior’s Ring! Not only that, but the player will also get a Drustan’s Hammer, a Boar’s Head Shield, the Drustan’s Glove, the Drustan’s Garb, and the Drustan’s Leggings.
3. Adyrqamar Ring
The Adyrqamar Ring is durable and increases the player’s damage output by 10% when using two-handed weapons. According to in-game lore, an Adyrqamar Brotherhood member once wore this ancient ring.
How to Get
To get the Adyrqamar Ring, the player must purchase it from Damarose. To buy it, the player must exchange 3,000 Vigor for it. However, before the player can access Damarose the Marked’s shop, the player must first complete a questline. The questline in question is the ‘Adyr’s Faithful Servant’ quest.
To take on the “Adyr’s Faithful Servant” questline and purchase the Adyrqamar Ring, the player must do the following:
- Before starting this quest, it is important to note that the player must not cleanse any beacons. The player must comply with this requirement while taking on this quest. The ‘Adyr’s Faithful Servant’ questline will fail if the player cleanses even one beacon.
- First, the player must talk to Damarose. To find Damarose, the player can head near the Vestige of Chabui in the Sanctuary of Baptism area of the Pilgrim’s Perch area. This is before the player’s battle with Scourged Sister Delyth.
- After that, the player must talk to Damarose again in Pilgrim’s Perch. From the Vestige of Blind Agatha in the Pilgrim’s Perch Ballroom area, the player must ride the lift just in front of the Vestige and head downwards. At the bottom, exit the lift and follow the path on the right. While on this path, the player will eventually reach a ladder that leads down. The player must then climb or slide down the ladder to find a lever on the right. Interact with the lever to make the platform start moving downwards. At the bottom, exit the platform to enter another lift and make it start moving down.
- Following that, at the bottom, the player must exit the lift and continue on the dark path. A bit ahead of this path, the player will finally find Damarose again. This is the area before the player faces Gentle Gaverus, Mistress of Hounds. Here, the player must now talk to Damarose.
- Next, the player must go through the Forsaken Fen area and eliminate The Hushed Saint boss. It is important to note that the player must not cleanse the beacon.
- Afterward, the player must continue towards Fitzroy’s Gorge area and find Damarose. Here, the player can locate Damarose near the edge of a cliffside path. This is near a Stigma. The player must talk to Damarose in this area.
- Then, the player must continue in the Fitzroy’s Gorge area and eliminate the boss called Ruiner. The next step requires the player to cross the Umbral Realm to discover a large arch with a secret route. The player must drop down from the ledge of the arch and jump towards the platforms to continue. Eventually, the player will have to soulflay the platform across the gap to make it move towards the player. Jump towards the platform and soulflay the target on the other side to move the platform back. Jump towards the next platform, where the player will encounter many enemies.
- After that, the player must soulflay the target on the other side of the gap again. Doing so will result in a bridge to emerge. Before continuing, the player must face the wall above on the right and soulflay the target. Doing so will remove the obstruction to continue. The player must then continue on the path to reach another platform, face a few more enemies, and find a wooden ladder on the left.
- Following that, the player must climb the wooden ladder and head to the right to go up a flight of wooden stairs. From here, continue on the path where the player will face more enemies. Eventually, the player will reach the entrance to the Shrine of Adyr. Here, the player will find the Vestige of Betrayed Eliard.
- Next, the player must find Damarose in the Shrine of Adyr area. From the Vestige of Betrayed Eliard, the player must continue on the path and follow the path on the left. The player will find a large opening on this path with Damarose near the left corner. Talk to Damarose, and she will request that the player get an item known as the Adyr-Worshipper’s Saw for her.
- Afterward, the player must now get the Adyr-Worshipper’s Saw. The player will be able to find this item in the Cistern area. This is a sublocation of the Sunless Skein area. From the Vestige of Catrin in the area, the player must follow the path on the left. Here, keep following the tracks on the left. While on this path, the player will pass through a wooden bridge, a narrow path through a cave with an enemy, a slightly open area with another enemy, and a doorway.
- Then, from the doorway, the player must head straight to reach an area with many cages and a few enemies. From here, the player must follow the path on the right and then take the next path on the left. Here, the player will face a few enemies. After going up a small set of stairs, the players must head down the next flight on the left. Following this path, the player will reach a platform with a few wooden crates. Here, the player must head slightly straight and follow the thin path on the wall on the left to head down a ramp. Here, the player will find an open gate on the left.
- After that, the player must continue the path and head up a small flight of stairs. Pass through the next doorway on the right and climb up a wooden ladder. On top, the player must head towards the wooden crates and barrels on the right to find a wooden part of the wall. Destroy the wooden plank to reveal a hidden path with an enemy. Continue on this path, and the player will find an altar with candles and something glowing. The player must approach the glowing item and interact with it. The player now has the Adyr-Worshipper’s Saw.
- Following that, the player must now bring this item to Damarose. The player can still find Damarose near the Vestige of Betrayed Eliard in the Shrine of Adyr area. Talk to Damarose and select ‘Hand over Adyr-Worshipper’s Saw’ on the prompt. Damarose will then ask the player to get three types of Rhogar Flesh. For this, the player can give her the Infernal Enchantress Flessh, the Spurned Progeny Flesh, and the Lightreaper Flesh.
- For the Infernal Enchantress Flesh, the player can get this as a drop after defeating the Infernal Enchantress boss. The player can find this boss just after the Vestige of Sebastian in Lower Calrath. At this point in the game, the player must have fought and eliminated the Infernal Enchantress boss.
- For the Spurned Progeny Flesh, the player can get this as a drop after defeating the Spurned Progeny colossal boss. The player can find this boss sitting in the plaza at the end of the Calrath Slums in the Upper Calrath. Also, at this point in the game, the player has already defeated the Spurned Progeny boss.
- For the Lighreaper Flesh, the player can obtain this as a drop after defeating the Lightreaper colossal boss. The player will be able to get this item at any of the three locations where the player will face the Lightreaper. First, the player will find the Lightreaper in the Defiled Sepulchre area. If the player dies while fighting this colossal boss in this area, the player will face the Lightreaper again in the plains of Fitzroy’s Gorge and, lastly, at the Upper Calrath area on the way to Bramis Castle.
- Next, once the player has collected all three items, the player must head back to Damarose. She is still near the Shrine of Adyr, close to the Vestige of Betrayed Eliard. The player must talk to Damarose and select ‘Hand over Infernal Enchantress Fless’ on the prompt. Talk to Damarose again and, on the prompt, select ‘Hand over Spurned Progeny Flesh.’ Lastly, talk to Damarose again and select ‘Hand over Lightreaper Flesh’ on the prompt.
- Finally, after all that, the player must interact with Damarose again and select ‘Purchase’ on the prompt. Here, the player can now purchase the Adyrqamar Ring for 3,000 Vigor!
The player will still be able to purchase the Adyrqamar Ring and all of her other wares when the player finds Damarose again at the gates of Bramis Castle. If the player talks to her here, the player will get Damarose’s Cleaver weapon.
It is important to note that the player must purchase all the items they want from Damarose’s inventory while in this location. Damarose will no longer be available as a merchant once the player continues to Bramis Castle.
4. Ring of Nourishment
With the Ring of Nourishment, the player can recover HP after eliminating an enemy. As of patch v.1.1.231, this ring allows the player to regain 15 Health Points after defeating an enemy. Before the patch, the Ring of Nourishment only restored 5 of the player’s Health Points.
According to in-game lore, the Ring of Nourishment represents the quick death caused by Rhogar weapons. This type of weapon cauterized cuts before the victims died from the wounds they received.
How to Get
The player can get the Ring of Nourishment in the Lower Calrath area. This ring is next to a charred corpse in the said area. To locate and obtain the Ring of Nourishment, the player must do the following:
- First, the player must start from the Vestige of Lydia the Numb Witch. From here, the player must follow the wooden path with the wooden barrels on the right. At the end of the platform, drop down the platform below.
- Following that, the player must head slightly forward and down a flight of stairs. Head to the right, where the player will find an opening. The player must pass through the opening to drop down to an alley below. From here, follow the path on the right. The player must keep heading in this direction, where the player will encounter a couple of enemies and pass through an arch.
- Then, the player must destroy the obstruction on the path just after the arch and follow the next path on the right. Head down the stairs, and the player will reach an open area with many burning items and structures. The player must keep heading straight until the player finds another set of stairs on the left. Go up this flight of stairs, and, on top, the player must follow the wooden path on the left. Break the wooden crates and barrels in the way and head up another small set of stairs. The player must keep following this path, where the player will encounter another enemy and head up a wooden ramp on the left.
- Afterward, on top, the player must head for the wooden roof on the right and then drop down the wooden ramp on the right again. At the edge of the ramp, the player must drop down to the alley below. From here, follow the path on the right, where the player will eventually face a couple more enemies. While on this path, the player will find a burning structure ahead. The player must go around this structure through the path on the right and then on the left. Around the burning structure, the player must head up a large wooden ramp.
- Next, on top of the wooden ramp, the player must head towards the path on the right. Head up the stairs, and the player will face another enemy on top. Once on top, the player must pass through the arch just ahead to enter a building. Inside, head to the left, and the player will find a wooden ladder. Climb the wooden ladder, and once on top, the player must head to the left and then up a wooden ramp.
- After that, from here, the player must follow the wooden path on the right up some wooden stairs. The player must then pass through the next arch on the right and head up the stairs just ahead. On top of that, the player will encounter another enemy. Here, follow the path on the left and head up another set of stairs. The player must then head to the left again and go up another flight of stairs.
- Following that, the player must head to the wooden platform on the left. Here, the player will face a couple more enemies. The player must now cross to the Umbral Realm to continue. After doing so, the player will find a ladder on the wooden stairs. Climb the ladder and climb the wooden flight of stairs on the left.
- Then, once on top, the player must head towards the path on the left. While on this path, the player will find an obstructed alley on the right. Destroy the wooden wagon blocking the way and continue on this path. Once on the wooden platform, the player must then follow the wooden path on the right.
- Lastly, while on this path, the player will eventually find a scarred corpse on the right with something glowing near it. The player must approach the glowing item and interact with it. Finally, the player has now acquired the Ring of Nourishment!
5. Queen Verena II’s Ring
The player can equip the Queen Verena II’s Ring to regenerate health points over time. According to in-game lore, Queen Verena II of Mournstead once wore this ring. The unexpected and shocking demise of Queen Verena II sparked widespread theories. Some of these were that they suspected assassination, and others claimed it was the result of a short but fatal illness.
How to Get
The player will be able to get the Queen Verena II’s Ring in the Upper Calrath area. To access this area, the player must first complete the Cistern location. To find the Queen Verena II’s Ring, the player must perform the following:
- First, the player must start from the Vestige of the Forgotten Guardian in the Upper Calrath area. From here, the player must exit the room through the doorway opposite the Vestige. Once outside, the player must then follow the path on the right.
- After that, while on this path, The player will encounter a minor Elemental Enchantress up a structure. Some Husks will emerge from the ground to this enemy. While in this area, the player must cross to the Umbral Realm to continue.
- The player will find a ladder on the wall up towards the Elemental Enchantress. The ladder is right beside a little shade and a wooden table. The player must head up the ladder and remove the Elemental Enchantress to remove the nuisance. The player will discover three Fire Wards on a corpse in the platform’s corner.
- After that, the player will find a shed with a wooden platform on top across a gap near the ladder that the player just used to get up the platform. The player must jump towards this wooden platform. The player will find a large concrete hand ahead across the gap from here. Jump towards the large concrete hand and continue on the large concrete platform.
- Following that, the player will find something glowing near a door. Approach the glowing thing and interact with it. The player has now obtained Queen Verena II’s Ring!
Conclusion
Assembling the most overpowered build in Lords of the Fallen requires a meticulous selection of class, weapons, armor, and items. All of these variables must synergize seamlessly to amplify your character’s prowess. Each item is crucial in forging an indomitable warrior, from devastating weapons that maximize damage output to arcane-infused gear that bolsters magical abilities.
The thorough selection of equipment and the calculated distribution of stat points also play a significant role in crafting the most OP build in the game. Players can harness unparalleled strength and resilience by acquiring the recommended items and mastering their utilization. These will pave the way for unparalleled dominance in the challenging realms of Lords of the Fallen.