Sova is one of the most versatile and valuable Agents in VALORANT. Not only is he the most picked Agent of all time on Ascent, but Sova also has one of the highest pick rates of any map in VALORANT. His entire skillset revolves around gathering information about enemy locations and driving them away from various angles to secure site entry for his team. A good Sova will have a handful of lineups for every map, but a great Sova will have a Recon Bolt ready for any situation.
We have previously discussed Sova’s Recon Bolt lineups for Ascent (Attacking) which you can read about here: 5 Sova Recon Bolt Lineups on Ascent You Should Know (Attacking) I highly suggest you check the article out since lineups featured there can be used in conjunction with the lineups we will be discussing today to complete your ranked game domination.
Today, we will be looking at 5 Sova Recon Bolt lineups for Ascent, but this time it will be for early enemy information, and site retakes.
These are very valuable Recon Bolt lineups that you should add to your arsenal. The more lineups you have as a Sova player, the more value you will be giving your team. Let’s get started!
Ascent: Sova’s Playground
Ascent is where Sova truly shines. The map features tight entryways into Spike Sites, towering walls, and not many elevation changes; these all help with maximizing the effect of Sova’s Recon Bolt. Sova players can come up with hundreds of variations of his Recon Bolt lineups to keep enemies guessing.


As you can see, the entryways where enemies would normally be hanging out are often narrow. Sova players can find various clipping points for their Recon Bolt here. There are an almost infinite amount of Recon Bolt lineups players can come up with on Ascent.
Sova Early Information A-site/B-site/Middle God Arrows
The following Recon Bolt lineups are meant to give your team early information on enemy whereabouts. This is very important for a map like Ascent since your team will most likely split up into a 2-1-2 situation where two players hold B-site, one guy holds middle, and the two other players hold A-site – this is called “default”.
This gives your team early information about where the enemy team is stacking up players and will help your teammates rotate accordingly to the Spike Site that is most likely going to be taken by the Attacking Team.

1. Ascent A Site – God A Main/A Lobby Recon Bolt

This first Sova Recon Bolt on the list reveals most of A-Lobby and A-Main. This Sova Recon Bolt is very easy to line up and also lands very fast. This ensures that even if enemies are aware of where the Recon Bolt is, you will get at least one ping out of this Recon Bolt before the enemies destroy it. This is how you line it up:
- Go to this box in A-Site:

2. Position yourself on this corner

3. Look towards this gap here:

4. Place the tip of the right diamond bounce indicator at the bottom corner of this gap. Like this:
5. No bounce and 2-bar charge:

The Recon Bolt should land on this box here:

And reveal almost everything in A-Main and A-Lobby:

2. Ascent Middle – God Middle Arrow

This next Sova Recon Bolt is fast and elusive. It hits fast since there is no bounce, and the location the Recon Bolt lands on is barely visible to enemies inside Tiles. This Sova Recon Bolt reveals almost everything in Mid, including Catwalk, Short Cubby, Lower Middle, Tiles, and some of B-Lobby. It is a simple but powerful arrow that can reveal several enemies early in the round. Here’s how you line it up:
- Stand anywhere at Pizza:

2. Look for this brown wall:

3. Place your crosshair on this corner:

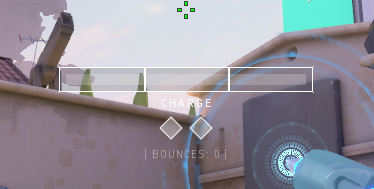
4. No-Bounce + Max Charge:

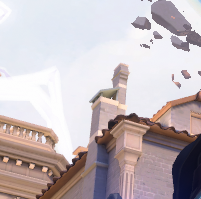
5. It should land like this:

It should reveal almost everything in middle:


3. Ascent B-Site – B Main Arrow
This quick Sova Recon Bolt reveals all of B-Main and some of B Lobby. This is a useful Recon Bolt to check if anyone is in B-Main, and especially valuable if you decide to use any high-penetration weapon to wall bang enemies in B-Main (You really should do the wall bang here, by the way. This scares off enemies from ever coming back to B-Main.) Here’s how to do it:
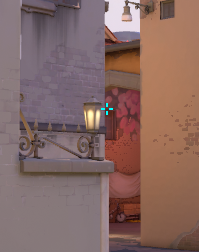
- Look for this spot at Lane:

2. Hug this post:

3. Look up towards this window. Place your crosshair at the bottom frame like this:

4. No-Bounce + Max Charge:


It should land in B-Main’s ceiling:

This Recon Bolt reveals all of B-Main and some of B-Lobby:

Sova God Retake Recon Bolt Lineups for A and B-site

These next two lineups will feature retake lineups for both A and B-site. These are very important lineups to add to your arsenal because retakes are some of the most difficult situations in a round of VALORANT. Whenever you and your team are in a retake situation, you will need every bit of information you can gather to safely and effectively regain control of the site and defuse the spike.

1. A Site God Retake Recon Bolt
This Sova Recon Bolt lineup is useful for A-site retakes, especially when rotating over from B-site. It is also relatively safe to execute since you are hidden from A Heaven sightlines. You can execute this quickly and secure a good position towards A-site by the time this lineup lands. Here’s how to do it:
- Go back to Defender Spawn:

2. Look for this pot, and tuck yourself in the corner.


3. Turn around and look for this pillar:


4. Line-up the tip of the Shock Bolt icon, with the corner of this white band here:


5. No-bounce + 3-Bar Charge:

This A-site retake Recon Bolt should land here:

It will reveal almost everything inside A-site, including anyone inside the door close to Tree.
2. B Site God Retake Recon Bolt
This last line-up on this list is also a retake Recon Bolt that is very useful for regaining control of the B-site. This line-up is easy to do and very repeatable. You are also situated relatively safely while lining up this Recon Bolt.
This lineup reveals almost everything inside B-site including Logs, Lane, some of B-Lobby, Market Stairs, and some of Boat House. This is an amazing arrow to learn and will give you and your team a better chance of retaking B-site post-plant. Here’s how to do it:
- Look for this corner in Defender Spawn:

2. Tuck yourself within the corner like this:

3. Turn around, and look for this “T” shaped marking on the wall:


6. Align your crosshair with this “T-shaped” marking:


7. One bounce + Max Charge:

8. The Recon Bolt should land here:

It should reveal most of B-Default, Boat House, the entire Lane, Logs, some areas around Switch, outside Market, and Market Stairs.
Bonus Line-up: Middle Retake Recon Bolt

Here’s a bonus Middle Retake Line-up for when you find yourself in a pinch. You can use this lineup to gain information about how many players have crossed over from Pizza to the inside Market.
This is useful when your teammates have unfortunately lost control of middle to the Attackers, and you are now trying to rotate over to B-site.
While you can throw any Recon Bolt inside Market, that would be a waste of Recon Bolt. This lineup will maximize the value you can get from your Recon Bolt by revealing not only everything inside Market, but also Lower Middle, Pizza, and even a spot close to B Switch. Let’s try it out:
- Look for this area close to A Heaven’s Ramp:

2. Stand in this corner:

3. Inch forward while still hugging the wall until you see the tip of the Market Arch:
4. Place the middle of your crosshair on the tip of this arch’s frame:
5. No bounce + Max Charge:

The arrow should land here:

And reveal all of these areas:


Become Omniscient. Become god-like.

Knowledge is power, everybody knows this. As a Sova player, your job is to gain information about enemy locations, so that you and your team can have a better chance of stopping the enemy team even before they have a chance to plant the Spike. The Recon Bolt early information lineups shown here will help you achieve just that. These arrows land fast and will give you at least one scan before enemies have a chance to destroy your Recon Bolt.
All is not lost if they do secure the site and plant the Spike, though. You are Sova, after all.
Sova makes post-plant retakes possible, and, most of the time, even winnable for his team. The retake Recon Bolt lineups shown here will give your team the valuable information they need to plan and strike back at the Attackers.
When you master these lineups and add them to your Sova Bag of Tricks, you will become all-knowing and almost god-like. Nowhere is safe when Sova is around. Your enemies can run, but they definitely cannot hide. Sova almost makes Cypher look silly.