Hollow Knight, a captivating and challenging action-adventure game, invites players into a beautifully crafted underground world filled with perilous creatures and mysterious secrets.
The desire to acquire more notches becomes increasingly enticing as the player enters this enchanting world. Notches serve as valuable upgrades that expand the Knight’s available charm slots. This, then, grants the Knight the ability to equip more charms.
Adding more Charms means the Knight’s combat and traversing prowess are enhanced. In this guide, we will discuss every single Notch that the Knight will get in the game. Doing so will empower the Knight to face the formidable enemies that await in the depths of Hollow Knight’s captivating world.
What are Notches?
As mentioned, Charm Notches, or simply Notches, in Hollow Knight are valuable upgrades that enhance the Knight’s capabilities in combat and traversing. These special items can be found throughout the kingdom of Hallownest or obtained by defeating certain bosses. Each Notch corresponds to an additional Charm slot, allowing the Knight to simultaneously equip and utilize more charms.
The Knight can experiment with different Charm combinations by getting more Charm Notches. The player can then tailor their playstyle to suit different challenges. Charms provide unique bonuses and abilities, such as increased damage, improved defense, or enhanced movement.
The Knight can equip a wider variety of Charms with additional Charm Notches. This gives the Knight greater flexibility in adapting to enemy encounters and environmental obstacles.
Getting more Charm Notches becomes essential for overcoming the game’s increasingly difficult foes and uncovering hidden areas. By getting Notches and equipping the right Charms, the player can optimize the Knight’s abilities and overcome even the most daunting obstacles in Hollow Knight’s hauntingly beautiful world.
How to Get More Notches
At the start of the game, the Knight will only have three Charm Notches. As the Knight further explores the kingdom of Hallownest, the Knight will be able to get eight more Notches. This means that the Knight can have 11 Notches in Hollow Knight.
The 8 Notches can be found in the following locations:
Notch #1-4
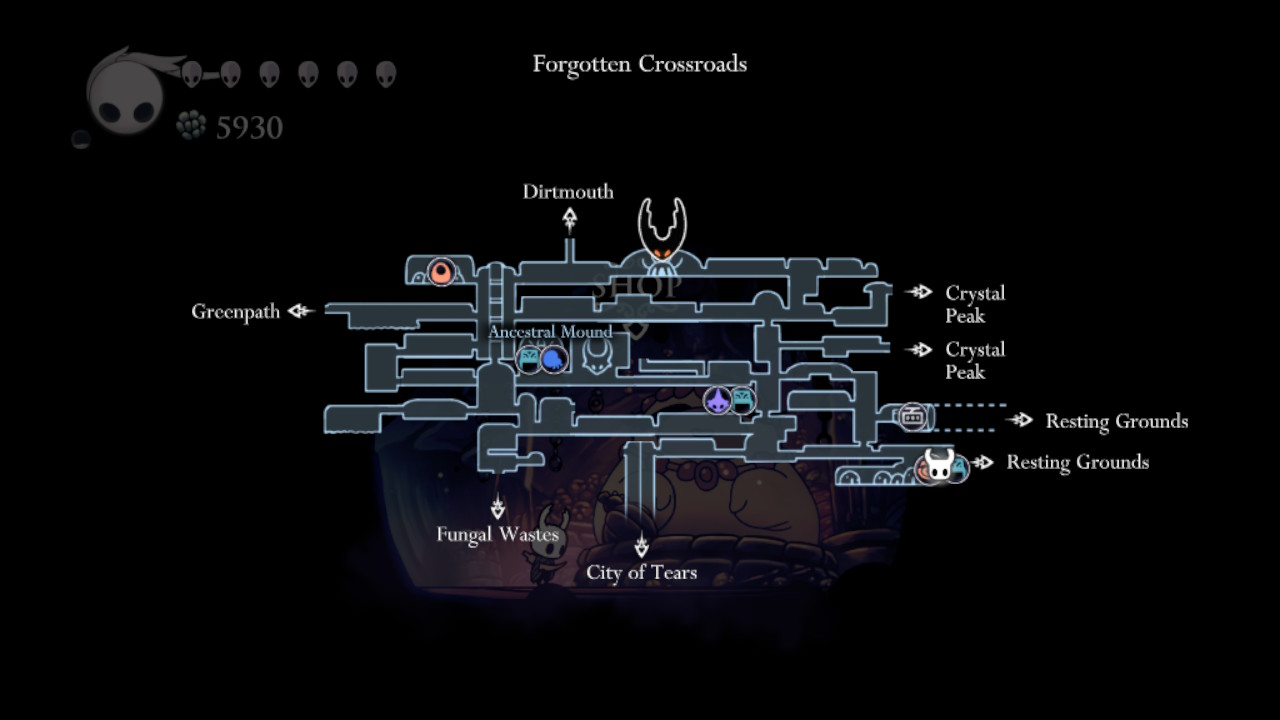
The Knight can get four more Notches from Charm Lover Salubra. This merchant can be found in the southeasternmost part of the Forgotten Crossroads.
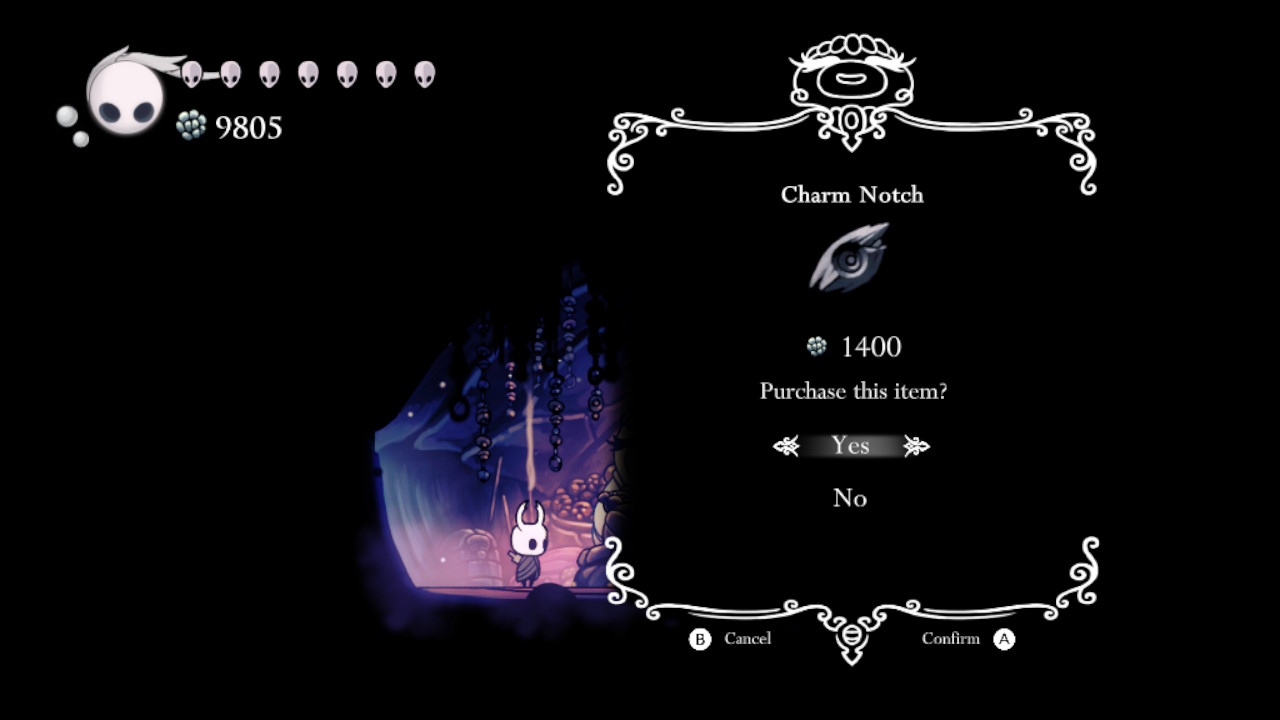
Charm Lover Salubra will sell the Knight four Charm Notches, but each Notch she will sell has requirements: a certain number of Charms and Geo. To unlock a Charm Notch, the Knight must first collect 5 Charms. This Charm Notch costs 120 Geos. Another Charm Notch will be unlocked once the Knight collects 10 Charms.
The Knight can buy this Charm Notch for 500 Geos. Charm Lover Salubra will sell another Charm Notch after the Knight accumulates 18 Charms for 900 Geos. The Knight can unlock the last Charm Notch that Charm Lover Salubra will sell for 1400 Geos after collecting 25 Charms.
How to Find Charm Lover Salubra
As previously noted, the Knight can find Charm Lover Salubra in the southeastern corner of the Forgotten Crossroads.
Enemies
To reach Charm Lover Salubra, the Knight must defeat the Gruz Mother, a mini-boss, on the way. The battle against the Gruz Mother will only begin after the Knight attacks her and interrupts her slumber.
The following moves that the Gruz Mother will perform:
- Fly – Gruz Mother will aimlessly fly inside the arena to move and deal contact damage.
- Charge – This mini-boss will charge straight toward the Knight’s location for a short distance. It will either stop or collide with the floor or a wall.
- Wild Slam – She will continuously slam herself against the ceiling and then the floor, moving a little with each slam. Then, Gruz Mother will turn around when she reaches a wall.
The Knight can dodge Gruz Mother’s Wild Slam attack by dashing if the Knight has already learned the Mothwing Cloak ability. If not, watch for the timing of the attack and move away accordingly. The Knight can stay in a corner and wait for it to approach. Then, jump and attack Gruz Mother after it slams on the ceiling, and move away. The Knight can also use the Vengeful Spirit spell to attack from a distance.
As for the Charge attack, the Knight can simply move away from its range to dodge it. The Knight can also quickly attack and move away to deal some damage.
Gruz Mother’s low HP makes her an easy enemy to take on. There will be plenty of opportunities for attacks because she is often idle. Attacking her 18 times with the Knight’s Old Nail or six times with the Vengeful Spirit spell is enough to defeat Gruz Mother.
After Gruz Mother is defeated, 7-8 Gruzzers emerge from her body. Simply attack as they approach, or use the Vengeful Spirit spell to simultaneously attack a group of them. The gate will then open, allowing the Knight to proceed.
Aside from the Gruz Mother, the Knight will face many enemies in the Forgotten Crossroads. The Knight will specifically face the following enemies on the way to Charm Lover Salubra: Tiktiks, Crawlids, Gruzzers, Aspid Hunters, Goams, Vengeflies, Leaping Husks, Wandering Husks, and Husk Hornheads.
Abilities
To reach Charm Lover Salubra, there is an ability that the Knight must first learn. This ability is the Mothwing Cloak ability, which gives the Knight the ability to perform a horizontal dash forward. Alternatively, the Knight can use the Mantis Claw ability, which allows the Knight to cling to walls and jump off them to reach Charm Lover Salubra.
This is due to Charm Lover Salubra’s house being on top of a towering platform that can only be reached utilizing these abilities. Technically, It is possible to reach Charm Lover Salubra’s house without these abilities, but it would be difficult because the Knight would have to Nail-bounce from a Shade in the immediate area.
Path to Charm Lover Salubra
To find Charm Lover Salubra in the Forgotten Crossroads, this is what the Knight must do:
- Start from the Bench in Dirtmouth, go to the right, then drop down on the well to the Forgotten Crossroads.
- After that, go to the left, where the Knight will find a Tiktik and a Crawlid, then take the exit.
- Then, the Knight is now in a large room with many Gruzzers and Tiktiks. Go to the bottom of the room and take the exit in the middle.
- Next, go downwards towards the bottom of the room and exit the room on the right.
- Afterward, go to the right, where the Knight will face an Aspid Hunter. Exit the room on the bottom right side.
- Then, continue heading to the right, where the Knight must pass through three Goams repeatedly blocking the path, a Vengefly, and another Goam. Exit the room on the right.
- Next, continue going to the right, where the Knight will find more Vengeflies and more Goams. The Knight can go straight ahead on the right or up the platforms. Conversely, the Knight will not have to avoid Goams up the platforms. Take the exit on the far right side of the room.
- After that, upon entering this room, drop down from the platform, and the Knight will find another Aspid Hunter. Go to the bottom of the room, go to the right, where the Knight will face a Leaping Husk. Exit the room on the right. It is worth noting that a Soul Totem is on top of a platform above the Leaping Husk.
- Next, go to the right, and the Knight will enter a small room where the Knight will be trapped and must defeat the Gruz Mother to continue. Attack the sleeping Gruz Mother to begin the battle. The paths back and forwards will be opened after defeating the Gruz Mother and her Gruzzers. Go to the newly-opened path on the right to continue.
- Then, drop down the gap where the Knight will find two Wandering Husks and a Husk Hornhead. Head to the right, and at the end, there is a tall platform. At the top of the platform is a Bench and a house.
- Finally, head to the platform’s top using the Mothwing Cloak or the Mantis Claw ability. The Knight can sit on the Bench to heal and save your progress. Enter the house next to the Bench, and the Knight will find Charm Lover Salubra there!
When the Knight speaks with Charm Lover Salubra, she will introduce herself and her Charm business. She will then ask the Knight if the townspeople outside her house invited them to come over and visit her. She would respond that the village outside is gorgeous, cozy, and full of life, implying that Charm Lover Salubra is unaware that all that is left outside her house are ruins. Then, Charm Lover Salubra will explain that she has observed that the Knight has begun their Charm collection, and she will show some of her own that the Knight can purchase if they choose.
Notch #5

The Knight can find another Charm Notch in Fog Canyon. This Notch is inside a hidden room with many Oomas, Uomas, and exploding orange bubbles on the left side of the room.
Enemies
The Knight does not have to face a boss to get this Notch. However, the Knight will face enemies like Uomas, Oomas, and Charged Lumaflies in the Fog Canyon.
Abilities
To find the Charm Notch, There are a few abilities that the Knight must have. One of them is the Shade Cloak ability, which gives the Knight the ability to dash through enemies, their attacks, and Shade Gates. Another required ability is the Monarch Wings ability, which allows the Knight to perform a secondary jump in mid-air. The Mantis Claw ability, which gives the Knight the ability to cling to walls and jump off them, is also required. The last ability that the Knight must have to get the Charm Notch is Isma’s Tear ability. This ability allows the Knight to swim in pools of acid without taking any damage.
Path to the Charm Notch in Fog Canyon
This is what the Knight must do to find the Charm Notch in Fog Canyon:
- Start from the Queen’s Station Stag Station Bench, and exit the room on the right. Head up the platforms, go to the top, then exit the room on the left.
- Then, the Knight is now in Fog Canyon. The Knight will face a lot of Uomas and Oomas in this room. Attacking Oomas will cause its shell to pop, and its orange center will close in on the Knight and explode. Go to the top of the room and exit the room on the left.
- Next, there are many more Uomas and Oomas in this room. Go all the way to the very top of the shaft and exit the room on the right.
- After that, head to the right, where there are five Oomas, two Uomas, and a pool of acid below. In the middle of the room, the Knight will eventually come upon a void gate, a Shade Gate. If the Knight attempts to pass through, the Knight will bounce back but will not take damage. The Knight must use the Shade Cloak to pass through the Shade Gate. Press the assigned dash button for the Shade Cloak ability and dash through the Shade Gate. Continue heading to the right, where the Knight will face five more Oomas and four Uomas. Exit the room on the right end of the room. Cornifer may be found at the top of the room after the Shade Gate, and the Knight can acquire a map of the area from him for 150 Geo.
- Then, go to the right, where the Knight will face 11 more Oomas. Additionally, look out for explosive bubbles on the floor. The Knight will then find more Uomas and a pool of acid below. Take the exit on the right end of the room.
- Next, the Knight will face more Uomas, Oomas, and Charged Lumaflies in this room. Go up the room until there is a tree with orange bubbles on top of a small platform above a Charged Lumafly on the right side. On the wall on the right, slightly above that small platform, is a path not seen on the map. Head for the hidden exit on the right.
- After that, this hidden room is a maze filled with Uomas, Oomas, and exploding orange bubbles on the floor. Drop down on the gap and swim in the acid pool below using Isma’s Tear ability. Go to the left and climb up the top of the shaft while dodging or eliminating the two Oomas and the explosive bubbles on the wall.
- Then, there will be many exploding orange bubbles and some Oomas and Uomas. Go all the way to the left towards the wall at the end, go down the path, go to the right, then go down on the next path. Part of the bottom floor will break, revealing a route back that will be handy for exiting the room.
- Finally, go to the left, and there is a platform in the middle of a pool of acid. There, the Knight will see a glowing thing inside of a bubble. Attack the bubble, inspect the glowing item, and the Knight will get the Charm Notch!
Notch #6
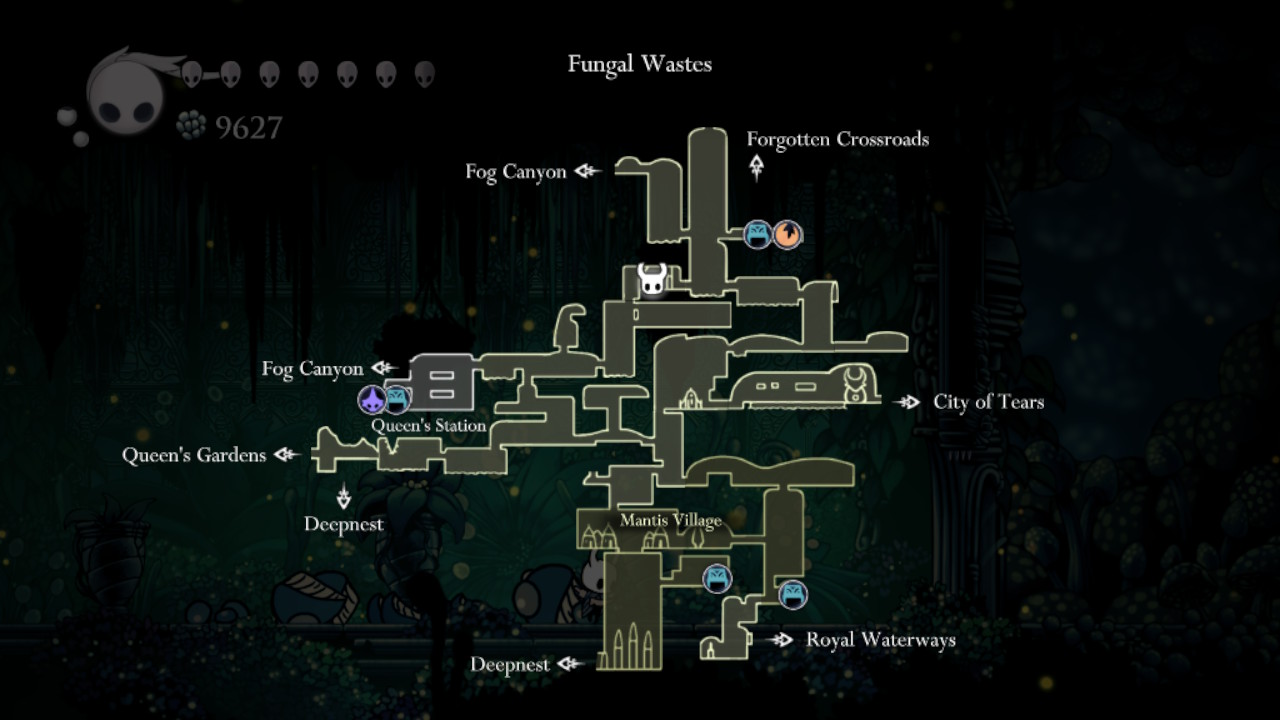
The Knight will also find another Charm Notch inside a room with two Shrumal Ogres in the northern part of the Fungal Wastes area.
Enemies
As previously noted, the Knight must defeat two Shrumal Ogres to get this Charm Notch. Other than that, the Knight will also encounter a few Shrumelings.
Abilities
There is an ability required to find this Charm Notch. This is the Mothwing Cloak ability, which is the ability that allows the Knight to dash short distances forward horizontally. Alternatively, the Knight can also use the Monarch Wings ability, which gives the Knight the ability to jump again while in mid-air.
Path to the Charm Notch in Fungal Wastes
To get the Notch in Fungal Wastes, this is what the Knight must do:
- From the Bench next to Leg Eater in the northern part of Fungal Wastes, exit the room on the left. Jump and dash (Mothwing Cloak ability) or double jump (Monarch Wing’s ability) across the pool of acid on the left and drop down the gap on the left. Drop down another gap on the left towards a small platform, drop down on the right towards another small platform, then drop down on the left to land on a ledge next to another pool of acid.
- Next, drop down the small platform below, drop down another small platform on the right, then drop down the right and dash towards the small platform below. Head down the small platforms below on the right towards the platform below above a pool of acid. Head to the left to exit the room.
- After that, head to the left, where the Knight will enter a large arena and be trapped inside. Here, the Knight must defeat two Shrumal Ogres and several Shrumelings. Defeat all the enemies in the arena to continue.
- Finally, after defeating the Shrumal Ogres and Shrumelings, the path to continue and back will be opened. Then, something glowing will drop down from the ceiling. Inspect the glowing item and the Knight will get a Charm Notch!
Charm Notch #7

The Knight can get a Charm Notch after completing the Trial of the Warrior in the Colosseum of Fools. This area can be accessed at the top of Kingdom’s Edge.
The Colosseum of Fools, located at the peak of Kingdom’s Edge, is where brave adventurers can participate in a series of challenging Trials. The Colosseum is constructed from the hollowed-out remnants of a gigantic bug. Strong chains support its massive shell.
Warriors can put their combat skills to the test against unrelenting waves of opponents during the Trails. The Trials can be accessed through the head of this huge shell, where Little Fool handles the entry fee. Once inside, battles occur in the large arena to the right of the trial boards. These Trials provide an unparalleled and thrilling experience for those brave enough to overcome the Colosseum’s tough obstacles.
How to Get to the Colosseum of Fools

The Knight must have Isma’s Tear ability to reach the Colosseum of Fools. This ability allows the Knight to swim in acid pools without taking damage. Although not required, the Monarch Wings ability can also help traverse the Colosseum. This ability enables the Knight to the ability to jump again mid-air.
The Knight will not confront any bosses on his way to the area. The Knight will, however, encounter the following foes: Booflies, Primal Aspids, Belflies, and Hoppers.
This is what the Knight must do to find the Colosseum of Fools:
- Begin at the entrance of the center cliff of Kingdom’s Edge and proceed to the right where a Boofly is floating above. Use the small platforms in the middle of the room to get up the large room. When you reach the end of the small platforms, jump onto the huge platform on the right and exit.
- Then, using Isma’s Tear ability, drop down the acid pool. Swim to the right, jump up the tiny platform, and proceed to this room. The Knight will encounter Primal Aspids and Booflies on their way up. Take the exit on the left at the top of the room.
- After that, the Knight is on the upper half of the central cliff of the Kingdom’s Edge. Head to the left to find a Hopper and a Boofly, and go up the room. The Monarch Wings ability is handy when getting up this room. The Knight will battle Primal Aspids, Belflies, Hoppers, and Booflies on their way up. Take the exit at the top left corner of the room.
- Next, proceed to the top left exit of this room. There are various Hoppers and Belflies along the path.
- Then, turn left and jump up the platform above. A wooden scaffolding supports the wall here. Strike the wood repeatedly to shatter it and reveal an alternative path to this area. The Knight will be able to reach this place via this newly opened path from the City of Tears’ elevator shaft that leads up to the Resting Grounds.
- After that, proceed to the right, where the Knight will encounter four additional Belflies. Crowds and clashing sounds can now be heard on the path. At the end of the trail, enter the shell.
- Finally, the Knight has arrived at the Colosseum of Fools’ trial boards!
Talk to Little Fool, who is shackled above the floor, and he will explain the Trials to the Knight. To begin the first Trial, pay him a few Geos. To begin the Trial, inspect the board directly behind him and enter the arena on the right.
If you do not wish to begin the Trial right away, the Knight can enter a hole in the floor just after the three trial boards. There, the Knight will find a warriors’ pit, some sleeping and non-violent Fools, and a Bench to rest on.
Previous characters encountered by the Knight may also be discovered in this location: Tiso will be on the Bench if he was spoken to at any previous point the Knight met him, and Zote will be in the area if he was saved in Deepnest.
The Knight’s Shade can be discovered in the far left area of the warrior’s pit whenever the Knight is eliminated in the Trial. On the other hand, a breakable wall can be found on the far right side of the warrior’s pit. Beyond this breakable wall is a hot spring from which the Knight can generate Soul. In this hot spring, a Sturdy Fool can also be spotted relaxing.
Trial of the Warrior
The Trial of the Warrior is the first of three Trials in the Colosseum of Fools. This Trial, compared to the other Trials, is the easiest of the three because the enemies are slow and manageable. However, despite being the easiest, the Trial of the Warrior should not be taken lightly.
Winning the Trial of the Warrior for the first time grants the Knight 1000 to 1024 Geo, a Charm Notch, and the Warrior achievement. Following victories in this Trial will only award 1000 to 1024 Geo.
To attempt the Trial of the Warrior, the Knight must give Little Fool 100 Geo. After that, inspect the trial board just behind Little Fool to begin the Trial. Next, go to the arena, accessed at the right exit.
The Knight’s foes in the Trial of the Warrior will attack in waves. The Knight will encounter the enemies in the following order:
- Wave 1 – One Shielded Fool will come in the initial wave. After the Knight defeats it, two more Shielded Fools will spawn on either side of the arena. After eliminating them, two Sharp Baldurs will spawn on opposite ends of the arena. Defeat them to continue.
- Wave 2 – Following that, five platforms of varying heights will rise, each carrying a Sharp Baldur. It’s worth noting that the Sharp Baldurs can be provoked to attack the Knight one at a time by approaching each one individually. The downtime following the defeat of one Sharp Baldur can be used to heal before tackling the others. To advance to the next wave, defeat all five Sharp Baldurs.
- Wave 3 – After that, the five platforms will be removed, and the arena will revert to its former state. Then one Sturdy Fool will appear. After defeating it, two more Sturdy Fools will spawn on each side of the arena. It is worth noting that Sturdy Fools’ attack behavior is similar to that of a Husk Miner in that it fires projectiles and executes a melee assault if the Knight gets too close. Kill them to advance to the next wave.
- Wave 4 – Three platforms will rise for this wave (the other two platforms will be the same height but higher than the middle one), and two Primal Aspids will appear. To proceed, defeat the Primal Aspids.
- Wave 5 – Next, two additional platforms will rise, both taller than the preceding platforms (now a total of five). Also, spikes will appear and cover the arena floor. Then, on opposite edges of the arena, two Primal Aspids will spawn. Eliminate them to go on to the next wave.
- Wave 6 – The five platforms will go away individually and be replaced by two connected platforms on the left and right and three in the middle. Below them are the spikes from the last wave. Then, a Sturdy Fool will spawn on each of the double platforms. Defeat them; then another Sturdy Fool will appear on the triple platform in the middle. Kill all the enemies to continue.
- Wave 7 – After that, the platforms will be exchanged with three quadruple platforms on top of each other. Then, Primal Aspids will spawn on the bottom left and the upper right. Defeat them; then, a Sharp Baldur will spawn on the center platform. Defeat one of them; then another Sharp Baldur will appear on the bottom platform. Eliminate all the enemies to continue.
- Wave 8 – The quadruple platforms will be removed, leaving only a single, double platform. It is worth noting that there are still spikes on the floor below. Following that, four Vengeflies will appear, two on each side. Defeat them; then a Vengefly King will spawn on the right. Eliminate the Vengefly King to continue.
- Wave 9 – Next, the arena will return to its original state. Then, two Sturdy Fools will spawn. After defeating one, a Shielded Fool will spawn. After defeating one of the enemies, a Primal Aspid will spawn. After defeating one of them, another Shielded Fool will spawn. After defeating one of the enemies, another Sturdy Fool will spawn. Then, finally, after defeating one of the enemies, another Primal Aspid and a Sharp Baldur will spawn. Eliminate all the enemies to continue.
- Wave 10 – After that, the ceiling will drop, leaving only about 10% of the arena. Three Sharp Baldurs will then spawn one after the other is eliminated. Defeat all the enemies to continue.
- Wave 11 – The ceiling will reach about 50% of the arena. Two Volatile Gruzzers will then spawn. Defeat them; then three more will spawn. After defeating all the enemies, two Gruz Mothers will spawn. Eliminate them to continue to the last wave.
- Wave 12 – Finally, the ceiling will return to its original state. Then, given you saved him in Greenpath and Deepnest previously, Zote the Mighty will come as the final enemy in the Trial of the Warrior. If you didn’t save him in the locations mentioned, the Trial would end after Wave 11. After the Knight beats Zote the Mighty for the first time in the Trial, he will no longer appear as the final enemy on the Knight’s next attempts, and the Trial will end after Wave 11.
Notch #8

The Knight will be able to get the last Charm Notch after defeating Troupe Master Grimm inside the tent up in Dirtmouth.
Before attempting to get the Notch from Troupe Master Grimm, it is important to note that he can only be accessed in The Grimm Troupe DLC. So, the player must first download and install this free content pack to get this last Charm Notch.
How to Summon the Grimm Troupe

To get the Charm Notch from Troupe Master Grimm, the Knight must first summon The Grimm Troupe. To do that, the Knight must light up the Nightmare Lantern in the lower half of the middle of Howling Cliffs.
The Knight must have a few abilities to reach this area. One of those is the Mantis Claw ability. This ability helps the Knight cling to walls and jump off of them. The next ability that the Knight must have is the Dream Nail ability. This ability allows the Knight to collect Essence and enter Dreams.
Another is the Mothwing Cloak ability or the Monarch Wings ability. The Mothwing Cloak ability helps the Knight perform a horizontal dash forward. The Monarch Wings ability, on the other hand, helps the Knight jump again in mid-air. The Knight must also buy the Lumafly Lantern from Sly in Dirtmouth to light up dark rooms.
To summon The Grimm Troupe, the Knight must do the following:
- From the Bench in Dirtmouth, go all the way to the left, then, in the end, climb up the wall using the Mantis Claw ability. At the top of the wall, dash (Mothwing Cloak ability) or double jump (Monarch Wings) towards the next platform, then go through the entrance.
- The Knight is now in King’s Pass. Go to the left, drop down the gap, and go to the right. Drop down the gap and continue using the platforms on the left. Go to the bottom on the right of the spikes.
- Afterward, go to the right of what looks like a wall to reveal a hidden part of the area. Go to the right, and cross the spikes by dashing or double jumping. Drop down the gap where the Knight will use the Lumafly Lantern to light up the area. Go to the left, where there is a Geo Chest. Hit it, and it will give off the Fury of the Fallen charm instead of Geos.
- Next, go to the left, head down the narrow gap, and go to the left, where the Knight will find a Crawlid. Jump on the platform on the left, where the Knight will face another Crawlid, jump across the gap, then go to the left, where there is a large area.
- Then, Head to the left of what looks like the wall of the room to reveal another hidden part of the area. Climb the narrow shaft while looking out for the spikes, then take the exit at the top.
- After that, jump to the next platform above and head up, then head to the left, where a wooden structure is holding up a wall. Attack the wooden structure several times to break it and open up the path.
- Next, go to the left and up the platforms where the Knight will face a Crawlid, and the Knight is now in Howling Cliffs! Go to the left, where the Knight will find a Crawlid. Head across the gap using the small platforms where there is a Tiktik, a Vengefly, and another Crawlid. Go to the left past Gorb the Great Mind’s tomb and cross the gap using the small platforms where the Knight will find another Vengfly and Tiktik. Exit the room on the left.
- Then, go to the left and drop down on the gap to land on a small platform. Here, the Knight will find another Vengefly, Tiktik, and Crawlids. Head down the shaft below and down the path on the right, where the Knight will be on a platform with many pieces of paper. Head to the left, drop down the gap, go to the left, and drop down another gap to land on a platform with a Crawlid. Go to the right, drop down the gap towards a small platform, and drop below. Here, the Knight will face another Crawlid on the left.
- After that, head towards the wall on the right and strike it several times to break it and reveal a hidden path. Head to the right and drop down the shaft, where the Knight will find a Wanderer’s Journal at the bottom. Head to the left, strike the wooden barrier several times to break it but head towards the wall on the right. Strike this wall several times to break it and reveal an exit. Go through the newly-revealed exit.
- Next, head to the right to get to another room. Near the far right end of this room is a corpse of a large bug. Strike the large bug using the Dream Nail, which will explode with red Essence.
- Finally, head to the left, back to the previous room, where the Knight will find the Nightmare Lantern. Strike the Nightmare Lantern several times, and the torches in the room will be lit, and music will play. This signifies that The Grim Troupe is now in Dirtmouth!
After all this, the Knight can return to Dirtmouth to find The Grimm Troupe! The Knight can find their tent to the left of the Bench and Sly’s shop.
Troupe Master Grimm
Grimm is the leader of the Grimm Troupe, a traveling circus. The Grimm Troupe moves from the Nightmare Realm to wherever the Nightmare Lantern is lit. They harvest Nightmare Flames from wrecked regions to power the Nightmare’s Heart, the evil creature who enslaves the Troupe.
Enter the main tent, then Grimm shows up in a flash of red light and smoke. The Troupe Master is aware that the Knight summoned them with the Lantern and offers them the option of participating in their Ritual. He then hands the Knight the Grimmchild Charm and entrusts them with collecting the Nightmare Flames. The Grimmkins are carrying these in certain places in Hallownest.
Grimm has the Grimmchild devour each set of three Flames for them to grow. Following the second set, Grimm will test the Knight’s strength in a heated, theatrical battle as a boss. Grimm says this is in preparation for the Knight’s encounter with the Nightmare King. Grimm will also give the Knight a Charm Notch after the battle.
How to Battle Troupe Master Grimm
As mentioned, the Knight must first collect two sets of three Nightmare Flames to face Troupe Master Grimm in battle. The Knight can find each of these Flames after equipping the Grimmchild Charm.
Once this charm is equipped, the Grimmchild will follow the Knight around and attack enemies with the Knight. Also, the Knight can see the locations of the first set of three Flames on the map if the Grimmchild Charm is equipped. On the map, the flame icon represents their locations.
Grimmkins will carry every single one of these flames. These Grimmkins are fiery spirits who will laugh, produce flames, and fly around the Knight. The Knight must eliminate them to retrieve the Flames they carry on their torches.
First Set of Flames: Grimmkin Novices
The Knight must defeat the Grimmkin Novices for the first set of Flames. The Knight can find these enemies in the following locations:
- On the lower left, near the middle of the map of Greenpath.

- Slightly west of the City Storerooms Stag Station northwest of the City of Tears.

- Near the exit that leads to Dirtmouth in the western part of Crystal Peak.

After defeating all three Grimmkin Novices, head back to Troupe Master Grimm in Dirtmouth. There, Grimm will upgrade the Grimmchild and then tell the Knight to gather three more Flames.
Grimmkin Novices: Moves
The Grimmkin Novices will perform the following moves:
- Charge – the Grimmkin Novice will quickly charge towards the Knight.
- Flame Spray – this enemy will shoot three fireballs simultaneously. The Grimmkin Novice will shoot one of the fireballs forward and the other two diagonally. After this attack, the Grimmkin Novice is vulnerable to attacks for a few seconds.
- Teleport – the Grimmkin Novice will disappear and reappear at a random place inside the room. This enemy will reappear at the same distance from the Knight when it disappeared. After this move, the Grimmkin Novice will perform an attack.
Grimmkin Novice: Tips
When the Knight approaches a torch while wearing the Grimmchild Charm, Grimmkin Novices spawn and become hostile, attacking the Knight until the Knight defeats them or exits the room.
All Grimmkin variations follow the Knight’s movements, remaining an equal distance from the Knight until executing an attack. Grimmkin teleport after each attack and when they are attacked while they are dashing.
The Grimmkin Novice’s Charge attack can be evaded or dashed through using the Shade Cloak ability. The Knight can deal damage while the enemy performs the Charge attack, which can be risky. The Knight can equip the Sharp Shadow Charm to decrease the risk when dealing damage by dashing through them.
Second Set of Flames: Grimmkin Masters
For the second set of Flames, the Knight must defeat Grimmkin Masters. The Knight can find them in the following locations:
- In the middle of King’s Pass.

- Near the middle of the Resting Grounds.

- In the lower half of the central cliff of Kingdom’s Edge.

After defeating all three Grimmkin Masters and collecting the Flames, the Knight can fight Troupe Master Grimm!
Grimmkin Master: Moves
The Grimmkin Master’s attacks are similar to Grimmkin Novice’s attacks. Some of them just have a few improvements and additions. These are the moves that Grimmkin Master will perform:
- Charge – the Grimmkin Master will charge towards the Knight very quickly. The speed of this attack is faster than the Grimmkin Novice’s Charge attack.
- Flame Spray – this enemy will shoot five fireballs at the same time. Three of these fireballs are shot the same as the Grimmkin Novice, but two more are shot in between the gaps of the latter fireballs. The additional fireballs move slower than the first three but are the same speed as the Grimmkin Novice’s Flame Spray attack. The first three fireballs are faster than the Grimmkin Novices. After this attack, the Grimmkin Master is vulnerable to attacks for a short while.
- Teleport – the Grimmkin Master will teleport to a random spot in the room but will always be at the same distance away from the Knight. After this, this enemy will attack.
- Flame Spiral – this enemy will shoot four fireballs spinning around its body. This attack makes the Grimmkin Master vulnerable to attacks.
In the battle, the Knight can implement the tips mentioned by the Grimmkin Novices.
Finally, vs. Troupe Master Grimm
After collecting two Flames, the Knight can finally face Grimm in battle. The Knight can find Grimm in the main tent of The Grimm Troupe up in Dirtmouth.
Grimm: Moves
- Teleport – Grimm will disappear and reappear randomly inside the room. After this, Grimm will make an attack.
- Skitter – this boss will move away on all fours if he teleports on the ground too close to the Knight. After this, Grimm will perform an attack. Although rare, Grimm may also perform a ground attack, Skitter, then perform another ground attack.
- Fire Bats – Troupe Master Grimm will open his cloak and send three Fire Bats toward the Knight. These Fire Bats will poorly follow the Knight. During this attack, Grimm will stand still. Before Grimm sends out three Fire Bats, if the Knight gets within reach of him, Grimm will teleport to a spot in the room and send out one final Fire Bat. The Knight can’t stop this Fire Bat. This indicates that there is a possibility that Grimm can only send out one Fire Bat.
- Dive Dash – this boss will teleport and reappear up in the air, make itself look like a drill, and dives toward the Knight. Grimm will then land and rush toward the Knight while wielding his cloak like a lance. Grimm will follow the Knight’s position during the beginning of the dive. The dive can also span the entire arena.
- Dash Uppercut – Grimm will dash the span of the arena while performing a strike. After this, he will jump into the air with an uppercut. Grimm will teleport at the top of the uppercut and drop five fireballs in an arc.
- Cloak Spikes – this boss will throw his cloak to the ground, which will cause tall, thin spikes to rise from the floor. These spikes will get to the arena’s top with gaps in between. The spikes will not deal damage until they reach their maximum height, and the spikes last around a half-second.
- Pufferfish – Troupe Master Grimm will cover his cloak around his body and send small fireballs all over the room. When Grimm’s health gets to 75%, 50%, and 25%, Grim will perform this attack in the middle of the room. The fireballs move in five directions and typically follow the Knight in two groups. Grimm sends out twelve sets of fireballs, with every fourth set landing in the bottom. The Knight cannot use some type of attack to damage Grimm during this attack. Also, the Knight cannot stagger Grimm while doing this attack.
Grimm: Tips
It’s recommended to inflict as much damage on Grimm as quickly as possible, given that Grimm teleports and rarely stays in one spot for very long.
At the start of the battle, Grimm will bow before actually performing attacks. If the Knight attacks Grimm during this, Grimm will immediately perform the Pufferfish attack.
During Grimm’s Pufferfish attack, if the Knight stays close to the right or left edge of the screen and jumps a little, the Knight can avoid most of the flames.
The Knight can get in range to attack Grimm after performing a double jump (with the help of the Monarch Wings ability) and dashing over the Fire Bats.
It is advised that the Knight heal while Grimm is performing the Cloak Spikes. The Quick Focus Charm makes this easier to accomplish.
Using the Shade Cloak ability, the Knight can dodge Grimm’s Dive Dash and Dash Uppercut attacks. If the Knight has the Sharp Shadow Charm equipped, the Knight can dash through Grimm to deal damage.
The five projectiles from Grimm’s Dash Uppercut attack spread in a cone shape. So, it is recommended that the Knight stand next to Grimm when he explodes into the fire during the Dash Uppercut attack. This also presents a healing opportunity, especially if you have the Quick Focus Charm.
All of the Spells in the Knight’s arsenal have their uses against Grimm. The Knight can use the Vengeful Spirit and Shade Soul Spell while Grimm performs the Fire Bats, Cloak Spikes, and Pufferfish attack. As for the Desolate Dive and the Descending Dark Spell, the Knight can use them as soon as Grimm prepares for the Dive Dash attack so that Grimm will dive in the middle of the spell.
The Knight can also use these spells to dodge the Dive Dash attack. Additionally, the Knight can use the Howling Wraiths and Abyss Shriek Spell before Grimm’s fireballs appear during the Pufferfish attack. The Knight can also use these spells during the Cloak Spikes attack as Grimm is higher than the Knight.
The Knight can also use Nail Arts against Troupe Master Grimm. The Great Slash and Dash Slash Nail Arts deal 2.5x Nail damage. Also, these Nail Arts give a good range for dealing damage to Grimm and avoiding danger, particularly during the Cloak Spikes, Dash Uppercut, and Fire Bats attacks.
After dealing enough damage, Grimm will stagger for 3.5 seconds. During this, Grimm will scatter as a swarm of bats that resembles the Grimmchild. Grimm is the bat with the red eyes in this swarm. Even though attacking Grimm in this form doesn’t remove the stagger, there is a 50-damage cap. The bats gather back into Grimm after the stagger is over.
The Shape of Unn Charm is a great help for healing when fighting Grimm. It reduces the Knight’s hitbox so that the Knight can safely heal while Grimm performs the Fire Bats attack. If this charm is paired with the Quick Focus Charm, the Knight can run while healing during the Dash Uppercut attack or the Cloak Spikes attack.
The Knight can deal huge damage by repeatedly casting the Abyss Shriek Spell with the Shaman Stone Charm equipped to reduce Grimm’s HP quickly. In this scenario, the Grubsong Charm is beneficial because it gives the Knight more Soul to spend to cast the Abyss Shriek spell every time the Knight takes damage.
The Knight can also pair this with the Grubberfly’s Elegy Charm to boost the Soul obtained. Remember that Grimm may perform the Pufferfish attacks consecutively. So, if the Knight doesn’t have enough SOUL to drain Grimm’s HP completely, the Knight will have a hard time attacking or healing in between.
After defeating Troupe Master Grimm, the player will unlock the Grand Performance Achievement, and the Knight will finally get the last Charm Notch!
Conclusion
As you can tell, collecting all the Charm Notches in the game is a very long ordeal. The Knight cannot get all the Charm Notches in one go unless the Knight is doing this very late in the very unlikely game. Collecting these Notches individually helps the Knight improve and prepare for the next challenges. Thanks to this long and detailed guide, the Knight can get more Notches in Hollow Knight!