When first starting out in Elden Ring, you are presented with a myriad of sights and ruins before you, with one of them being the Dragon-burnt ruins. While nothing but a smoldering ruin now, it’s home to one of the first challenges for the new Tarnished.
To say that one of the very first greater enemies is a dragon will certainly come as a surprise to many Tarnished, but what if we told you that the fight need not be as overwhelming as it seems? This guide will help you best this unnerving dragon.
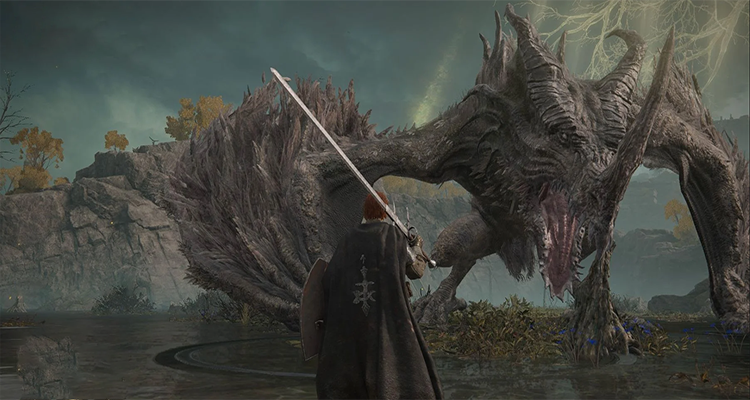
Flying Dragon Agheel Overview

As Agheel is a fairly early encounter in the game, it can be bested, even at level 1. However, as for the recommended level, the range would be between 15-30. Anything beyond level 30 at this stage of the area will make things that much easier.
While you don’t need to fight Agheel to progress through the story, it’s recommended that you go toe to toe with him, as doing so yields useful items and rewards.
Weaknesses: Agheel, as a dragonoid, is weak to piercing damage. Additionally, its head takes slightly more damage than the rest of his body, but is harder to reach as a melee user.
Elden Ring Flying Dragon Agheel Location: When approaching the Dragon-burnt Ruins, it will seem like nothing is amiss beyond the curious naming choice of ruins. Agheel will then arrive when you begin your approach to the northern section of Dragon-burnt ruins, near a congregation of wandering nobles.
Pre-fight Preparation

Here are some tips to consider before you go forth to the battle.
Acquire Torrent
Torrent can make this fight significantly easier as this boss is extremely mobile and can make himself difficult to hit on foot. Mounted combat will make the dodge windows much longer and if properly timed, you can use the mounting and demounting animations as invincibility frames. To acquire Torrent, head north from the first church of Elleh, towards the Gatefront Ruins site of grace.
Get some poison arrows
In northern Limgrave, there is a nomadic merchant who will sell a recipe book called Nomadic Warrior’s Cookbook [3], which contains poison arrows. You can buy a bow at Roundtable Hold at the statue if you did not start with one. While Agheel starts with a lot of resistance, the poison arrows will at least passively deal damage while he is out of your reach.
Negate Agheel’s breath
As Agheel’s breath is typically deadly, there are some ways to mitigate the damage.
To the north of the Church of Elleh, there is a small cave called Groveside Cave. Go inside and beat Beastman of Farum Azula, a smaller humanoid beast. He will drop the Flamedrake Talisman, something that reduces flame damage by 13%. Not a significant margin, but enough to potentially save your life.
Making a case for Ashes of War
As Agheel is a mobile boss with a wide area of attack, it is recommended to use Ashes with high poise break and/or range. The Kaiden Sellsword, Spirit Jellyfish, or Fanged Imps are all decent early ashes. To get the Kaiden Sellsword, you have to complete the Cliffbottom Catacombs.
The Jellyfish is within Stormhill Shack, given to you by a woman named Roderika. Just keep engaging her in conversation until she hands over Jellyifish to you.
Finally, the Fanged Imps is a keepsake you can either start with or obtain from the merchant located at the Main Academy Gate grace.
Brace yourself for a challenge if you’re rocking a melee build
While melee will be challenging for this fight, there are still some weapons you can get early on that can make this fight easier. Within the Gatefront ruins, there are numerous enemies roaming about, some carrying greatshields and partisans.
The greatshield is called the Gilded Greatshield and is easily one of the handiest shields you can farm for early on as it has a whopping 69 poise right out of the gate. Poise prevents you from being flinched and can cause some enemy attacks to bounce.
The partisan is a solid spear and when used in conjunction with a shield, allows you to both block and attack at the same time. If a spear is not to your liking, however, there is one additional weapon you can acquire at the ruins. Thankfully, you can acquire both the Partisan and the Gilded Greatshield from the same enemy, the Godrick Knights!
The Flail can be found in the back of one of the hearses, typically found on patrol throughout the game. What makes this weapon unique this early on is it allows for bleed, which deals a flat 20% of damage to any target that can bleed. Bleed ignores defenses and will do damage directly to the target, making it a solid way to damage Agheel.
Running with Magic and/or Ranged Builds? You’re in luck
As most of the time fighting this boss will be spent outside of melee ranges, this fight is considerably easier for magic and somewhat easier for ranged users.
Glinstone pebble, arc, and stars are all excellent spells to use. All three can be purchased from Sorceress Sellen.
As for ranged users, poison or blood arrows would be useful. Additionally, if you have visited Caelid already, you can visit the merchant in the south who will sell Nomadic Warrior’s Cookbook [15]. This contains rot arrows, which is a superior version of poison arrows that lasts longer.
As for the blood arrows, they can be found in Nomadic Warrior’s Cookbook [6], found within Fort Haight.
Fight Strategy

This fight will be an introduction for some players to the differences between fighting humanoid enemies and large monsters. With that, here are a few pieces of advice to help tip the balance in your favor.
Know your enemy
Knowing what to expect from the boss and how to deal with it will prove invaluable to your chances of success against the Flying Dragon Agheel.
Here are the moves you should keep in mind:
- Grounded Firebreath: Used when a player is a certain distance away from Agheel. The dragon will arch his neck and fire particles will appear in his mouth, preparing his breath. If the player moves, the flame breath will track. To dodge, sprint diagonally towards the boss.
- Sweeping Grounded Firebreath: Also used when the player is far from the dragon, this time he will turn his head to his left (your right) and sweeps it slowly. Dodging this will require you to sprint towards Agheel, moving left as the sweep approaches you.
- Flying Firebreath: Agheel will leap into the sky with their body angled, flame particles in his mouth. He will then fly forwards, throwing his fire at an angle to his left. Dodging this one is quite simple, turn to your left and sprint to him or retreat and wait for the flame to dissipate.
- Divebomb: He will jump backwards into the sky and will hover there for three flaps of his wings. On the third beat, he dives down towards the player. To dodge this, wait until the third beat, and as he begins to drop toward the player, roll.
- Tail Whip: This is used typically when the player is behind Agheel. He will curl his tail to his left and then spin himself around, sweeping counterclockwise. You can prevent this by not standing behind him or if you do, dodge forwards or to the left, into the attack.
- Stomp: Agheel will raise one of his feet, stomping forward to create a shockwave. To get away from this, sprint backward.
- Wing Sweep: He will raise one of his wings, sweeping left to right or vice versa. Rolling through the sweep can prove to be challenging as the timing can be tight, so be cautious of this one!
Camera lock-on
While fighting humanoid enemies and bosses, locking onto the target is by far the easiest way to both keep an eye on the boss as well as guide your attacks to their correct mark, but with large, widely varied body sizes such as Agheel, camera lock-on may end up more a detriment to you then not locking on. If you are doing a melee build, not locking on will allow you to control your camera instead of locking onto a torso you cannot reach
The three P’s
Patience, practice, and positioning. This fight will take you some time to complete, padded stats or no. Agheel will often leap away from you and will take you out of position. Some of your positions on the boss will bait out attacks, making predicting his next move just a little bit easier. The biggest of all, however, is taking your time and not getting greedy for attacks.
The world is your oyster
As Agheel is a boss fight that takes place in the overworld and is not locked behind a fog wall, use the environment to your advantage. Use all the extra room in the area to increase your chances of dodging.
NPC summon
Near the area, an NPC by the name of Bloody Finger Yura, or just Yura will be nearby. If you talk to him, he will mention the dragon. If you die to it afterward, he will chastise you for it but will put down his summon sign to summon him to the fight. His summon sign appears right next to the stake of Marika when you die.
Rewards
When you finally finish the dragon off, he will drop:
- 5,000 Runes
- Dragon Heart: The dragon heart can be consumed at a cathedral of dragon communing to acquire the skill Agheel’s Flame.
And with that, you now have everything you need to show Agheel who’s boss around here! Once again, the boss fight takes place pretty early on in the game, should you choose to go ahead with it. So, not much is required to beat Agheel. Still, we hope that this guide will make the battle a little bit easier.