You are not entirely alone in Far Cry 6. Aside from the Libertad members, you will also be fighting Anton Castillo’s regime alongside ferocious animals called Amigos or, as the game puts it, Fangs For Hire. There are seven Amigos in the game, but two of those are exclusive to DLC content. The other five can be unlocked through regular in-game progression.
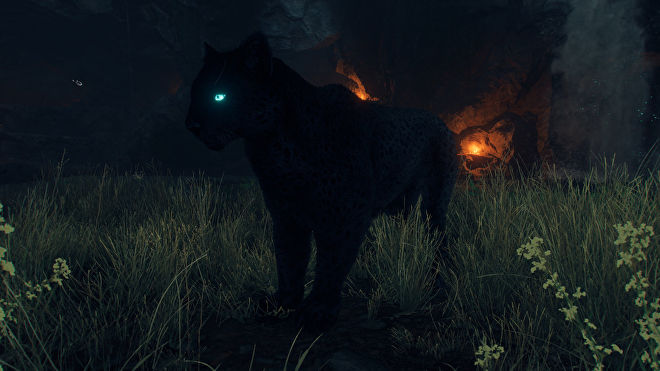
The first four Amigos you are likely to unlock in the game are Guapo, Chorizo, Chicharron, and Boom Boom. The path towards unlocking them is pretty easy as you will only need to proceed with the story. The fifth and most useful Amigo of them all is a black panther named Oluso. Oluso is a bit more elusive and can be more challenging to unlock than your other animal companions.
Unlocking Oluso
Oluso is locked behind a lengthy questline that you can complete once you have been through the first three major regions in the game. To begin the questline, you will have to go to Oluwa Cave which is inside Isla Santuario. You can head there directly, but you can initiate a quest that points you towards the cave after liberating the Cabeza Fuel Depot.

The path to Oluwa Cave is tough as you will have to do minor climbing to get on top of a mountain. Make sure to look for orange paint on ledges, as this will signify you can pull yourself up from that area. Once you get on top of the first cliff, you will have to walk towards the cave. There will not be anything inside the cave other than the questline itself.
Once inside the cave, you can pick up a document that will start the Triada Blessing side quest. This quest tasks you with collecting three artifacts from all over Yara. You will need to collect these artifacts and place them inside Oluwa Cave so that you can summon Oluso. Finding the artifacts is the tricky part of this quest, as you must explore the first three major regions of Yara.
Getting The Three Relics
The first relic that you should go after is the Madrugada Relic. It is located in the Lozania region. All you need to do is look for a purple gem icon on your map, which will indicate all the relics’ locations. In the case of the Madrugada Relic, the icon is near the Dos Monjas Mogote marker on the map. Specifically, you need to go to a small town called La Triada Mural.

Head to the northeastern part of town. You will know that you are near the relic once you begin seeing purple smoke nearby. From there, you will need to make a trek towards the relic itself, which is inside a cave. You will not be fighting anything here. We suggest equipping the Parkour Set so that you have more stamina for moving around the cave.
Next, you will have to head to Fort Oro, which is in the northeastern region of Cruz del Salvador. You will know you are in the right place when you see the same Triada triangle symbol that you have seen from Oluwa Cave and the La Triada Mural. Now, you can not enter Fort Oro until it is 19:00 in-game. To check the time, open photo mode and check from there.

Once inside, you will be tasked with completing three puzzles inside Fort Oro. In the first room, look for a mirror that does not shatter when you go near it. Once you have found it, slash it with your machete, and you will see a control panel that opens a secret room when interacted with. Inside the room, press the buttons in this order: west, center, east.
In the next room, you will have to read a note and have Dany play the piano. Here, you will be given the Dungeon Key, which will open the room to the last door. In the dungeon room, head past all the statues until you find a button at the end. Trigger it to trigger some bombs outside. Head to the next room, and you will see a zipline that you can ride directly to the next artifact.

The last relic is in McKay Drill Site D – in the southwestern corner of La Joya. Find an elevator with an orange lock beside it. Destroy the lock and get into the mines. This puzzle is all about following the cables on the floor. This will direct you to a series of locks, leading to the last artifact you need to unlock, Oluso.
Once you have acquired all three artifacts, head back to Oluwa Cave and place all the relics on the altar. Before you do, make sure you are stocked with good weapons as you will be in for a fight.
Upon putting in the relics, you will unlock a new room and gain access to a few items, including the True Sight a Supremo equipment. Make sure to equip this immediately as right at this moment, Oluso herself will attack. Once you hit Oluso, she will teleport to another location. Equip a powerful shotgun to make that one hit count.

After you beat Oluso, you have to revive her, and she will be a part of your party forever. She is a stealth-type Amigo that specializes in stealth takedowns. She is a very good ally to have at your side, and all the trouble in getting her is worth it. To make things better, Oluso can also hide the bodies of the enemies she kills.
You can upgrade her with a few skills. Mimo Abosi’s Luck allows Oluso to do stealth takedowns when in a gunfight. Rage of Ida can potentially scare enemies if they see Oluso initiating a takedown. This will cause them to run away. Last is Mist of Oku. When at 50% health, Oluso becomes obscured by smoke, and she becomes immune to damage while regenerating health more quickly.
You can get Oluso a few hours into the game. She is very troublesome to get considering the lengthy questline that trails her. However, once you get Oluso and you maximize her abilities, she will make stealth missions and stealth attacks on military bases a lot easier to manage.