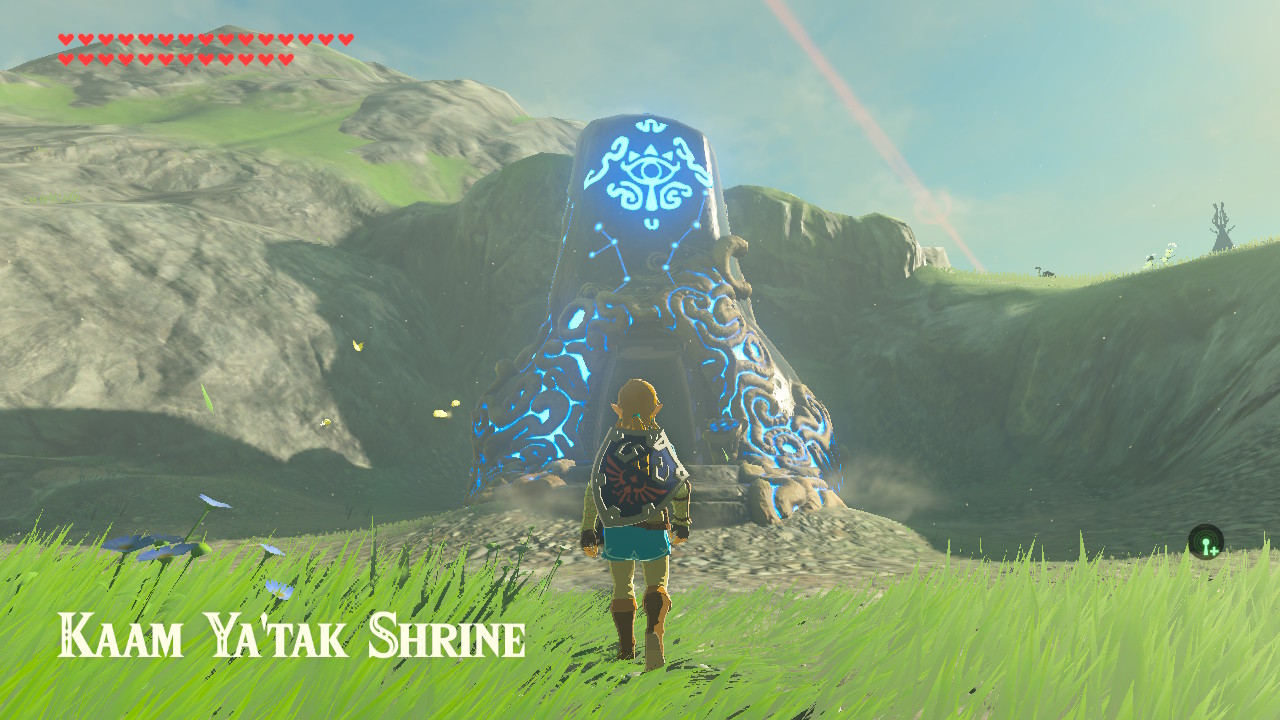
One of the Shrines in The Legend of Zelda: Breath of the Wild is the Kaam Ya’tak Shrine or the Trial of Power. This shrine requires Link to overcome several obstacles using Link’s Rune abilities and weapons to reach the altar. This shrine may seem confusing and intimidating, but you will learn how to complete the Kaam Ya’tak Shrine in this guide, get the chests, and claim the Spirit Orb.
Link will be rewarded with Spirit Orbs for completing Shrines. You can exchange the Spirit Orbs for more Heart Containers or Stamina Vessels. Hyrule has 120 Shrines so that Link can get a total of 120 Spirit Orbs by endgame. You get to decide whether you want Link to have more Hearts or more Stamina.
Location

The Kaam Ya’tak Shrine can be found surrounded by small hills southeast of Mount Daphnes, southwest of the Central Tower in the west of Hyrule Field. The Kaam Ya’tak Shrine is one of eight shrines in the Central Tower region of Hyrule.
The Trial of Power

Before descending on the shrine, make sure that Link has enough bows and arrows to use, as you will need them to make certain parts of the shrine easier to complete. You will also need weapons and shields as Link would have to fight a few Guardian Scouts.
Upon entering the Kaam Ya’tak Shrine, you will find a huge concrete door ahead of Link. Before these, you will find a large concrete sphere hanging from a metal sphere that can be moved in one direction. To complete this shrine, this is what Link must do.
- Head down the ramp and press the up directional button. Then, select the Magnesis Rune ability. Press L to aim, aim on the metal sphere above the concrete sphere, and press the A button to activate the Magnesis Rune ability on it. Pull the metal sphere all the way back and then press the B button to let go of the metal sphere. This will cause the metal sphere to roll back down with the concrete sphere to its original position, and, as the metal sphere reaches its original position, the concrete sphere will be thrown towards the concrete doors with enough power to open it.
- Next, proceed on the path, and you will see two rows where spiky metal spheres will be rolling along. Only one spiky metal sphere rolls at a time on the first row. Meanwhile, the second one has a constant stream of spiky metal spheres. To cross the spiky metal spheres, press the up directional button, and select the Stasis Rune ability. Afterwards, press the L button to aim, aim on one of the spiky metal spheres, press the A button to activate the Stasis Rune ability on it, and stop it from rolling across. As the spiky metal spheres are rolling swiftly, you would have to time the activation of the Stasis Rune ability perfectly. Once the Stasis Rune ability is activated on the spiky metal sphere, quickly cross the row before the timer for the Stasis Rune ability runs out, and the spiky metal sphere rolls again. Do the same thing on the next row by using the Stasis Rune ability to freeze one of the spiky metal spheres and clog the flow of spiky metal spheres. Then, quickly cross before the timer for the Stasis Rune ability runs out.
- After that, proceed on the path. At the end of the it, to the right, you will see another huge concrete door and on the left you will see two Guardian Scouts. Behind them, you will find a concrete sphere on top of a wooden platform that is surrounded by leaves. There is also a chest near the concrete sphere. Defeat the two Guardian Scouts first. Once they are defeated, they will drop their weapons for the taking along with a few Ancient Gears and Screws.
- Then, proceed to the chest near the concrete sphere. Open the chest to obtain an Edge of Duality.
- For this next part, the goal is to get the huge concrete sphere to roll towards the huge concrete door to open it. There are several ways to do this. You can either fire an arrow on the lantern hanging above the leaves to drop it and set the leaves and the wooden platform on fire; or you can fire a fire arrow directly on the leaves or the wooden platform. If you do not have a fire arrow, you can use a regular arrow and set it on fire by aiming and putting the tip of the arrow near the flame of the torch near the huge concrete doors). You can also use the Remote Bomb Rune ability to blow up the wooden platform. After doing any of these, the concrete sphere will roll and open the concrete door.
- Next, go through the concrete door, and you will see a flight of stairs. On the left side of the flight of stairs, you will see a chest. Open the chest to obtain a Royal Broadsword.
- After that, go up the stairs and follow the path; you will eventually see another huge concrete door guarding it are two more Guardian Scouts. Across the huge concrete door is a closed gate, but there is a path just straight ahead of the path you took. Defeat the Guardian Scouts first, take the dropped weapons and Ancient Gears and Screws, then proceed to the path just straight ahead.
- Then, as you follow the path you will see that part of the floor is unstable and once stepped on, will give way and cause Link to fall. To cross this, simply use the Stasis Rune ability on the seesaw and cross it before the timer for the Stasis Rune ability runs out.
- Next, as you go on the path, you will see a machine floating on the left and the glowing machine to control it is on a platform just up ahead. The goal of this machine is to get the huge concrete sphere to roll on the huge concrete doors to open it. To do this, interact with the glowing machine to control the huge apparatus and control the huge hammer on the very left of the apparatus by rotating your Nintendo Switch or controller. With the hammer, hit the metal sphere so that it will hit the concrete sphere and let it roll up the ramp. Do this three or four times to destroy the three obstacles in the middle of the ramp and to let the concrete sphere roll up the ramp and into the hole that leads to the concrete doors to open them.
- Before going through the doors, there is a chest on the left of the door. Open the chest to obtain an Ancient Core.
- After that, continue on the path and Link will eventually be in a huge room where there is another huge concrete sphere on top of a wooden platform surrounded by leaves, a gap just ahead of it, a pressure plate that raises a ramp, another huge unstable platform, then another set of huge concrete doors. The goal here, again, is to let the concrete sphere roll towards the concrete doors to open it. To do this, you must first set the wooden platform on fire by shooting a fire arrow (or set an arrow on fire by bringing it to the torch near the platform) on it. A concrete sphere will then drop one at a time. This next step should be done in quick succession and with the right timing: go near the pressure plate, use the Stasis Rune ability on the seesaw to freeze it in place, then step on the pressure plate before the concrete sphere rolls on the ramp so that it will jump high and reach the frozen seesaw and roll towards the concrete doors to open it. As the right timing is needed, this may take a few tries.
- Next, continue on the path, and you will see the other side of the closed gate you saw earlier which has a pressure plate and another machine that needs to be pushed. On the other side of the door you went through, you can find breakable blocks. Break the blocks using the Remote Bomb Rune ability. Behind it is a chest containing a Silver Rupee (100 Rupees).
- Then, step on the pressure plate to open the gate. Activate the Stasis Rune ability on the machine in front of the pressure plate and attack it as much as you can to generate energy. When the timer for the Stasis Rune runs out, the machine will go forward, causing the huge concrete doors in the distance to open.
- After that, go through the newly opened doorway where you will find a flight of stairs with a switch on top. Go up the flight of stairs to reach a part of the floor that is a lighter color near the switch. Additionally, at the top of a platform is a chest behind bars. Get on the lighter part of the floor, hit the switch to cause the floor to rise up so fast that Link will be thrown up in the air. Once this happens, you will see the altar at the top of a high platform. Press the X button to use the paraglider, but do not glide towards the altar just yet. Glide down to the platform of the chest and behind it you will see an opening to access it. Open the chest to obtain a Diamond.
- Next, go back down and hit the switch again to revert the rising platform back to ground level. Get on the rising platform and hit the switch again to let Link fly into the air and glide towards the platform with the altar.
- Finally, go to the altar, talk to the monk, and claim your Spirit Orb!
The Kaam Ya’tak Shrine or the Trial of Power is one of eight shrines in the Central Tower region. The other shrines are the Dah Kaso Shrine or A Minor Test in Strength, the Wahgo Katta Shrine or the Metal Connections, the Rota Ooh Shrine or the Passing of the Gates, the Katah Chuki Shrine or A Minor Test of Strength, the Noya Neha Shrine or A Minor Test Of Strength, the Saas Ko’sah Shrine or A Major Test of Strength, and the Namika Ozz Shrine or A Modest Test of Strength.