Learn how to improve your FPS in Ready or Not!
Ready or Not is a tactical first-person shooter game developed by Void Interactive. Set in the fictional city of Los Sueños, California, players take on the role of David “Judge” Beaumont, the head of a police SWAT unit battling crime across the city.
Despite its positive reviews and increasing popularity, some players have reported experiencing extremely low fps, which prompts the need for a solution to optimize and enhance players’ overall gaming experience.
This article will show you a couple of workarounds that you can try to improve your low FPS in Ready or Not so you can get straight back to fighting criminals and saving the day.
See also: Ready or Not ‘Your connection to the host has been lost’ error fix
How to Improve Low FPS in Ready or Not
1. Try Restarting Ready or Not
One of the most common ways to fix frame drops is to simply restart your game or the launcher. Although this may be a standard method that does not always work, it is still viable to try restarting Ready or Not, as this helps resolve common errors and glitches in the game, including frame drops.
2. Lower the Graphical Settings
Try lowering or disabling the graphical settings in Ready or Not to lessen the burden on your system. This will boost your FPS, allowing you a better gaming experience. Set it to Medium or Low and disable effects such as Motion Blur and Shadows for optimal performance.
3. Change the Shader Cache Size Settings
If you are using an NVIDIA graphics card, you can change your Shader Cache Size settings from Default to Unlimited. To do this, do the following steps:
- On your desktop, right-click and select NVIDIA Control Panel.
- Under the Manage 3D Settings tab, navigate to Global Settings.
- Locate Shader Cache Size and select the Unlimited option.
Related: Should I Use Shader Cache And What Size? | Pro Advice (2023)
4. Run Using DirectX 12
Several players have reported increased frame rate by running it with DirectX 12 while playing Ready or Not. Running the game with DirectX 12 eases the burden of compiling shaders and boosts your FPS. You can run Ready or Not using DirectX 12 from the Properties tab in your Steam Library.
Related: DirectX 12 FAQ: All about Windows 10’s supercharged graphics tech
5. Use Optimal Video Settings for FPS Increase in Ready or Not
For Graphics Preset, you can use either Low or Custom. Use Fullscreen for Screen Mode, as performance is slightly better when using low-end PCs. The Screen Resolution should match your current monitor’s recommended or native resolution. Lastly, change the Interface Aspect Ratio to Fill.
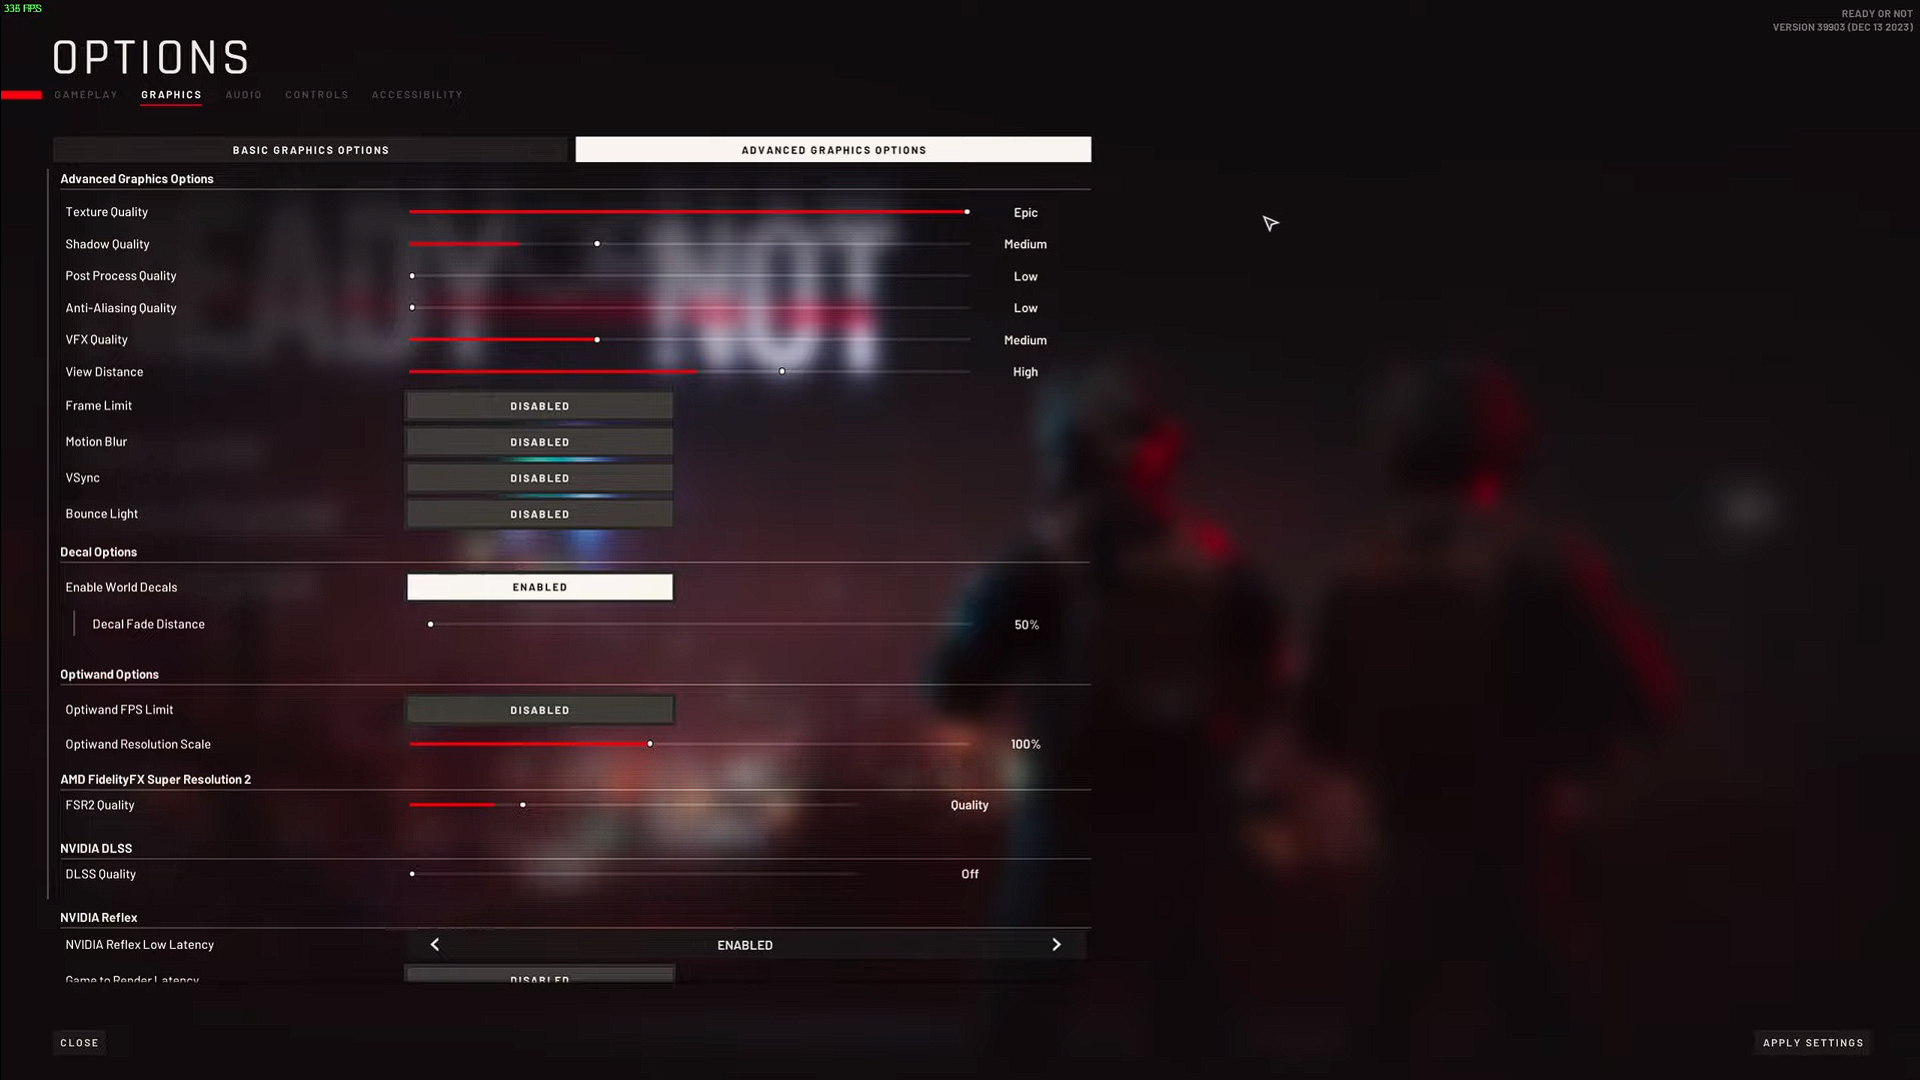
For Advanced Settings, use these options for the best performance in FPS:
- Texture Quality: Medium is recommended, but you can use Low if your PC cannot handle it.
- Shadow Quality: Low or Medium.
- Post-Processing Quality: Low.
- Anti-Aliasing Quality: Medium is recommended here but Low for low-end PCs.
- VFX Quality: Low or Medium, either one will do.
- View Distance: Medium, but you can lower it if necessary.
- Frame Limit: Disabled.
- Motion Blur: Keep this disabled.
- VSync: Enable only if you are experiencing screen tearing, otherwise keep this disabled.
- Bounce Light: Disabled.
- World Decals Enabled: Enabled.
- World Decal Fade Distance: Keep it at 50%.
- Optiwand FPS Limit: Disabled.
- Optiwand Resolution Scale: 100%.
- Nvidia Reflex Low Latency: Try to enable this and see if it boosts your FPS.
You can change the Field of View to suit your needs. Here’s the tradeoff:
- You can see more of the game environment for a larger Field of View, but it will take a toll on your PC unless you use a high-end gaming system.
- A smaller Field of View will greatly reduce your line of sight, allowing your PC to render fewer graphics and boost your FPS in-game.
That’s all there is to know about how to improve your low FPS in Ready or Not. Be sure to check Player Assist for the latest gaming tips, walkthroughs, and guides:


