To put it simply, Valheim is one of the best multiplayer survival games out there right now. Sure, games like Minecraft and Rust are well-known also, but they fall in complexity and immersive experience when compared to Valheim.
Players can create their own community servers and play with a couple of players, but in these cases, when the host is not active, i.e. has his system on and Valheim turned on, other players cannot play.
This is why so many are looking to switch to a dedicated server or a hosted server. Still, not many would like to lose the progress that they’ve made in the world.
How to Transfer World Save Files Between PC & Server – Valheim
Surprisingly, Valheim has made it quite easy for players to transfer or share worlds between each other. This is great, and not many are used to having such a seamless experience when transferring worlds or save files.
All you need to do when transferring world is to find where they’re located on your server. But for the purpose of making it easier for you, we will show you how to transfer world save files, and set them up in Valheim:
Step 1 – Finding World Save Files
This will be different for everyone, but usually the worlds are located in a specific default path. If you haven’t chosen otherwise you will find them in the following location:
C:Users*User*AppDataLocalLowIron GateValheimWorlds
When you’re here, look for the name of the world you want to transfer. There should be two files for it, one db and one fwl. Put those files in a ZIP.
Step 2 – Transfer the Files
When you have the zipped files, you can then transfer the zip files to another server or PC. In some cases, you might run a dedicated server, and we will show you how to set that up as well.
Make sure that you extract the zipped file to the location to where your worlds are on that server or PC.
If you’re on a hosted server, it is the same process. Just upload the world files, into your worlds folder.
Step 3 – Change Settings
Dedicated Server
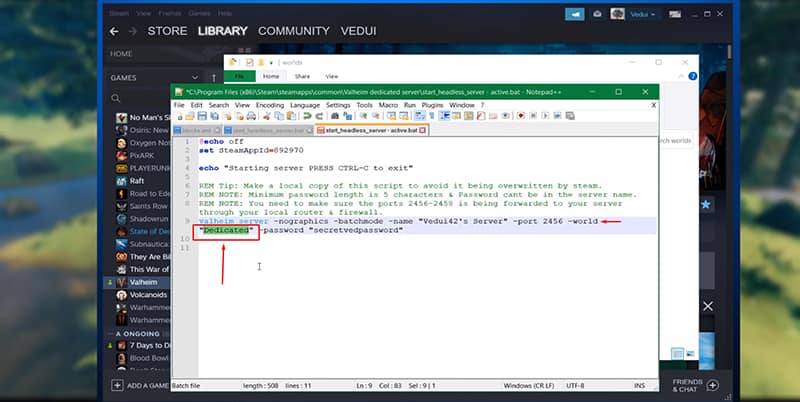
If you’re running a dedicated server, then you will need to tell the server that you want to use those worlds save files that you just transferred. Otherwise, it will default to the last one.
Find you start server .bat file, and open it up. At the place where it says: -world “Name”, change that to the name of the world that you transferred.
Hosted Server
After you have uploaded the files to your hosted server, you will need to change some setting, similar to the dedicated server, so that the server runs that world.
Find the command line on your hosted server, and then change your world name to the one that you uploaded. This process will vary for many, since there are thousands of hosting platforms out there. But that is usually how it goes.
READ NEXT : Valheim: How to Flatten Ground